The Deep Learning with USB Accelerator
The term of edge AI is borrowed from edge computing which means that the computation is happening close to the data source.
There are a number of applications used in the benchmarks, two of the most common ones are classification and object detection.
- classification make one prediction of what that image is e.g. an apple or an orange.
- detection detect location of multiple objects and their classes e.g. multiple cars and pedestrians. This is exactly the application that requires hardware acceleration.
USB Accelerator
直購
- Intel Movidius – Neural Compute Stick 2 神經計算棒第二代,3,990/組
- Intel Movidius – Neural Compute Stick 神經計算棒,3,255/組
- Google Coral Dev Board,6,850元/片(現貨)
- Google Coral Camera Module,1,260元/個 (現貨)
- Google Coral USB Accelerator,2,940元/個 (現貨)
- NVIDIA® Jetson Nano™ Developer Kit,3,780元/片(現貨)
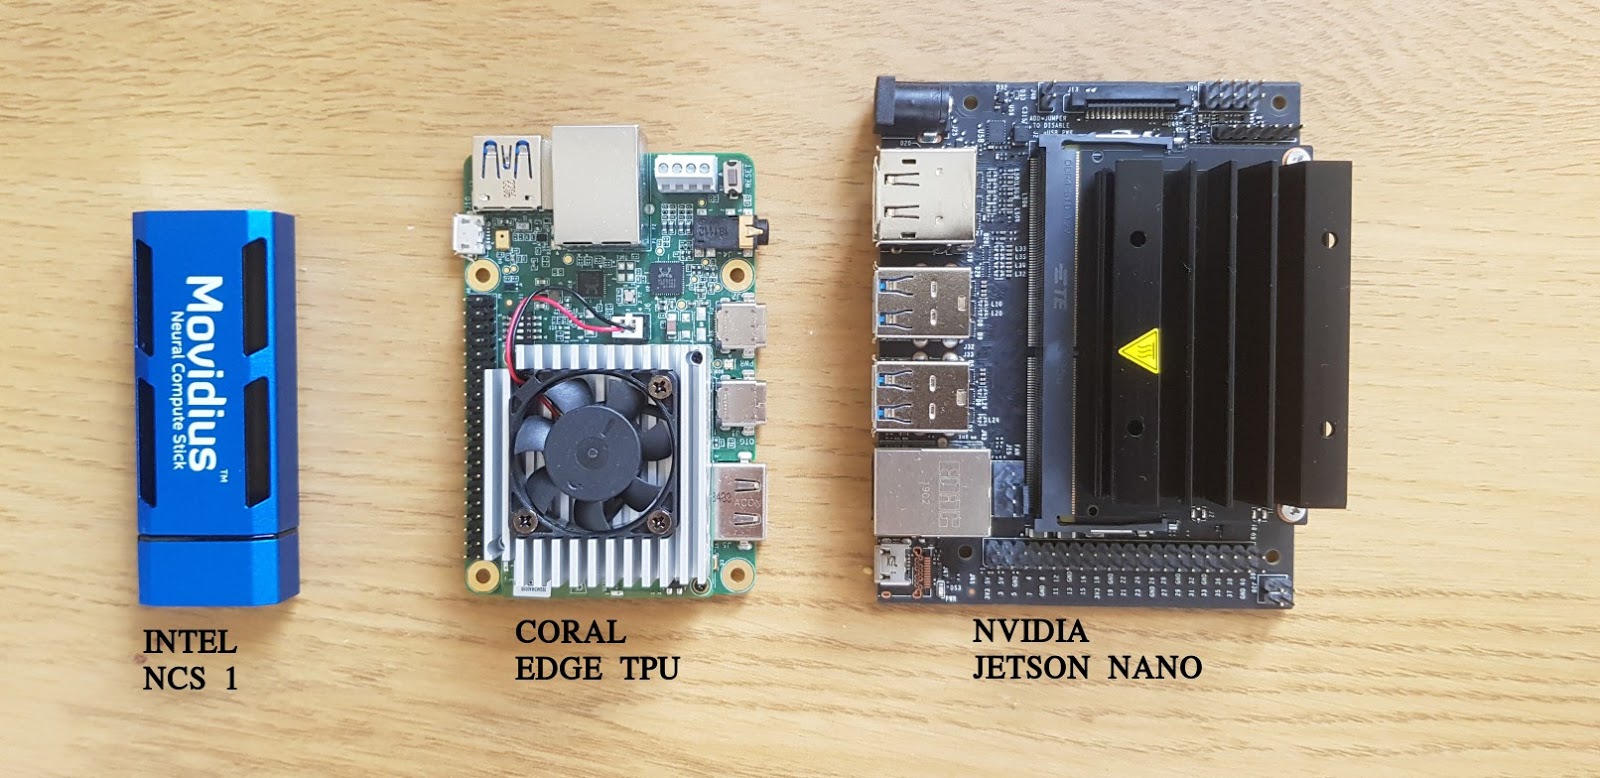
Comparison
Google's Edge CPU supports Tensorflow Lite and the models must be quantized to 8-bits integer (INT8)
If your application involves some non computer vision models e.g. recurrent network or you develop your own models with many custom layers, then it is safer to use Jetson series to avoid nasty surprise when porting trained models to embedded deployment.
- INTEL Neural computer Stick (NCS2)
- good Support Windows, fast deployment, good selection of models.
- bad Relatively slower inference speed and higher price
- good
- bad
- Google EDGE TPU
- good Top performance, comes with Wifi and encryption engine
- bad Limited training resources, AI models and software libraries e.g. OpenCV is not supported.
- NVIDIA JETSON NANO
- good software ecosystem and resources, additional software libraries
- bad Slightly bulky
Google's Coral USB Accelerator
The Coral USB Accelerator is a USB device that includes a onboard Edge TPU(TensorFlow Processor Unit).- System requirements The Coral USB Accelerator must be connected to a host computer(any Linux computer with a USB port) with the following specifications:
- Debian 6.0 or higher, or any derivative thereof (such as Ubuntu 10.0+)
- System architecture of either x86_64 or ARM64 with ARMv8 instruction set
- Components overview
- Edge TPU designed by Google that provides high performance ML inferencing for TensorFlow Lite models
- USB 3.1 (gen 1) port
- Software The host computer to which it's attached must install the Edge TPU runtime and API library.
Getting started with Google Coral’s TPU USB Accelerator
Set up on Linux or Raspberry Pi
Download Install the Edge TPU runtime and Python library
cd ~/
wget https://dl.google.com/coral/edgetpu_api/edgetpu_api_latest.tar.gz -O edgetpu_api.tar.gz --trust-server-names
tar xzf edgetpu_api.tar.gz
cd edgetpu_api
bash ./install.sh
- you'll be asked, "Would you like to enable the maximum operating frequency?" If you're not sure you need the increased performance, type N and press Enter to use the default operating frequency. (You can change this later by simply re-running the install script.)
- your Python version must not be lower than 3.5 If you see the message ./install.sh: line 116: python3.5: command not found, then the install failed because you don't have Python 3.5 installed. If your "python --version" is higher than 3.5, open the install.sh script and edit the very last line to use python3 instead of python3.5.
Plug in the Accelerator using the provided USB 3.0 cable
The accelerator must be plugged in after the installation so that the udev rule can take effect.
Run a model on the Edge TPU
Once the USB Accelerator is setup, you can start running TensorFlow Lite models on the Edge TPU.
You can perform image classification with one of Google's pre-compiled models and sample scripts.
- download Google's bird classifier model, labels file, and the test image:
cd ~/Downloads/

wget https://dl.google.com/coral/canned_models/mobilenet_v2_1.0_224_inat_bird_quant_edgetpu.tflite \
https://dl.google.com/coral/canned_models/inat_bird_labels.txt \
https://coral.withgoogle.com/static/images/parrot.jpg
# on Debian/Ubuntu Linux:
cd /usr/local/lib/python3.6/dist-packages/edgetpu/demo

# on Raspberry Pi:
cd /usr/local/lib/python3.5/dist-packages/edgetpu/demo

python3 classify_image.py \
--model ~/Downloads/mobilenet_v2_1.0_224_inat_bird_quant_edgetpu.tflite \
--label ~/Downloads/inat_bird_labels.txt \
--image ~/Downloads/parrot.jpg
ERROR: Failed to retrieve TPU context
ERROR: Node number 0 (edgetpu-custom-op) failed to prepare
Then either your USB Accelerator is not plugged in or you cannot access it because your user account is not in the plugdev system group. Ask your system admin to add your account to the plugdev group, and then restart your computer for it to take effect.
To use the Anaconda with Coral, you need to copy the edgetpu package to the Anaconda folder:
:/usr/local/lib/python3.6/dist-packages$ tar czf ~/anaconda3/lib/python3.7/site-packages/edgetpu.tgz edgetpu

(base) :~/anaconda3/lib/python3.7/site-packages$ tar xzf edgetpu.tgz

(base) :~/anaconda3/lib/python3.7/site-packages$ cd edgetpu/swig

(base) :~/anaconda3/lib/python3.7/site-packages/edgetpu/swig$ cp _edgetpu_cpp_wrapper.cpython-36m-x86_64-linux-gnu.so _edgetpu_cpp_wrapper.cpython-37m-x86_64-linux-gnu.so
This demo uses a Python API that makes it easy to perform an image classification or object detection inference on the Edge TPU.
- To learn more about the API, see the Edge TPU API overview and demos.
- For details about how to create compatible TensorFlow Lite models, read TensorFlow Models on the Edge TPU.
TensorFlow models on the Edge TPU
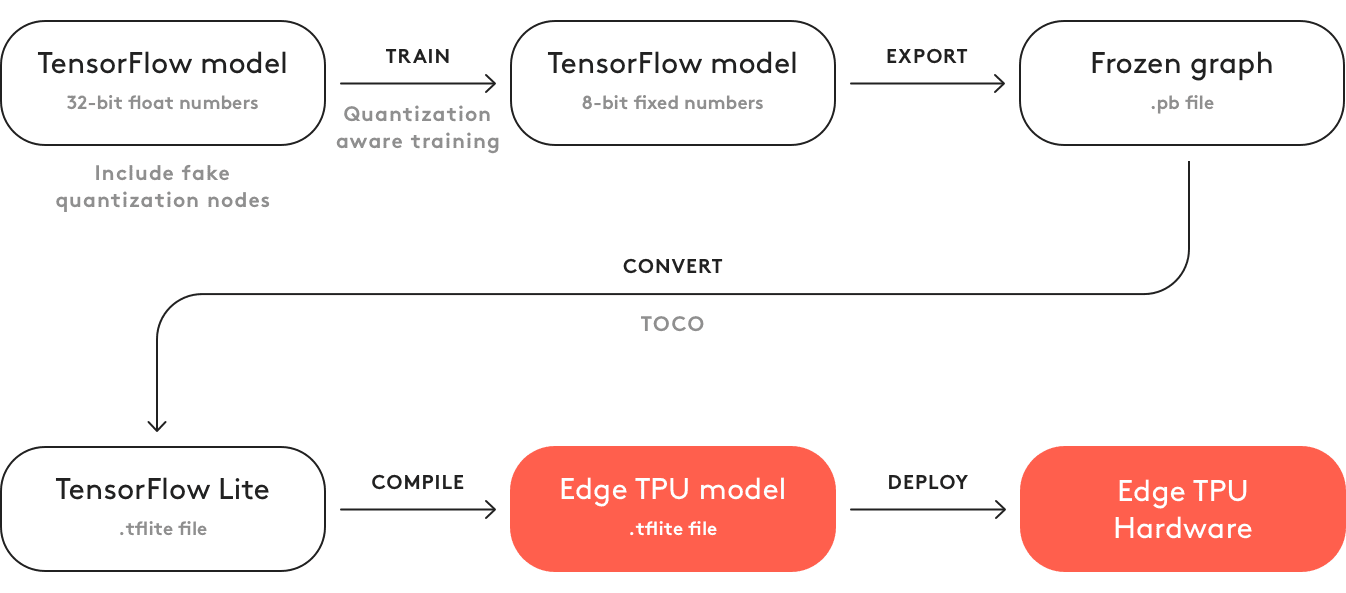
The Edge TPU supports only TensorFlow Lite models that are fully 8-bit quantized and then compiled specifically for the Edge TPU. TensorFlow Lite is a lightweight version of TensorFlow designed for mobile and embedded devices.
You cannot train a model directly with TensorFlow Lite; instead you must convert your model from a TensorFlow file (such as a .pb file) to a TensorFlow Lite file (a .tflite file), using the TensorFlow Lite converter.
Converting your model means quantizing all the 32-bit floating-point numbers (such as weights and activation outputs) to the nearest 8-bit fixed-point numbers.
Object detection and image classification with Google Coral USB Accelerator
The Edge TPU runtime and Python library is downloaded under:
~/edgetpu
The next step is to download the pre-trained classification and object detection models.
The full list of pre-trained models Google provides are for the following usages:
- Image classification
- Object detection
- On-device retraining (classification)
You can run these models on your Coral device using the scripts shown in API demos. (Remember to also download the model's corresponding labels file.)
If you'd like to download all models at once, you can clone our Git repo https://coral.googlesource.com/edgetpu/ and then find the models in edgetpu/test_data/.
Download this "All model files" archive to get the checkpoint file you'll need if you want to use the model as your basis for transfer-learning, as shown in the tutorials to retrain a classification model and retrain an object detection model.
We’ll be using the following models:
- Image classification MobileNet V2 (ImageNet)
- Object detection
- MobileNet SSD v2 (COCO)
- MobileNet SSD v2 (Faces)
- On-device retraining (classification)
mkdir ~/edgetpu_models
cd ~/edgetpu_models

wget https://dl.google.com/coral/canned_models/imagenet_labels.txt
wget http://download.tensorflow.org/models/tflite_11_05_08/mobilenet_v2_1.0_224_quant.tgz
wget https://dl.google.com/coral/canned_models/mobilenet_ssd_v2_coco_quant_postprocess_edgetpu.tflite
wget https://dl.google.com/coral/canned_models/coco_labels.txt
wget http://download.tensorflow.org/models/object_detection/ssd_mobilenet_v2_quantized_300x300_coco_2019_01_03.tar.gz
wget https://dl.google.com/coral/canned_models/mobilenet_ssd_v2_face_quant_postprocess_edgetpu.tflite
wget http://download.tensorflow.org/models/object_detection/facessd_mobilenet_v2_quantized_320x320_open_image_v4.tar.gz

tar xzf mobilenet_v2_1.0_224_quant.tgz
tar xzf ssd_mobilenet_v2_quantized_300x300_coco_2019_01_03.tar.gz
tar xzf facessd_mobilenet_v2_quantized_320x320_open_image_v4.tar.gz
Test
Image classification
cd /usr/local/lib/python3.6/dist-packages/edgetpu/demo

python3 classify_image.py \
    --model ~/edgetpu_models/mobilenet_v2_1.0_224_quant.tflite \
    --label ~/edgetpu_models/imagenet_labels.txt \
    --image test_data/parrot.jpg
Object detection and image classification with Google Coral USB Accelerator
We can download three pre-trained TensorFlow Lite models + labels from Google :
- Classification (trained on ImageNet):
- inception_v4/ – The Inception V4 classifier.
- mobilenet_v2/ – MobileNet V2 classifier.
- Object detection (trained on COCO) mobilenet_ssd_v2/ – MobileNet V2 Single Shot Detector (SSD).
Image classification with the Coral USB Accelerator
classify_image.py :
- Install necessary packages
pip install imutils
# import the necessary packages
#from edgetpu.detection.engine import DetectionEngine
from edgetpu.classification.engine import ClassificationEngine

from PIL import Image
import argparse
import time
import cv2
import os
import imutils

model_dir = '/home/jerry/edgetpu_models'
model_file = os.path.join(model_dir, 'inception_v4_299_quant_edgetpu.tflite')
label_file = os.path.join(model_dir, 'imagenet_labels.txt')
test_dir = '/home/jerry/images'
test_file = os.path.join(test_dir, 'test.jpg')
# construct the argument parser and parse the arguments
ap = argparse.ArgumentParser()
ap.add_argument("-m", "--model", required=True,
 help="path to TensorFlow Lite classification model")
ap.add_argument("-l", "--labels", required=True,
 help="path to labels file")
ap.add_argument("-i", "--image", required=True,
 help="path to input image")

args = vars(ap.parse_args(['--model', model_file, '--labels', label_file, '--image', test_file]))
- --model The path to our TensorFlow Lite classifier.
- --labels Class labels file path associated with our model.
- --image Our input image path.
# initialize the labels dictionary
print("[INFO] parsing class labels...")
labels = {}

# loop over the class labels file
for row in open(args["labels"]):
 # unpack the row and update the labels dictionary
 (classID, label) = row.strip().split(" ", maxsplit=1)
 labels[int(classID)] = label.strip()
  0  background
  1  tench, Tinca tinca
  ...
  163  beagle
  ...
  1000  toilet tissue, toilet paper, bathroom tissue
The Coral API will return the predicted classID (an integer). We can then take that integer class ID and lookup the associated class label value in this dictionary.
# load the Google Coral classification model
print("[INFO] loading Coral model...")
model = ClassificationEngine(args["model"])
# load the input image
image = cv2.imread(args["image"])
image = imutils.resize(image, width=500)
orig = image.copy()

# prepare the image for classification by converting (1) it from BGR
# to RGB channel ordering and then (2) from a NumPy array to PIL
# image format
image = cv2.cvtColor(image, cv2.COLOR_BGR2RGB)
image = Image.fromarray(image)
- imread( path, flag ) where flag:
- cv2.IMREAD_COLOR It is the default flag.
- cv2.IMREAD_GRAYSCALE
- cv2.IMREAD_UNCHANGED
- resize() The image shape before and after the call to resize():
(540, 600, 3) (450, 500, 3)imutils.resize() is a wrapper of cv2.resize(), it only dose the scaling according to width or height. Here is implementation in imutils.py:
def resize(image, width = None, height = None, inter = cv2.INTER_AREA):
    # initialize the dimensions of the image to be resized and grab the image size
    dim = None
    (h, w) = image.shape[:2]
    # if both the width and height are None, then return the original image
    if width is None and height is None:
        return image
        # check to see if the width is None
        if width is None:
            # calculate the ratio of the height and construct the dimensions
            r = height / float(h)
            dim = (int(w * r), height)
        # otherwise, the height is None
        else:
            # calculate the ratio of the width and construct the dimensions
            r = width / float(w)
            dim = (width, int(h * r))
        # resize the image
        resized = cv2.resize(image, dim, interpolation = inter)
        # return the resized image
        return resized
- OpenCV to PIL.Image
import cv2
from PIL import Image
import numpy

img = cv2.imread("plane.jpg")
cv2.imshow("OpenCV",img)
image = Image.fromarray(cv2.cvtColor(img,cv2.COLOR_BGR2RGB))
import cv2
from PIL import Image
import numpy

image = Image.open("plane.jpg")
img = cv2.cvtColor(numpy.asarray(image),cv2.COLOR_RGB2BGR)
# make predictions on the input image
print("[INFO] making predictions...")
start = time.time()
results = model.ClassifyWithImage(image, top_k=5)
end = time.time()
print("[INFO] classification took {:.4f} seconds...".format(
 end - start))
- Parameters:
- img (PIL.Image) The image you want to classify.
- threshold (float) Minimum confidence threshold for returned classifications. For example, use 0.5 to receive only classifications with a confidence equal-to or higher-than 0.5.
- top_k (int) The maximum number of classifications to return.
- resample (int) A resampling filter for image resizing. This can be one of PIL.Image.NEAREST, PIL.Image.BOX, PIL.Image.BILINEAR, PIL.Image.HAMMING, PIL.Image.BICUBIC, or PIL.Image.LANCZOS. Default is PIL.Image.NEAREST. See Pillow filters. (Note: A complex filter such as PIL.Image.BICUBIC may create slightly better accuracy but it also causes higher latency.)
- Returns: A list of classifications, each of which is a list [int, float] that represents the label id (int) and the confidence score (float).
- Raises: RuntimeError – If the model’s input tensor shape doesn’t match the shape expected for an image classification model, which is [1, height, width, 3]. ValueError – If argument values are invalid.
# loop over the results
for (i, (classID, score)) in enumerate(results):
 # check to see if this is the top result, and if so, draw the
 # label on the image
 if i == 0:
  text = "Label: {}, {:.2f}%".format(labels[classID],
   score * 100)
  cv2.putText(orig, text, (10, 30), cv2.FONT_HERSHEY_SIMPLEX,
   0.8, (0, 0, 255), 2)

 # display the classification result to the terminal
 print("{}. {}: {:.2f}%".format(i + 1, labels[classID],
  score * 100))

# show the output image
cv2.imshow("Image", orig)
cv2.waitKey(0)
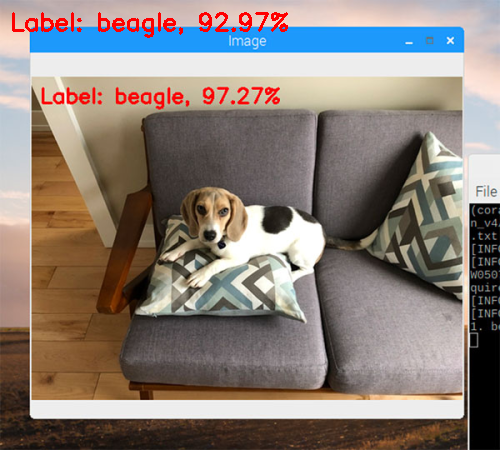
Image classification in video with the Google Coral Accelerator
classify_video.py:
- import the necessary packages
# import the necessary packages
from edgetpu.classification.engine import ClassificationEngine
from imutils.video import VideoStream
from PIL import Image
import argparse
import imutils
import time
import cv2
import os

model_dir = '/home/jerry/edgetpu_models'
model_file = os.path.join(model_dir, 'mobilenet_v2_1.0_224_quant.tflite')
label_file = os.path.join(model_dir, 'imagenet_labels.txt')

# construct the argument parser and parse the arguments
ap = argparse.ArgumentParser()
ap.add_argument("-m", "--model", required=True,
 help="path to TensorFlow Lite classification model")
ap.add_argument("-l", "--labels", required=True,
 help="path to labels file")
args = vars(ap.parse_args(['--model', model_file, '--labels', label_file]))
# initialize the labels dictionary
print("[INFO] parsing class labels...")
labels = {}

# loop over the class labels file
for row in open(args["labels"]):
    # unpack the row and update the labels dictionary
    (classID, label) = row.strip().split(" ", maxsplit=1)
    label = label.strip().split(",", maxsplit=1)[0]
    labels[int(classID)] = label

# load the Google Coral classification model
print("[INFO] loading Coral model...")
model = ClassificationEngine(args["model"])
# initialize the video stream and allow the camera
# sensor to warmup
print("[INFO] warming up camera...")
vs = VideoStream(usePiCamera=args["picamera"] > 0).start()
time.sleep(2.0)

# initialize the FourCC, video writer, dimensions of the frame, and
# zeros array
fourcc = cv2.VideoWriter_fourcc(*args["codec"])
writer = None
(h, w) = (None, None)
zeros = None
# loop over frames from the video stream
while True:
    # grab the frame from the threaded video stream and resize it
    # to have a maximum width of 500 pixels
    frame = vs.read()
    frame = imutils.resize(frame, width=500)
    # check if the writer is None
    if writer is None:
        # store the image dimensions, initialize the video writer,
        # and construct the zeros array
        (h, w) = frame.shape[:2]
        writer = cv2.VideoWriter(args["output"], fourcc, args["fps"],(w, h), True)
    orig = frame.copy()
    # prepare the frame for classification by converting (1) it from
    # BGR to RGB channel ordering and then (2) from a NumPy array to
    # PIL image format
    frame = cv2.cvtColor(frame, cv2.COLOR_BGR2RGB)
    frame = Image.fromarray(frame)
    # make predictions on the input frame
    start = time.time()
    results = model.ClassifyWithImage(frame, top_k=1)
    end = time.time()
    # ensure at least one result was found
    if len(results) > 0:
        # draw the predicted class label, probability, and inference
        # time on the output frame
        (classID, score) = results[0]
        text = "{}: {:.2f}% ({:.4f} sec)".format(labels[classID], score * 100, end - start)
        print(text)
        cv2.putText(orig, text, (10, 30), cv2.FONT_HERSHEY_SIMPLEX,0.5, (0, 0, 255), 2)
        # write the output frame to file
        writer.write(orig)
        # show the output frame and wait for a key press
        cv2.imshow("Frame", orig)
        key = cv2.waitKey(1) & 0xFF
        # if the `q` key was pressed, break from the loop
        if key == ord("q"):
            break

# do a bit of cleanup
print("[INFO] cleaning up...")
cv2.destroyAllWindows()
vs.stop()
writer.release()
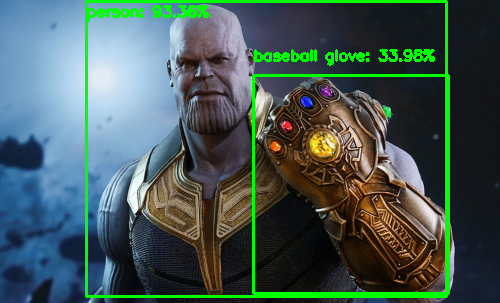
Object detection with the Google Coral
We not only wanted to classify an object in an image but also detect where in the image the object is.
# import the necessary packages
from edgetpu.detection.engine import DetectionEngine
from PIL import Image
import argparse
import imutils
import time
import os
import cv2

model_dir = '/home/jerry/edgetpu_models'
model_file = os.path.join(model_dir, 'mobilenet_ssd_v2_coco_quant_postprocess_edgetpu.tflite')
label_file = os.path.join(model_dir, 'coco_labels.txt')
image_file = os.path.join(model_dir, 'thanos.jpg')

# construct the argument parser and parse the arguments
ap = argparse.ArgumentParser()
ap.add_argument("-m", "--model", required=True,help="path to TensorFlow Lite object detection model")
ap.add_argument("-l", "--labels", required=True,help="path to labels file")
ap.add_argument("-i", "--image", required=True,help="path to input image")
ap.add_argument("-c", "--confidence", type=float, default=0.3,help="minimum probability to filter weak detections")
args = vars(ap.parse_args([ '--model', model_file, '--labels', label_file, '--image', image_file]))

# initialize the labels dictionary
print("[INFO] parsing class labels...")
labels = {}

# loop over the class labels file
for row in open(args["labels"]):
    # unpack the row and update the labels dictionary
    (classID, label) = row.strip().split(maxsplit=1)
    labels[int(classID)] = label.strip()

# load the Google Coral object detection model
print("[INFO] loading Coral model...")
model = DetectionEngine(args["model"])

# load the input image
image = cv2.imread(args["image"])
image = imutils.resize(image, width=500)
orig = image.copy()

# prepare the image for object detection by converting it
# (1) from BGR to RGB channel ordering and
# (2) from a NumPy array to PIL image format
image = cv2.cvtColor(image, cv2.COLOR_BGR2RGB)
image = Image.fromarray(image)

# make predictions on the input image
print("[INFO] making predictions...")
start = time.time()
results = model.DetectWithImage(image, threshold=args["confidence"],keep_aspect_ratio=True, relative_coord=False)
end = time.time()
print("[INFO] object detection took {:.4f} seconds...".format(end - start))

# loop over the results
for r in results:
    # extract the bounding box and box and predicted class label
    box = r.bounding_box.flatten().astype("int")
    (startX, startY, endX, endY) = box
    label = labels[r.label_id]

    # draw the bounding box and label on the image
    cv2.rectangle(orig, (startX, startY), (endX, endY),(0, 255, 0), 2)
    y = startY - 15 if startY - 15 > 15 else startY + 15
    text = "{}: {:.2f}%".format(label, r.score * 100)
    cv2.putText(orig, text, (startX, y), cv2.FONT_HERSHEY_SIMPLEX, 0.5, (0, 255, 0), 2)

# show the output image
cv2.imshow("Image", orig)
cv2.waitKey(0)
DetectWithImage(img, threshold=0.1, top_k=3, keep_aspect_ratio=False, relative_coord=True, resample=0):
Performs object detection with an image.
- Parameters:
- img (PIL.Image) – The image you want to process.
- threshold (float) – Minimum confidence threshold for detected objects. For example, use 0.5 to receive only detected objects with a confidence equal-to or higher-than 0.5.
- top_k (int) – The maximum number of detected objects to return.
- keep_aspect_ratio (bool) – If True, keep the image aspect ratio the same when down-sampling the image (by adding black pixel padding so it fits the input tensor’s dimensions, via the ResamplingWithOriginalRatio() function). If False, resize and reshape the image (without cropping) to match the input tensor’s dimensions. (Note: This option should be the same as what is applied on input images during model training. Otherwise, the accuracy might be affected and the bounding box of detection result might be stretched.)
- relative_coord (bool) – If True, provide coordinates as float values between 0 and 1, representing each position relative to the total image width/height. If False, provide coordinates as integers, representing pixel positions in the original image. [0, 0] is always the top-left corner.
- resample (int) – A resampling filter for image resizing. This can be one of PIL.Image.NEAREST, PIL.Image.BOX, PIL.Image.BILINEAR, PIL.Image.HAMMING, PIL.Image.BICUBIC, or PIL.Image.LANCZOS. Default is PIL.Image.NEAREST. See Pillow filters. (Note: A complex filter such as PIL.Image.BICUBIC may create slightly better accuracy but it also causes higher latency.)
- Returns: A list of detected objects as DetectionCandidate objects.
Convert TensorFlow models into the TensorFlow Lite format
This describes how to convert TensorFlow models into the TensorFlow Lite format using the TensorFlow Lite Converter Python API.
Install the TensorFlow Lite Converter:
pip install tf-nightly
The API for converting TensorFlow models to TensorFlow Lite is tf.lite.TFLiteConverter, which provides class methods based on the original format of the model:
- TFLiteConverter.from_session() is available for GraphDefs
- TFLiteConverter.from_saved_model() is available for SavedModels
- TFLiteConverter.from_keras_model_file() is available for tf.Keras files
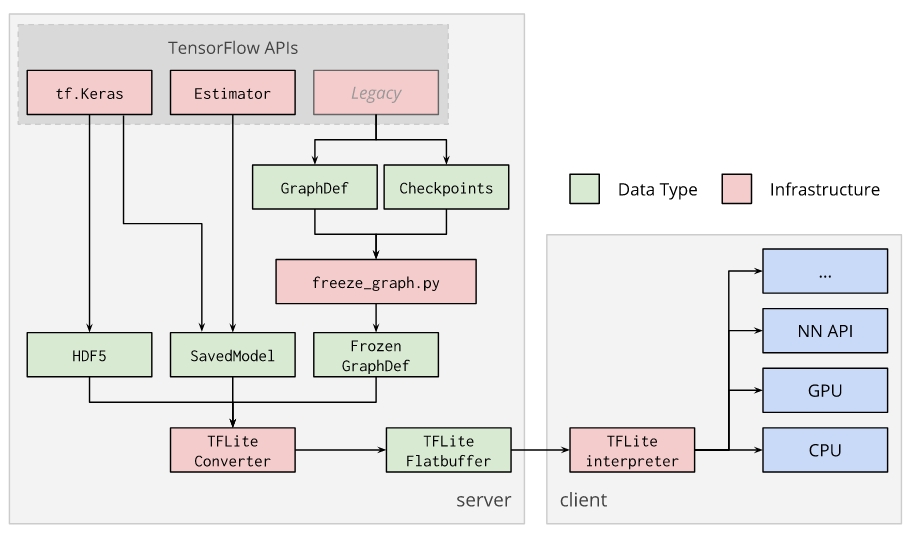
The basic workflow to create a model for the Edge TPU:
Examples
Convert a basic float-point model
- convert a TensorFlow GraphDef from a tf.Session object
import tensorflow as tf

img = tf.placeholder(name="img", dtype=tf.float32, shape=(1, 64, 64, 3))
var = tf.get_variable("weights", dtype=tf.float32, shape=(1, 64, 64, 3))
val = img + var
out = tf.identity(val, name="out")

with tf.Session() as sess:
  sess.run(tf.global_variables_initializer())
  converter = tf.lite.TFLiteConverter.from_session(sess, [img], [out])
  tflite_model = converter.convert()
  open("converted_model.tflite", "wb").write(tflite_model)
import tensorflow as tf

graph_def_file = "/path/to/Downloads/mobilenet_v1_1.0_224/frozen_graph.pb"
input_arrays = ["input"]
output_arrays = ["MobilenetV1/Predictions/Softmax"]

converter = tf.lite.TFLiteConverter.from_frozen_graph(
  graph_def_file, input_arrays, output_arrays)
tflite_model = converter.convert()
open("converted_model.tflite", "wb").write(tflite_model)
import tensorflow as tf

converter = tf.lite.TFLiteConverter.from_saved_model(saved_model_dir)
tflite_model = converter.convert()
open("converted_model.tflite", "wb").write(tflite_model)
import tensorflow as tf

converter = tf.lite.TFLiteConverter.from_keras_model_file("keras_model.h5")
tflite_model = converter.convert()
open("converted_model.tflite", "wb").write(tflite_model)
import numpy as np
import tensorflow as tf

# Generate tf.keras model.
model = tf.keras.models.Sequential()
model.add(tf.keras.layers.Dense(2, input_shape=(3,)))
model.add(tf.keras.layers.RepeatVector(3))
model.add(tf.keras.layers.TimeDistributed(tf.keras.layers.Dense(3)))
model.compile(loss=tf.keras.losses.MSE,
              optimizer=tf.keras.optimizers.RMSprop(lr=0.0001),
              metrics=[tf.keras.metrics.categorical_accuracy],
              sample_weight_mode='temporal')

x = np.random.random((1, 3))
y = np.random.random((1, 3, 3))
model.train_on_batch(x, y)
model.predict(x)

# Save tf.keras model in HDF5 format.
keras_file = "keras_model.h5"
tf.keras.models.save_model(model, keras_file)

# Convert to TensorFlow Lite model.
converter = tf.lite.TFLiteConverter.from_keras_model_file(keras_file)
tflite_model = converter.convert()
open("converted_model.tflite", "wb").write(tflite_model)
Complex examples
For models where the default value of the attributes is not sufficient, the attribute's values should be set before calling convert().

留言