Android: App Programming
Programming Android
2011Zigurd Mednieks, Laird Dornin, G. Blake Meike, and Masumi Nakamura
Part I. Tools and Basics
Part II. About the Android Framework
Part III. A Skeleton Application for Android
Part IV. Advanced Topics
Beginning Android Application development
2011Wei-Meng Lee
Teach Yourself Android Application Development in 24 Hours
2012Android Programming: The Big Nerd Ranch Guide
2013by Bill Phillips and Brian Hardy
Head First Android Development
2015Dawn Griffiths
David Griffiths
The source code can be downloaded:
git clone https://github.com/dogriffiths/HeadFirstAndroid2ndEdition.git
Chapter 1 Getting Started: Diving In
We are going to build Android apps using a mixture of Java and XML.
An Android app is composed of one or more screen.
Each screen is designed with a layout which is defined using XML.
Layouts can contain GUI components such as buttons and labels.
Layouts only defined the look of the app, a Java class called activity decides how the GUI component should respond to the UI event.
Other resources such as image files and application data can be bundled with when you build your app.
Setup development environment
Android device run the byte code which is the format generated from .class and .jar files.
Android SDK contains tools and libraries to convert the compiled Java code.
The Android build system compiles app resources and source code, and packages them into APKs that you can test, deploy, sign, and distribute. Android Studio uses Gradle, an advanced build toolkit, to automate and manage the build process, while allowing you to define flexible custom build configurations.
Android Studio is the official Integrated Development Environment (IDE) for Android app development, based on IntelliJ IDEA which is the popular IDE for Java development.
You need to make sure correct versions of JDK and JRE are installed before to use the Android Studio.
JDK and JRE (Java Standard Edition) can be downloaded:
https://www.oracle.com/technetwork/java/javase/downloads/index.html
Once Java is running, download Android Studio:
https://developer.android.com/studio
Build an App
Start Android Studio:
- Create a new project "Start a new Android Studio project", choose the "Empty Activity" template from "Phone and Tablet".
- Configure the project Android Studio uses the company name and application name to form the qualified name of a package. Enter the application name, a company name, and accept the default project location.
- Specify the API level The API level refers to the PI version used by the app. The minimum required SDK is the lowest version you app will support. Your app will run on devices withe the level API or higher.
- The layout file *.xml
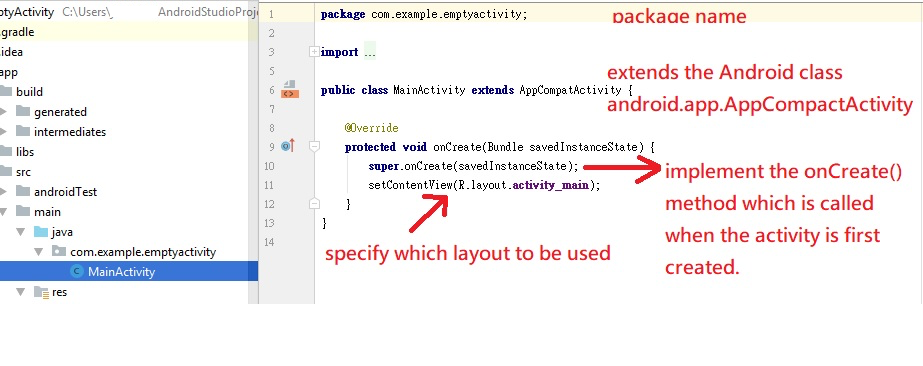
- The activity file *.java
- AndroidManifest.xml
Android Studio use the Gradle to compile and build your apps.
Gradle projects have a standard layout
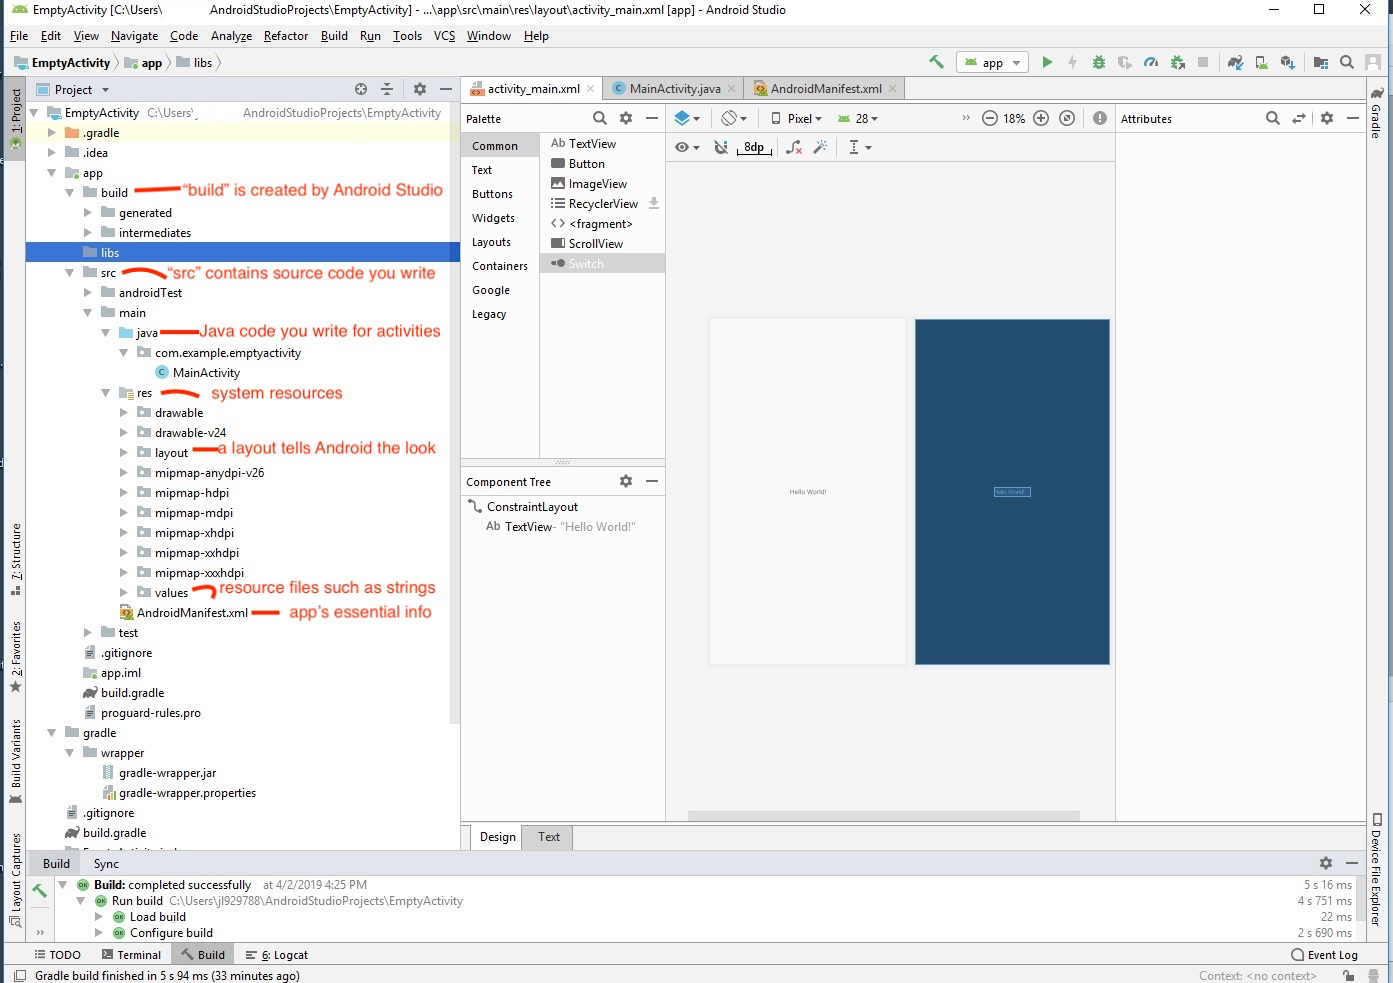
The layout can be designed by editing the XML file or the design editor. The design editor allows you to drag GUI components onto your layout.
Android Studio includes the emulator which enables you to set up one or more Android virtual devices(AVDs) and then run your app in the emulator. The emulator is a kind of virtual machine application, each emulator emulates a different type of device.
To set up an AVD, start the AVD manager on the Tool menu:
- create a virtual device
- choose a device Phone, Tablet, Wear or TV.
- choose a system image
Choose "Run app" from the Run menu, lists of connected devices and AVD will be listed, select the AVD you want the emulator to load.
During the running, some initial tasks are done:
- Java source files get compiled to byte code The byte code is in DEX format which runs on the Android RunTime. ART can convert the DEX bytecode into native code that can run on the CPU directly. ART is smaller than the JVM.
- emulator is launched with an AVD It takes time to start the AVD, the console tells you what the Gradle build system is doing.
- APK is created
- the APK file is installed to the AVD DEVICE SHELL COMMAND: pm install -r ...
- AVD starts the application then triggers the main activity associated with the app DEVICE SHELL COMMAND: am start ...
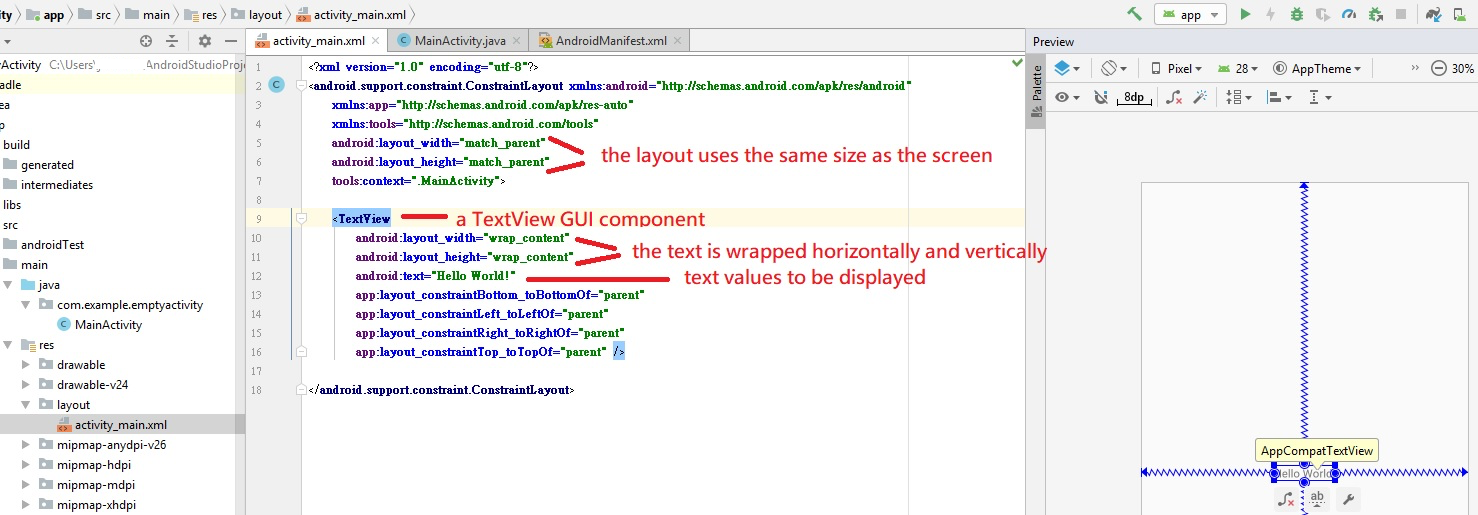
Change the Layout
<?xml version="1.0" encoding="utf-8"?>
<android.support.constraint.ConstraintLayout xmlns:android="http://schemas.android.com/apk/res/android"
    xmlns:app="http://schemas.android.com/apk/res-auto"
    xmlns:tools="http://schemas.android.com/tools"
    android:layout_width="match_parent"
    android:layout_height="match_parent"
    tools:context=".MainActivity">

    <TextView
        android:layout_width="wrap_content"
        android:layout_height="wrap_content"
        android:text="Hello World!"
        app:layout_constraintBottom_toBottomOf="parent"
        app:layout_constraintLeft_toLeftOf="parent"
        app:layout_constraintRight_toRightOf="parent"
        app:layout_constraintTop_toTopOf="parent" />

</android.support.constraint.ConstraintLayout>
- res/values/strings.xml strings.xml is the default resource file used to hold name / value pairs of strings which can be referenced throughout your app. Define a new text in the resource,
<resources>
    <string name="app_name">My Application</string>
    <string name="app_text">Hi, Jerry.</string>
</resources>
<string name="name">value</string>
android:text="@string/app_text"
- i18n for different languages You can have one string resource file for each language. The default English resource file in res/values/ folder, other string resource file will be in the folder named res/values-language.
- text change across the whole application
Chapter 2 Building Interactive Apps: Apps that Do Something
First, setup a new project:
- Start a new project
- Choose a "Blank Activity"
- Enter the application name "Beer Adviser"
- layout res/layout/activity_main.xml is created. It include all GUI components you need. You can change the layout using the Design editor:
- Move the TextView component
- Drag a Button component into the design editor.
   <Button
        android:id="@+id/button"
        android:layout_width="wrap_content"
        android:layout_height="wrap_content"
        android:text="Button"
        tools:layout_editor_absoluteX="174dp"
        tools:layout_editor_absoluteY="98dp" />
<Spinner
    android:id="@+id/planets_spinner"
    android:layout_width="fill_parent"
    android:layout_height="wrap_content" />
- Click the view
- Click the edge of the bounding box in the attribute window to add constrains.
<android.support.constraint.ConstraintLayout xmlns:android="http://schemas.android.com/apk/res/android"
...
    tools:context=".MainActivity">

    <TextView
...
        app:layout_constraintBottom_toBottomOf="parent"
        app:layout_constraintHorizontal_bias="0.047"
        app:layout_constraintLeft_toLeftOf="parent"
        app:layout_constraintRight_toRightOf="parent"
        app:layout_constraintTop_toTopOf="parent"
        app:layout_constraintVertical_bias="0.051" />

    <Spinner
...
        app:layout_constraintBottom_toTopOf="@+id/button"
        app:layout_constraintEnd_toEndOf="parent"
        app:layout_constraintStart_toStartOf="parent"
        app:layout_constraintTop_toBottomOf="@+id/textview" />

    <Button
...
        app:layout_constraintBottom_toBottomOf="parent"
        app:layout_constraintEnd_toEndOf="parent"
        app:layout_constraintStart_toStartOf="parent"
        app:layout_constraintTop_toBottomOf="@+id/planets_spinner" />

</android.support.constraint.ConstraintLayout>
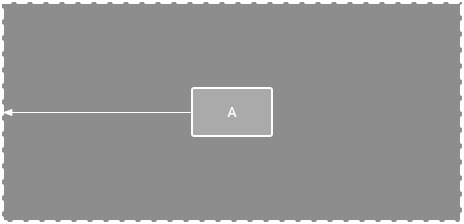
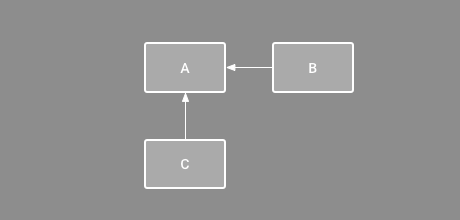
- Parent position A horizontal constraint to the parent
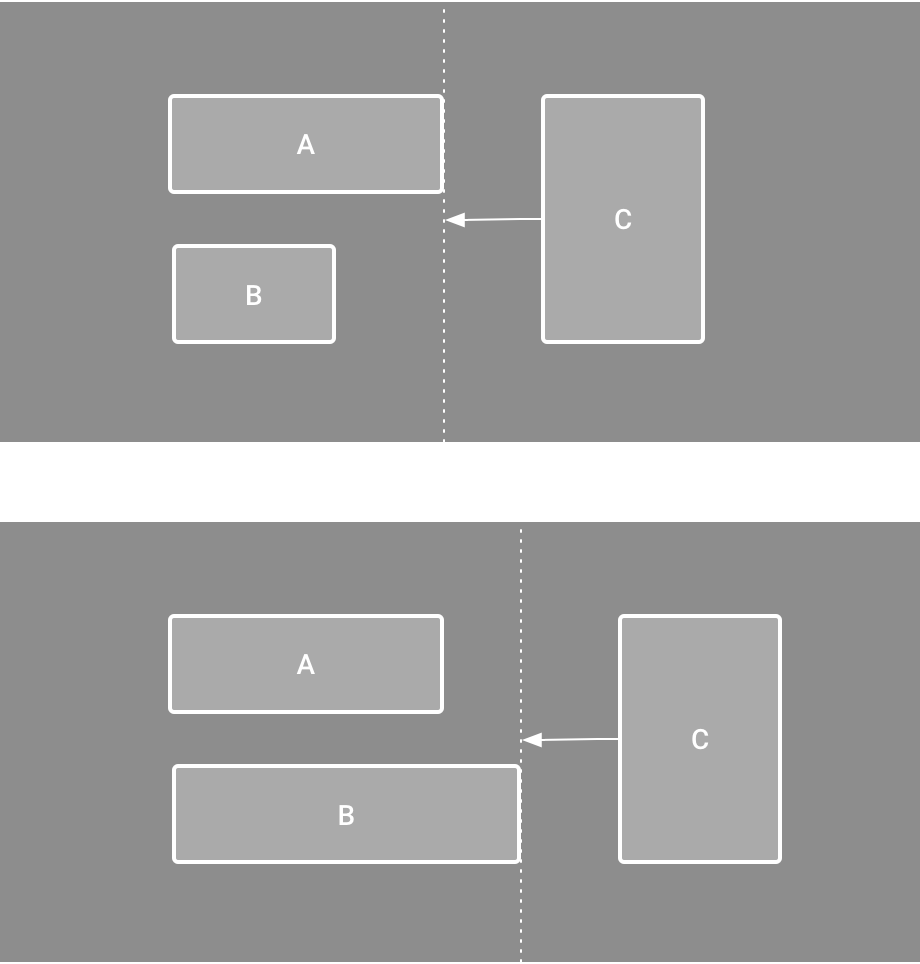
- Order position B is constrained to always be to the right of A, and C is constrained below A.
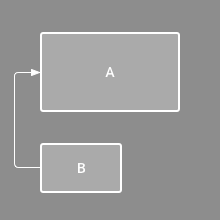
- Alignment A horizontal alignment constraint:
- Baseline alignment Select the text view you want to constrain and then click Edit Baseline:
- Constrain to a guideline
- Constrain to a barrier A barrier is an invisible line that you can create to constrain views.
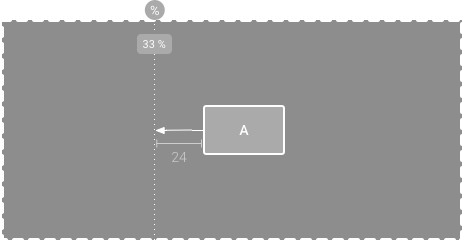
 An offset horizontal alignment constraint:
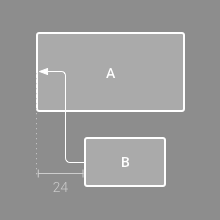

<resources>
    <string name="app_name">Beer Adviser</string>
    <string name="find_beer">Find Beer !</string>
    <string name="brands"></string>

</resources>
...
        android:text="@string/brands"
...
        android:text="@string/find_beer"
...
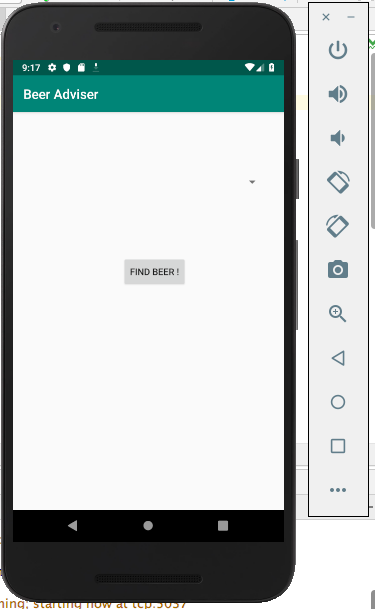
At this point, the layout includes a spinner, but it does not include anything in it.
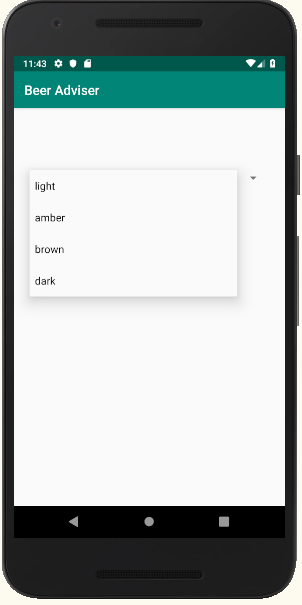
We can specify an array of String values in the resource XML file so that the spinner can reference it.
    <string-array name="beer_colors">
        <item>light</item>
        <item>amber</item>
        <item>brown</item>
        <item>dark</item>
    </string-array>
android:entries="@array/beer_colors"
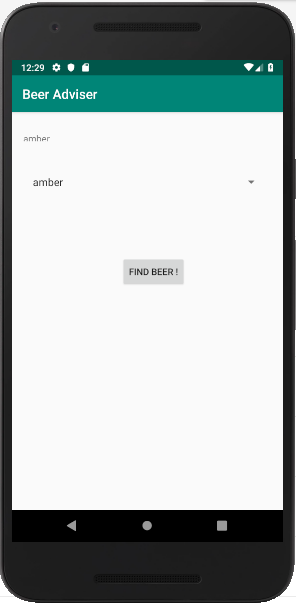
The next step is to make the app to react to the value selected in the spinner.
We want the button to call a method when it is clicked, 2 files needed changes:
- the layout file activity_main.xml Specify the method to be called when the button is clicked. Add the android:onClick attribute to the button element:
<Button
...
        android:onClick<="onClickFindBeer"
...
/>
public void method_name(View view)
- This method will retrieve the selected value from the spinner then put it in the textview
...
import android.app.Activity;
import android.os.Bundle;
import android.view.View;
import android.widget.Spinner;
import android.widget.TextView;
...

public class MainActivity extends AppCompatActivity {
...
  public void onClickFindBeer(View view){
        //Get a reference to the TextView
        TextView brands = (TextView) findViewById(R.id.textview);

        //Get a reference to the Spinner
        Spinner color = (Spinner) findViewById(R.id.planets_spinner);

        //Get the selected item in the Spinner
        String beerType = String.valueOf(color.getSelectedItem());

        brands.setText(beerType);

  }
}
We can add a customer Java class to do more woks before returning the result in the onClick method.
To add the Java class, highlight the package com.example.beeradviser in app/java, and click Fiel -> New -> Class.
A Class template file "BeerExpert.java" will be created for you to work on it.
package com.example.beeradviser;

import java.util.ArrayList;
import java.util.List;

public class BeerExpert {
    List<String> getBrands(String color) {
        List<String> brands = new ArrayList<>();
        if (color.equals("amber")) {
            brands.add("Jack Amber");
            brands.add("Red Moose");
        } else {
            brands.add("Jail Pale Ale");
            brands.add("Gout Stout");
        }
        return brands;
    }
}
import java.util.List;


public class MainActivity extends AppCompatActivity {
    private BeerExpert expert = new BeerExpert();
...
        String beerType = String.valueOf(color.getSelectedItem());

        //Get recommendations from the BeerExpert class
        List brandsList = expert.getBrands(beerType);
        StringBuilder brandsFormatted = new StringBuilder();
        for (String brand : brandsList) {
            brandsFormatted.append(brand).append('\n');
        }

        //Display the beers
        brands.setText(brandsFormatted);

...
Chapter 3. Multiple Activities and Intents: State Your Intent
This chapter is to build apps with multiple activities and get apps to talk with each other by using intents.
The app will contain 2 activities and 2 layouts:
- When the app gets launched, it starts activity "CreateMessageActivity" The layout is "activity_create_message.xml".
- When the button in CreateMessageActivity is clicked, another activity "ReceiveMessageActivity" is launched The layout is "activity_receive_message.xml".
Create a basic app with a single activity and layout
First, create a new Android Studio project named "Messenger" with a blank activity .
Then change the generated layout "activity_main.xml" and activity "MainActivity.java":
- Use the Design Editor to remove the element <TextView>
- Use the Design Editor to add <Button> and <EditText> elements Move "Buttons -> Button" and "Text -> Plain Text" to the layout. Then, do the following changes:
    <Button
        android:id="@+id/send"
        android:layout_width="wrap_content"
        android:layout_height="wrap_content"
        android:text="@string/Send"
        android:onClick="onClickSendMessage"
        tools:layout_editor_absoluteX="161dp"
        tools:layout_editor_absoluteY="357dp" />

    <EditText
        android:id="@+id/message"
        android:layout_width="wrap_content"
        android:layout_height="wrap_content"
        android:ems="10"
        android:text="@string/Message"
        tools:layout_editor_absoluteX="64dp"
        tools:layout_editor_absoluteY="199dp" />
    <string name="Send">Send Message</string>
    <string name="Message">Input message...</string>
import android.view.View;

public class MainActivity extends AppCompatActivity {

    @Override
    protected void onCreate(Bundle savedInstanceState) {
        super.onCreate(savedInstanceState);
        setContentView(R.layout.activity_main);
    }

    //Call onSendMessage() when the button is clicked
    public void onClickSendMessage(View view) {

    }
}
Add a second activity and layout
Click "File -> New -> Activity -> Empty Activity", then, give the name of the activity "ReceiveMessage".
Android Studio will create a new activity file and layout file for you:
- ReceiveMessage.java
- activity_receive_message.xml
<?xml version="1.0" encoding="utf-8"?>
<manifest xmlns:android="http://schemas.android.com/apk/res/android"
    package="com.example.messenger">

    <application
        android:allowBackup="true"
        android:icon="@mipmap/ic_launcher"
        android:label="@string/app_name"
        android:roundIcon="@mipmap/ic_launcher_round"
        android:supportsRtl="true"
        android:theme="@style/AppTheme">
        <activity android:name=".ReceiveMessage"></activity>
        <activity android:name=".MainActivity">
            <intent-filter>
                <action android:name="android.intent.action.MAIN" />

                <category android:name="android.intent.category.LAUNCHER" />
            </intent-filter>
        </activity>
    </application>

</manifest>
- android:name Specify the name of the activity class. The class name is prefixed with "." because it will be combined with the package name to form a fully qualified class name.
Get the 1st activity to call the 2nd activity
Whenever you want an activity to start another activity, you use an Intent.
You start another activity by :
- creating an intent for a target activity
Intent intent = new Intent(src, dst);
startActivity(intent);
Get the 1st activity to pass data to the 2nd activity
You can deliver more information to the target activity via the Intent.
To send data to another activity, all you need to do is specify the data and its type.
The most straightforward and common use of the ACTION_SEND action is sending text content from one activity to another. For example,
Intent sendIntent = new Intent();
sendIntent.setAction(Intent.ACTION_SEND);
sendIntent.putExtra(Intent.EXTRA_TEXT, "This is my text to send.");
sendIntent.setType("text/plain");
startActivity(sendIntent);
Get the 2nd activity to display received data
Using Design Editor to move a TextView in the layout "activity_receive_message.xml". Then, modify it:
    <TextView
        android:id="@+id/received"
...
    />
Android Development Patterns
2016Phil Dutson

留言