Learning OpenCV 3 : Computer Vision in C++ with the OpenCV Library
Learning OpenCV 3
Computer Vision in C++ with the OpenCV Library
by
Adrian Kaehler and Gary Bradski
Preface
About the Programs in This Book
Source code for the examples in the book can be fetched from this book’s website.
$ git clone https://github.com/oreillymedia/Learning-OpenCV-3_examples.git
CHAPTER 1 Overview
Downloading and Installing OpenCV
Install related packages
$ sudo apt-get update

$ sudo apt-get install build-essential
$ sudo apt-get install cmake git libgtk2.0-dev pkg-config libavcodec-dev libavformat-dev libswscale-dev
$ sudo apt-get install python-dev python-numpy libtbb2 libtbb-dev libjpeg-dev libpng-dev libtiff-dev libjasper-dev libdc1394-22-dev
Download the OpenCV source
OpenCV 3.4.11,
$ sudo install -d /usr/local/src/opencv/
$ cd /usr/local/src/opencv/
$ sudo unzip ~/Downloads/opencv-3.4.11.zip
Build
- Configuring
$ sudo cd /usr/local/src/opencv/build
$ cd /usr/local/src/opencv/build
$ sudo cmake -D CMAKE_BUILD_TYPE=Release -D CMAKE_INSTALL_PREFIX=/usr/local /usr/local/src/opencv/opencv-3.4.11
By default, OpenCV’s cmake configuration script attempts to find and use as many third-party libraries as possible. For example, if it finds CUDA SDK, it will enable GPU-accelerated OpenCV functionality.
sudo make -j7
sudo make install
More OpenCV Documentation
OpenCV Contribution Repository
In OpenCV 3.0, the previously monolithic library has been split into two parts:
- The part maintained by the core OpenCV team and contains (mostly) stable code
- The part maintained and developed mostly by the community To download opencv_contrib:
https://github.com/opencv/opencv_contrib/tree/3.4
How to build OpenCV with extra modules
Path to the contrib modules can be passed to cmake to build them together with OpenCV:
cd /usr/local/src/opencv/
sudo unzip ~/Downloads/opencv-3.4.11.zip
sudo cd /usr/local/src/opencv/build
cmake -DOPENCV_EXTRA_MODULES_PATH=/usr/local/src/opencv/opencv_contrib-3.4/modules /usr/local/src/opencv/opencv-3.4.11
sudo make -j7
sudo make install
Therefore, OpenCV will be built in the opencv build directory with all modules from opencv_contrib repository.
If you don't want all of the modules, use CMake's BUILD_opencv_* to turn it off.
For ex.,
-DBUILD_opencv_legacy=OFF
CHAPTER 2 Introduction to OpenCV
CMake
Projects specify their build process with platform-independent CMake listfiles included in each directory of a source tree with the name CMakeLists.txt.
The “cmake” executable is the CMake command-line interface.
The easiest way of using OpenCV in your code is to use CMake.
CMake's find_package(OpenCV REQUIRED)會在Ubuntu系統中找到/usr/local/share/OpenCV/OpenCVConfig.cmake:
#  Usage from an external project:
#    In your CMakeLists.txt, add these lines:
#
#    find_package(OpenCV REQUIRED)
#    include_directories(${OpenCV_INCLUDE_DIRS}) # Not needed for CMake >= 2.8.11
#    target_link_libraries(MY_TARGET_NAME ${OpenCV_LIBS})
#
#    Or you can search for specific OpenCV modules:
#
#    find_package(OpenCV REQUIRED core videoio)
#
#    You can also mark OpenCV components as optional:

#    find_package(OpenCV REQUIRED core OPTIONAL_COMPONENTS viz)
#
#    If the module is found then OPENCV_<module>_FOUND is set to TRUE.
#
#    This file will define the following variables:
#      - OpenCV_LIBS                     : The list of all imported targets for OpenCV modules.
#      - OpenCV_INCLUDE_DIRS             : The OpenCV include directories.
#      - OpenCV_COMPUTE_CAPABILITIES     : The version of compute capability.
#      - OpenCV_ANDROID_NATIVE_API_LEVEL : Minimum required level of Android API.
#      - OpenCV_VERSION                  : The version of this OpenCV build: "3.4.11"
#      - OpenCV_VERSION_MAJOR            : Major version part of OpenCV_VERSION: "3"
#      - OpenCV_VERSION_MINOR            : Minor version part of OpenCV_VERSION: "4"
#      - OpenCV_VERSION_PATCH            : Patch version part of OpenCV_VERSION: "11"
#      - OpenCV_VERSION_STATUS           : Development status of this build: ""
...
When the package is found package-specific information is provided through variables and Imported Targets documented by the package itself.
Include Files
The main header file of interest is .../include/opencv2/opencv.hpp; it just calls the header files for each OpenCV module
You may use the include file opencv.hpp to include any and every possible OpenCV function, but it will slow down compile time.
First Program—Display a Picture
- Create a program using OpenCV
#include <opencv2/opencv.hpp> //Include file for every supported OpenCV function

int main( int argc, char** argv ) {
    cv::Mat img = cv::imread(argv[1],-1);
    if( img.empty() )
        return -1;

    cv::namedWindow( "Example1", cv::WINDOW_AUTOSIZE );
    cv::imshow( "Example1", img );
    cv::waitKey( 0 );
    cv::destroyWindow( "Example1" );
    return 0;
}
cmake_minimum_required(VERSION 2.8)

# set the project name
project( OpenCVTest )

# Finds and loads settings from the external OpenCV project.
# The REQUIRED option stops processing with an error message if the package cannot be found.
find_package( OpenCV REQUIRED )

# Add the given directories to those the compiler uses to search for include files.
include_directories( ${OpenCV_INCLUDE_DIRS} )

# add the executable
add_executable( OpenCVTest OpenCVTest.cpp )

target_link_libraries( OpenCVTest ${OpenCV_LIBS} )
cmake .
make
Note,
- OpenCV functions live within a namespace called cv .
- Use only the necessary include file to improve compile time
#include "opencv2/highgui/highgui.hpp"This examples only used API defined in highgui.hpp.
- 0 (the default value) the size of the window will be the same regardless of the image size, and the image will be scaled to fit within the window.
- cv::WINDOW_AUTOSIZE The window will expand or contract automatically to accommodate the image’s true size.
Second Program—Video
#include "opencv2/highgui/highgui.hpp"
#include "opencv2/imgproc/imgproc.hpp"

int main( int argc, char** argv ) {
    cv::namedWindow( "Example3", cv::WINDOW_AUTOSIZE );

    //--- INITIALIZE VIDEOCAPTURE
    cv::VideoCapture cap;
    cap.open( std::string(argv[1]) );

    // check if we succeeded
    if (!cap.isOpened()) {
        std::cerr << "ERROR! Unable to open camera\n";
        return -1;
    }
    cv::Mat frame;
    for(;;) {
        cap >> frame;
        if( frame.empty() )
            break;
        cv::imshow( "Example3", frame );
        if( cv::waitKey(33) >= 0 )
            break;
    }
    // Ran out of film
    return 0;
}
- VideoCapture The class provides C++ API for capturing video from cameras or for reading video files and image sequences.
- virtual bool cv::VideoCapture::open( const String & filename ) Open video file or a capturing device or a IP video stream for video capturing.
- virtual bool cv::VideoCapture::open(int index) Open a camera for video capturing.
- bool cv::VideoCapture::open( int cameraNum, int apiPreference ) Open a camera for video capturing.
- virtual bool cv::VideoCapture::open ( const String & filename, int apiPreference ) Open video file or a capturing device or a IP video stream for video capturing with API Preference.
- operator>>() Stream operator to read the next video frame.
- virtual VideoCapture& cv::VideoCapture::operator>>(Mat & image)
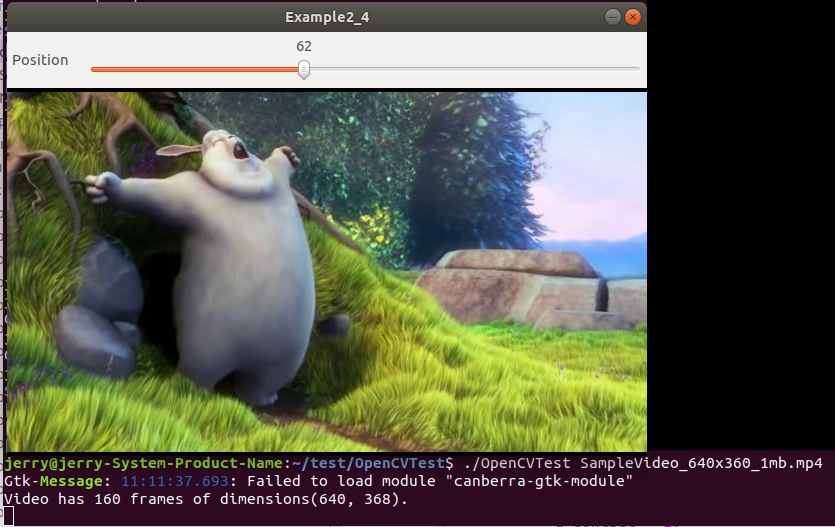
$ ./OpenCVTest SampleVideo_640x360_1mb.mp4
Moving Around
The HighGUI toolkit provides a number of simple instruments for working with images and video.
#include "opencv2/highgui/highgui.hpp"
#include "opencv2/imgproc/imgproc.hpp"

#include <iostream>
#include <fstream>

using namespace std;

int g_slider_position = 0;
int g_run = 1, g_dontset = 0; //start out in single step mode
cv::VideoCapture g_cap;

void onTrackbarSlide( int pos, void *) {
    g_cap.set( cv::CAP_PROP_POS_FRAMES, pos );
    if( !g_dontset )
        g_run = 1;
    g_dontset = 0;
}

int main( int argc, char** argv ) {
    cv::namedWindow( "Example2_4", cv::WINDOW_AUTOSIZE );
    g_cap.open( string(argv[1]) );
    int frames = (int) g_cap.get(cv::CAP_PROP_FRAME_COUNT);
    int tmpw = (int) g_cap.get(cv::CAP_PROP_FRAME_WIDTH);
    int tmph = (int) g_cap.get(cv::CAP_PROP_FRAME_HEIGHT);
    cout << "Video has " << frames << " frames of dimensions("<< tmpw << ", " << tmph << ")." << endl;
    cv::createTrackbar("Position", "Example2_4", &g_slider_position, frames, onTrackbarSlide);
    cv::Mat frame;

    for(;;) {
        if( g_run != 0 ) {// single step or run mode
            g_cap >> frame;
            if(frame.empty())
                break;
            int current_pos = (int)g_cap.get(cv::CAP_PROP_POS_FRAMES);
            g_dontset = 1;
            cv::setTrackbarPos("Position", "Example2_4", current_pos);
            cv::imshow( "Example2_4", frame );
            if ( g_run > 0 ) // single step
                g_run -= 1;
        }
        char c = (char) cv::waitKey(10);
        if( c == 's' ) // single step
        {
            g_run = 1;
            cout << "Single step, run = " << g_run << endl;
        }
        if( c == 'r' ) // run mode
        {
            g_run = -1;
            cout << "Run mode, run = " << g_run <<endl;
        }
        if( c == 27 ) // ESC
            break;
    }
    return(0);
}
- virtual double cv::VideoCapture::get( int propId ) const Returns the specified VideoCapture property.
- CAP_PROP_FRAME_COUNT Number of frames in the video file.
- CAP_PROP_FRAME_WIDTH Width of the frames in the video stream.
- CAP_PROP_FRAME_HEIGHT Height of the frames in the video stream.
- CAP_PROP_POS_FRAMES 0-based index of the frame to be decoded/captured next.
- virtual bool cv::VideoCapture::set (int propId, double value) Sets a property in the VideoCapture.
- cv::createTrackbar(const string& trackbarname, const string& winname, int* value, int count, TrackbarCallback onChange=0, void* userdata=0) Creates a trackbar and attaches it to the specified window.
- trackbarname Name of the created trackbar.
- winname Name of the window that will be used as a parent of the created trackbar.
- value Optional pointer to an integer variable whose value reflects the position of the slider. Upon creation, the slider position is defined by this variable.
- count Maximal position of the slider. The minimal position is always 0.
- onChange Pointer to the function to be called every time the slider changes position. This function should be prototyped as
void Foo(int, void*);, where the first parameter is the trackbar position and the second parameter is the user data (see the next parameter). If the callback is the NULL pointer, no callbacks are called, but only value is updated.
A Simple Transformation
The input image is blurred by a 5 × 5 Gaussian convolution filter and written to out .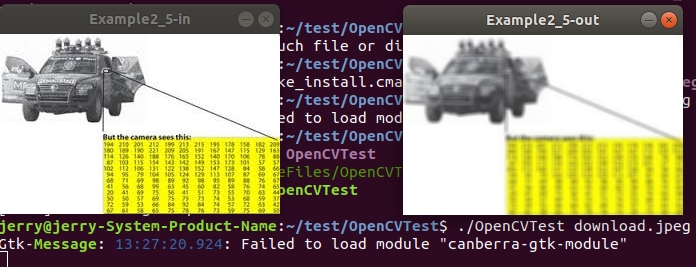
#include <opencv2/opencv.hpp>
#include <iostream>


void example2_5( const cv::Mat & image ) {
    // Create some windows to show the input
    // and output images in.
    cv::namedWindow( "Example2_5-in", cv::WINDOW_AUTOSIZE );
    cv::namedWindow( "Example2_5-out", cv::WINDOW_AUTOSIZE );
    // Create a window to show our input image
    cv::imshow( "Example2_5-in", image );

    // Create an image to hold the smoothed output
    cv::Mat out;
    // Do the smoothing
    // ( Note: Could use GaussianBlur(), blur(), medianBlur() or bilateralFilter(). )
    cv::GaussianBlur( image, out, cv::Size(5,5), 3, 3);
    // Show the smoothed image in the output window
    cv::imshow( "Example2_5-out", out );
    // Wait for the user to hit a key, windows will self destruct

    cv::waitKey( 0 );
}

int main( int argc, char** argv ) {
    cv::Mat img = cv::imread(argv[1],-1);
    if( img.empty() ) {
        std::cout  << "no data is read!" << std::endl;
        return -1;
    }

    example2_5(img);
    return 0;
}
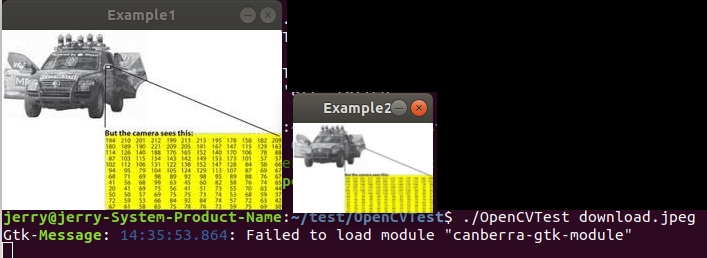
A Not-So-Simple Transformation
Blurs an image and downsamples it.
First, it convolves the source image with the kernel. Then, it downsamples the image by rejecting even rows and columns.
void pyrDown(InputArray src, OutputArray dst, const Size& dstsize=Size(), int borderType=BORDER_DEFAULT )
- src input image.
- dst output image; it has the specified size and the same type as src.
- dstsize size of the output image.
- borderType Pixel extrapolation method (BORDER_CONSTANT don’t supported).
#include <opencv2/opencv.hpp>

int main( int argc, char** argv ) {
    cv::Mat img1,img2;
    cv::namedWindow( "Example1", cv::WINDOW_AUTOSIZE );
    cv::namedWindow( "Example2", cv::WINDOW_AUTOSIZE );
    img1 = cv::imread( argv[1] );
    cv::imshow( "Example1", img1 );
    cv::pyrDown( img1, img2);
    cv::imshow( "Example2", img2 );
    cv::waitKey(0);
    return 0;
};
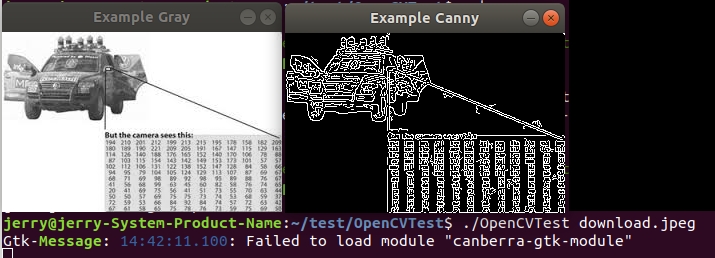
The Canny edge detector writes its output to a single-channel (grayscale) image,
#include <opencv2/opencv.hpp>

int main( int argc, char** argv ) {
    cv::Mat img_rgb, img_gry, img_cny;
    cv::namedWindow( "Example Gray", cv::WINDOW_AUTOSIZE );
    cv::namedWindow( "Example Canny", cv::WINDOW_AUTOSIZE );
    img_rgb = cv::imread( argv[1] );
    cv::cvtColor( img_rgb, img_gry, cv::COLOR_BGR2GRAY);
    cv::imshow( "Example Gray", img_gry );
    cv::Canny( img_gry, img_cny, 10, 100, 3, true );
    cv::imshow( "Example Canny", img_cny );
    cv::waitKey(0);
    return 0;
};
- void cvtColor(InputArray src, OutputArray dst, int code, int dstCn=0 ) Converts an image from one color space to another.
- src input image: 8-bit unsigned, 16-bit unsigned ( CV_16UC... ), or single-precision floating-point.
- dst output image of the same size and depth as src.
- code color space conversion code.
- RGB <--> GRAY CV_BGR2GRAY, CV_RGB2GRAY, CV_GRAY2BGR, CV_GRAY2RGB
- RGB <--> YCrCb CV_BGR2YCrCb, CV_RGB2YCrCb, CV_YCrCb2BGR, CV_YCrCb2RGB
- RGB <--> HSV CV_BGR2HSV, CV_RGB2HSV, CV_HSV2BGR, CV_HSV2RGB
- 0 to 255 for CV_8U images
- 0 to 65535 for CV_16U images
- 0 to 1 for CV_32F images If you have a 32-bit floating-point image directly converted from an 8-bit image without any scaling, then it will have the 0..255 value range instead of 0..1. So, before calling cvtColor , you need first to scale the image down:
So in a pixel, the 1st byte in a standard (24-bit) color image will be an 8-bit Blue component, the 2nd byte will be Green, and the 3rd byte will be Red.
The conventional ranges for R, G, and B channel values are:
			img *= 1./255;
			cvtColor(img, img, COLOR_BGR2Luv);
#include <opencv2/imgproc.hpp>
- image 8-bit input image.
- edges output edge map; single channels 8-bit image, which has the same size as image .
- threshold1 first threshold for the hysteresis procedure.
- threshold2 second threshold for the hysteresis procedure.
- apertureSize aperture size for the Sobel operator.
- L2gradient a flag, indicating whether a more accurate norm should be used to calculate the image gradient magnitude
Input from a Camera
The cv::VideoCapture object works the same for files on disk or from a camera.
You give it a camera ID number (typically 0 if only one camera is connected to the system). The default value is –1 , which means “just pick one”.
#include "opencv2/highgui/highgui.hpp"
#include "opencv2/imgproc/imgproc.hpp"

#include <iostream>

int main( int argc, char** argv ) {
    cv::namedWindow( "Example2_10", cv::WINDOW_AUTOSIZE );

    //--- INITIALIZE VIDEOCAPTURE
    cv::VideoCapture cap;
    if (argc==1) {
        cap.open(0);// open the first camera
    } else {
        cap.open(argv[1]);
    }

    // check if we succeeded
    if (!cap.isOpened()) {
        std::cout << "ERROR! Unable to open camera\n";
        return -1;
    }
    cv::Mat frame;
    for(;;) {
        cap >> frame;
        if( frame.empty() )
            break;
        cv::imshow( "Example2_10", frame );
        if( cv::waitKey(33) >= 0 )
            break;
    }
    // Ran out of film
    return 0;
}
Writing to an AVI File
We are able to create a writer device that allows us to place frames one by one into a video file. The object that allows us to do this is cv::VideoWriter.
- virtual bool cv::VideoWriter::open( const String & filename, int fourcc, double fps, Size frameSize, bool isColor = true ) Initializes or reinitializes video writer.
#include <opencv2/core.hpp>
#include <opencv2/videoio.hpp>
#include <opencv2/highgui.hpp>
#include <iostream>
#include <stdio.h>
using namespace cv;
using namespace std;

int main(int, char**)
{
    Mat src;
    // use default camera as video source
    VideoCapture cap(0);
    // check if we succeeded
    if (!cap.isOpened()) {
        cerr << "ERROR! Unable to open camera\n";
        return -1;
    }
    // get one frame from camera to know frame size and type
    cap >> src;
    // check if we succeeded
    if (src.empty()) {
        cerr << "ERROR! blank frame grabbed\n";
        return -1;
    }
    bool isColor = (src.type() == CV_8UC3);
    //--- INITIALIZE VIDEOWRITER
    VideoWriter writer;
    int codec = VideoWriter::fourcc('M', 'J', 'P', 'G');  // select desired codec (must be available at runtime)
    double fps = 25.0;                          // framerate of the created video stream
    string filename = "./live.avi";             // name of the output video file
    writer.open(filename, codec, fps, src.size(), isColor);
    // check if we succeeded
    if (!writer.isOpened()) {
        cerr << "Could not open the output video file for write\n";
        return -1;
    }
    //--- GRAB AND WRITE LOOP
    cout << "Writing videofile: " << filename << endl
         << "Press any key to terminate" << endl;
    for (;;)
    {
        // check if we succeeded
        if (!cap.read(src)) {
            cerr << "ERROR! blank frame grabbed\n";
            break;
        }
        // encode the frame into the videofile stream
        writer.write(src);
        // show live and wait for a key with timeout long enough to show images
        imshow("Live", src);
        if (waitKey(5) >= 0)
            break;
    }
    // the videofile will be closed and released automatically in VideoWriter destructor
    return 0;
}
CV_<bit_depth>(S|U|F)C<number_of_channels> :
- bit_depth 位元數. 8bits, 16 bits, 32 bits, 64 bits .
- S|U|F
- S signed int
- U unsigned int
- F float
- C<number_of_channels> 所儲存的圖片的通道數。 For ex.,
- gray image uses single channel
- RGB image uses 3 channels
eg:8表示你所建立的儲存圖片的Mat物件中,每個畫素點在記憶體空間所佔的空間大小8 bits。
CHAPTER 3 Getting to Know OpenCV Data Types
OpenCV Data Types
It is convenient to divide the data types into three major categories
- the basic data types assembled directly from C++ primitives ( int , float , etc.)
- schar signed 1 byte integer
- uchar unsigned 1 byte integer
- short signed 2 byte integer
- ushort unsigned 2 byte integer
- int signed 4 byte integer
- uint unsigned 4 byte integer
- int64 signed 8 byte integer
- uint64 unsigned 8 byte integer
#define 	CV_CN_MAX   512 // max. no. of channels
#define 	CV_CN_SHIFT   3
#define 	CV_DEPTH_MAX   (1 << CV_CN_SHIFT)
#define 	CV_8U   0
#define 	CV_8S   1
#define 	CV_16U   2
#define 	CV_16S   3
#define 	CV_32S   4
#define 	CV_32F   5
#define 	CV_64F   6
#define 	CV_16F   7
#define 	CV_MAT_DEPTH_MASK   (CV_DEPTH_MAX - 1)                                           // 0b0111
#define 	CV_MAT_DEPTH(flags)   ((flags) & CV_MAT_DEPTH_MASK)                          // 0 ~ 7
#define 	CV_MAKETYPE(depth, cn)   (CV_MAT_DEPTH(depth) + (((cn)-1) << CV_CN_SHIFT))
#define 	CV_MAKE_TYPE   CV_MAKETYPE
STL has four components
- Algorithms Sorting, Searching, Important STL Algorithms, Useful Array algorithms, Partition Operations
- Containers vector, list, deque, arrays
- Functors A functor (or function object) is a C++ class that acts like a function.
- Iterators Iterators are used for working upon a sequence of values
Overview of the Basic Types
- cv::Vec< _Tp, cnt > Template class for short numerical vectors, a partial case of Matx. The most straightforward of the basic data types is the template class cv::Vec<> which we will refer to as the fixed vector classes.
There are aliases (typedef) for common instantiations of the cv::Vec<> template.
typedef Vec<uchar, 2> Vec2b;
typedef Vec<uchar, 3> Vec3b;
...
typedef Vec<short, 2> Vec2s;
...
typedef Vec<int, 2> Vec2i;
...
typedef Vec<float, 2> Vec2f;
...
typedef Vec<double, 6> Vec6d;
In general, anything of the form cv::Vec{2,3,4,6}{b,w,s,i,f,d} is valid.
Closely related to the fixed vector classes are the point classes.
The main difference between the point classes and the fixed vector classes is that their members are accessed by named variables ( mypoint.x , mypoint.y , etc.) rather than by a vector index ( myvec[0] , myvec[1] , etc.). The point classes are typically invoked via aliases:
cv::Point2i , cv::Point2f , and cv::Point2d
The point classes are typically invoked via aliases:
cv::Point3i , cv::Point3f , and cv::Point3d .
typedef Scalar_< double > cv::Scalarcv::Scalar is used because the image can be multi-channel. the white color is represented as:
cv::Scalar(255,255,255);
cv::Size is mainly distinguished by having data members width and height rather than x and y.
- Coordinates of the top-left corner. This is a default interpretation of Rect_::x and Rect_::y in OpenCV.
- Rectangle width and height. Rect_::height and Rect_::width.
typedef Rect_<double> cv::Rect2d
typedef Rect_<float> cv::Rect2f
typedef Rect_<int> cv::Rect2i
typedef Rect2i 	cv::Rect
Basic Types: Getting Down to Details
The point classes
These point classes are implemented based on a template structure, such that there can be points of any type. Operations supported directly by the point classes,
The cv::Scalar class
A cv::Scalar in OpenCV is (somewhat confusingly) an array of 4 numbers, approximately equivalent to a cv::Vec with 4 elements! Operations supported directly by cv::Scalar,
The size classes
Operations supported directly by the size classes,
typedef Size_<int> Size2i;
typedef Size2i Size;
typedef Size_<float> Size2f;
The cv::Rect class
The rectangle classes include the members x and y of the point class (representing the upper-left corner of the rectangle) and the members width and height of the size class (representing the rectangle’s size). Operations supported directly by cv::Rect,

The cv::RotatedRect class
A cv::RotatedRect is located in “space” relative to its center Operations supported directly by cv::RotatedRect,
The fixed matrix classes
The fixed matrix classes are for matrices whose dimensions are known at compile time.As a result, all memory for their data is allocated on the stack, operations on them are fast.
The fixed matrix classes are really a template called cv::Matx< > .
The basic form of such an alias is cv::Matx { 1 , 2 ,...}{ 1 , 2 ,...}{ f , d }, where the numbers can be any number from 1 to 6.
Operations supported by cv::Matx,


The fixed vector classes
The fixed vector template cv::Vec<> is a cv::Matx<> whose number of columns is one. The readily available aliases for specific instantiations of cv::Vec<> are of the form cv::Vec { 2 , 3 , 4 , 6 }{ b , s , w , i , f , d }. ( w indicates an unsigned short )Operations supported by cv::Vec,

The complex number classes
Operations supported by the OpenCV complex number classes,
Helper Objects
The cv::TermCriteria class
Many algorithms require a stopping condition to know when to quit.The class defining termination criteria for iterative algorithms.
The cv::TermCriteria objects have three member variables:
- type The variable type is set to either cv::TermCriteria::COUNT, TermCriteria::EPS or cv::TermCriteria::COUNT + cv::TermCriteria::EPS
- maxCount the maximum number of iterations/elements
- epsilon the desired accuracy
    double cc = findTransformECC (template_image, target_image, warp_matrix, warp_mode,
        TermCriteria (TermCriteria::COUNT+TermCriteria::EPS, number_of_iterations, termination_eps)
        );
The cv::Range class
The cv::Range class is used to specify a continuous sequence of integers.cv::Range( int start, int end )cv::Range rng( 0, 4 ) includes the values 0 , 1 , 2 , and 3 , but not 4 .
The number of elements in a range can be found using range.size().
The cv::Ptr< T > template and Garbage Collection 101
Template class for smart pointers with shared ownership.A Ptr< T > pretends to be a pointer to an object of type T.
Unlike an ordinary pointer, however, the object will be automatically cleaned up once all Ptr instances pointing to it are destroyed.
cv::Ptr is similar to std::shared_ptr from the C++11 standard.
cv::Ptr<Matx33f> p( new cv::Matx33f );
cv::Ptr<Matx33f> p = makePtr<cv::Matx33f>()
The cv::Exception class and exception handling
OpenCV defines its own exception type, cv::Exception , which is derived from the STL exception class std::exception .The cv::DataType<> template
Deprecated.The cv::InputArray and cv::OutputArray classes
This is the proxy class for passing read-only input arrays into OpenCV functions.It is defined as:
typedef const _InputArray& InputArray;When you see in the reference manual or in OpenCV source code a function that takes InputArray, it means that you can actually pass Mat, Matx, vector< T > etc.
Utility Functions
The OpenCV library also provides some specialized functions that can be used to more efficiently handle mathematical and other operations which arise commonly in computer vision applications.cv::alignPtr()
cv::alignSize()
cv::allocate()
cv::deallocate()
cv::fastAtan2()
cvCeil()
cv::cubeRoot()
cv::CV_Assert() and CV_DbgAssert()
cv::CV_Error() and CV_Error_()
cv::error()
cv::fastFree()
cv::fastMalloc()
cvFloor()
cv::format()
cv::getCPUTickCount()
cv::getNumThreads()
cv::getOptimalDFTSize()
cv::getThreadNum()
cv::getTickCount()
cv::getTickFrequency()
cvIsInf()
cvIsNaN()
cvRound()
cv::setNumThreads()
cv::setUseOptimized()
cv::useOptimized()
The Template Structures
OpenCV versions 2.1 and later are built on a template metaprogramming style similar to STL. When you instantiate an object of type cv::Point , you are actually instantiating an even more fundamental template object of type cv::Point_<int> . This template could have been instantiated with a different type than int , obviously. For example, you also could have used the STL complex type std::complex , which has nothing to do with OpenCV at all.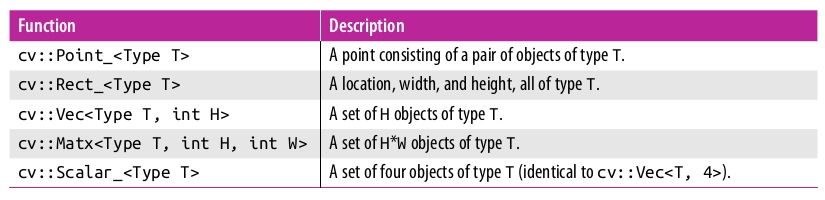
CHAPTER 4 Images and Large Array Types
Dynamic and Variable Storage
An array in which most of the values are non-zero is called a dense array. For every entry in the array, there is a data value stored in memory corresponding to that entry, even if that entry is zero. The alternative would be a sparse array. In the case of a sparse array, only nonzero entries are typically stored. A common case for using a sparse array rather than a dense array would be a histogram.The cv::Mat Class: N-Dimensional Dense Arrays
The cv::Mat class can be used for arrays of any number of dimensions. Public nember data,- flags includes several bit-fields:
- the magic signature
- continuity flag
- depth
- number of channels
- dims the matrix dimensionality, >= 2
- rows the number of rows
- cols the number of columns
- data pointer to the data
- step The memory layout in data is described by the array Mat::step[] .
In the simple case of a two-dimensional array,

Creating an Array
The type of an array determines what kind of elements it has. Valid types in this context specify both the fundamental type of element as well as the number of channels. All such types are defined in the library header, and have the form :
CV_{ 8U , 16S , 16U , 32S , 32F , 64F }C{ 1 , 2 , 3 }.
- Use CV_8UC1, ..., CV_64FC4 to create 1-4 channel matrices. For example, CV_32FC3 would imply a 32-bit floating-point three-channel array.
- Use CV_8UC(n), ..., CV_64FC(n) to create multi-channel matrices. n can be up to CV_CN_MAX(255) channels.


Accessing Array Elements Individually
The two primary options for accessing individual elements are to access them by location or through iteration. The basic means of direct access is the (template) member function at().The template methods return a reference to the specified array element.
  template<typename _Tp > _Tp& cv::Mat::at( int i0 = 0	)
  template<typename _Tp > _Tp& cv::Mat::at( int row, int col )
  template<typename _Tp > _Tp& cv::Mat::at( int i0, int i1, int i2 )
  template<typename _Tp > _Tp& cv::Mat::at( Point 	pt )
- i0 Index along the dimension 0
- i1 Index along the dimension 1
- i2 Index along the dimension 2
- row Index along the dimension 0
- col Index along the dimension 1
- pt Element position specified as Point(j,i) .
cv::Mat m = cv::Mat::eye( 10, 10, 32FC1 );
printf( "Element (3,3) is %f\n", m.at<float>(3,3) );
For a multichannel array, the best way to do this is to use a cv::Vec<> object to retrieve the returned referenve multi-channel element:
cv::Mat m = cv::Mat::eye( 10, 10, 32FC2 );
printf( "Element (3,3) is (%f,%f)\n", m.at<cv::Vec2f>(3,3)[0], m.at<cv::Vec2f>(3,3)[1] );
Variations of the at< >() accessor function:

uchar* cv::Mat::ptr	( int i0 = 0 )
uchar* cv::Mat::ptr	( int row, int col )
uchar* cv::Mat::ptr	( int i0, int i1, int 	i2 )
uchar* cv::Mat::ptr	( const int * idx	)

留言