Trusted Platform Module (TPM)
Trusted Platform Module
Overview
This is an oversimplified version of ALL THINGS that involve Trusted Computing.TPM Chip is just some kind of encrypted storage, that resides on the motherboard of computers that support Trusted Platform Environment, and have BIOSes prepared to handle it.
A TPM chip is a secure crypto-processor that helps you with actions such as generating, storing, and limiting the use of cryptographic keys. In practice a TPM can be used for various different security applications such as secure boot, key storage and random number generation.
TPM is naturally supported only on devices that have TPM hardware support.
There are two very different TPM specifications: 1.2 and 2.0,
- TPM 1.2 uses the "TrouSerS" TSS (TCG software stack) by IBM, which is packaged as trousersAUR (tcsd) and tpm-toolsAUR (userspace). All software access the TPM through the tcsd daemon.
- TPM 2.0 allows direct access via /dev/tpm0 (one client at a time), managed access through the tpm2-abrmd resource manager daemon, or kernel-managed access via /dev/tpmrm0.
There are two choices of userspace tools, tpm2-tools by Intel and ibm-tssAUR by IBM.
TPM 2.0 requires UEFI boot; BIOS or Legacy boot systems can only use TPM 1.2.
Checking support:
$ cat /sys/class/tpm/tpm0/device/description
TPM 2.0 Device
$ cat /sys/class/tpm/tpm0/tpm_version_major
2
TPM Software Stack
The Trusted Computing Group(TCG) has put together specifications for the various components that come together to create the TPM 2 Software Stack. There are multiple libraries that implement these specs to suit specific operating systems and architectures.

- TPM Device Driver The TPM device driver is an OS specific driver. It is responsible for establishing connection to the TPM and for reading from and writing to the TPM.
- TPM Command Transmission Interface (TCTI) The TCTI is an IPC abstraction layer used to send commands to and receive responses from the TPM (or the TAB/RM).
- System API (SAPI) The System API is a layer that provides access to all the functionality of a TPM 2.0 implementation.
- Extended System API (ESAPI) ESAPI is the layer on top of SAPI. This provides for enhanced context management and Cryptographic operations.
- Feature API (FAPI) The FAPI layer is on top of the ESAPI layer.
- TPM's Access Broker(TAB) and Resource Manager(RM). The access broker manages synchronization between the processes that use TPM simultaneously. The TAB is responsible for guaranteeing that a process using the TPM is able to proceed with the desired operation without any interference from any of the other simultanously TPM-accessinfg processes.
ESAPI provides an easier way to use the TPM.
FAPI provides a high-level interface including a policy definition language and key store.
A user would want to create keys without any knowledge of the underlying system. This is possible by using the FAPI layer of APIs.
The resource manager manages the TPM context in a fashion similar to the virtual memory manager. The TPM has a small memory capacity and is easily constrained by how many resources can be loaded simulatenously. The resource manager is responsible for swapping in and out of memory the various resources required by a process.
/dev/tpm0 is the direct path to the tpm hardware and at any given time, only a single process can access the tpm using this path.
/dev/tpmrm0 is used for resource manager. Using this multiple processes can use the tpm simultaneously.
The recent versions of kernel (starting from 4.12) have an in-kernal resource manager. The tpm2-abrmd is a system daemon that implements the TAB (TPM2 Access Broker) and resource manager specifications.
Using TPM 2.0
Linux TPM2 and TSS2 Software
TCG created a companion specification for a trusted software stack (TSS) to optimally function with the resource-limited TPM. The TSS specification partitions the stack into well-defined interfaces :- Feature API (FAPI) The specification is still in a draft form and work continues in this space for an implementation. The abstraction should profile common use cases and provide context management.
- Enhanced System API (ESAPI or ESYS) Provides cryptographic functions for sessions and session management.
- System API (SAPI) A one-to-one mapping of all the available TPM2 commands. While sufficient, it requires expert TPM knowledge for managing sessions, contexts, and cryptographic functions. Marshalling and unmarshalling of command and response buffers is also handled here.
- Trusted Access Broker and Resource Manager (TAB/RM) Enables the hardware TPM resource to be shared with multiple applications by serializing TPM access and automatically managing TPM state. There is a user-space dbus-based implementation (tabrmd) as well an in-kernel implementation (/dev/tpmrm0).
- TPM Command Transmission Interface (TCTI) Decouples the API generating the TPM command and responses from the transport mechanism.
- Trusted Device Driver (TDD) This is the primary device interface handling the command-response buffering, control registers and interface management. This is part of the mainline kernel tree in the character device driver category.
The one that is getting widespread adoption by distributions and Linux community at large is the tpm2-software project on GitHub. One of its notable features is that it follows the TCG guidelines on having well-defined interfaces for ESYS, SAPI, TAB/RM and the TCTI.
Following are the links for the tpm2-software projects:
- tpm2-tss
- tpm2-abrmd
- tpm2-tools
- tpm2-pkcs11
TPM Command Transmission Interface (TCTI)
The TCTI is the communication mechanism with the TPM.TCTIs can be changed for communication with TPMs across different mediums.
To control the TCTI, the tools respect:
- The command line option -T or --tcti
- The environment variable: TPM2TOOLS_TCTI.
The current known TCTIs are:
- tabrmd The resource manager, called tabrmd (https://github.com/tpm2-software/tpm2-abrmd).
- mssim Typically used for communicating to the TPM software simulator.
- device Used when talking directly to a TPM device file.
- none Do not initalize a connection with the TPM.
Note that tabrmd and abrmd as a tcti name are synonymous.
The tools will search for TCTIs in this ORDER and USE THE FIRST ONE FOUND:
- tabrmd
- device
- mssim
The TCTI arguments to either the command line option or the environment variable are in the form:
<tcti-name>:<tcti-option-config>For ex.,
- tabrmd
--tcti=tabrmd:bus_name=com.example.FooBar,bus_type=session
-T mssim:host=localhost,port=2321
-T device:/dev/tpm0
Trusted Platform Module Technology Overview
TPM fundamentals
The TPM is usually installed on the motherboard of a computer, and it communicates with the remainder of the system by using a hardware bus.Computers that incorporate a TPM can create cryptographic keys and encrypt them so that they can only be decrypted by the TPM. This process, often called wrapping or binding a key, can help protect the key from disclosure.
Each TPM has a master wrapping key, called the storage root key, which is stored within the TPM itself.
You can specify whether encryption keys that are created by the TPM can be migrated or not. If you specify that they can be migrated, the public and private portions of the key can be exposed to other components, software, processes, or users. If you specify that encryption keys cannot be migrated, the private portion of the key is never exposed outside the TPM.
Once the TPM plug-in module is installed, it is cryptographically bound to that specific system board.
Any attempt to remove an installed TPM plug-in module breaks the cryptographic binding, the removed TPM cannot be reinstalled or installed on another system board.
Understanding PCR banks on TPM 2.0 devices
A Platform Configuration Register (PCR) is a memory location in the TPM that has some unique properties.The size of the value that can be stored in a PCR is determined by the size of a digest generated by an associated hashing algorithm.
For ex., the size of a SHA-1 digest is 20 bytes, a SHA-1 PCR can store 20 bytes.
Multiple PCRs associated with the same hashing algorithm are referred to as a PCR bank.
To store a new value in a PCR, the existing value is extended with a new value as follows:
PCR[N] = HASH( PCR[N] || ArgumentOfExtend )The existing value is concatenated with the argument of the TPM Extend operation. The resulting concatenation is then used as input to the associated hashing algorithm, which computes a digest of the input. This computed digest becomes the new value of the PCR.
The TCG PC Client Platform TPM Profile Specification defines the inclusion of at least one PCR bank with 24 registers.
The only way to reset the first 16 PCRs is to reset the TPM itself. This restriction helps ensure that the value of those PCRs can only be modified via the TPM Extend operation.
Some TPM PCRs are used as checksums of log events.
The log events are extended in the TPM as the events occur.
Later, an auditor can validate the logs by computing the expected PCR values from the log and comparing them to the PCR values of the TPM.
Since the first 16 TPM PCRs cannot be modified arbitrarily, a match between an expected PCR value in that range and the actual TPM PCR value provides assurance of an unmodified log.
How does Windows use PCRs?
To bind the use of a TPM based key to a certain state of the PC, the key can be sealed to an expected set of PCR values.For instance, PCRs 0 through 7 have a well-defined value after the boot process – when the OS is loaded. When the hardware, firmware, or boot loader of the machine changes, the change can be detected in the PCR values. Windows uses this capability to make certain cryptographic keys only available at certain times during the boot process. For instance, the BitLocker key can be used at a certain point in the boot, but not before or after.
It is important to note that this binding to PCR values also includes the hashing algorithm used for the PCR.
For instance, a key can be bound to a specific value of the SHA-1 PCR[12], if using SHA-256 PCR banks, even with the same system configuration. Otherwise, the PCR values will not match.
What happens when PCR banks are switched?
When the PCR banks are switched, the algorithm used to compute the hashed values stored in the PCRs during extend operations is changed.Each hash algorithm will return a different cryptographic signature for the same inputs.
As a result, if the currently used PCR bank is switched all keys that have been bound to the previous PCR values will no longer work.
For example, if you had a key bound to the SHA-1 value of PCR[12] and subsequently changed the PCR banks to SHA-256, the banks wouldn’t match, and you would be unable to use that key.
The BitLocker key is secured using the PCR banks and Windows will not be able to unseal it if the PCR banks are switched while BitLocker is enabled.
For steps on how to switch PCR banks on your PC, you should contact your OEM or UEFI vendor.
How can I identify which PCR bank is being used?
A TPM can be configured to have multiple PCR banks active.When BIOS is performing measurements it will do so into all active PCR banks, depending on its capability to make these measurements.
BIOS may chose to deactivate PCR banks that it does not support or "cap" PCR banks that it does not support by extending a separator.
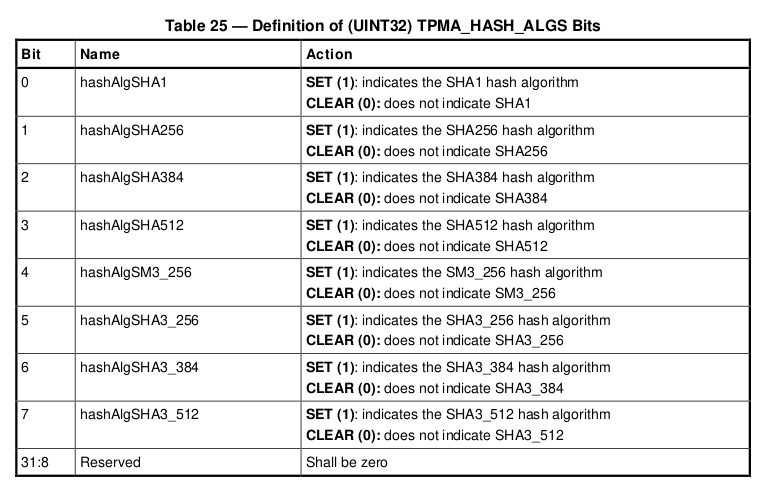
Which PCR banks are currently active should be interpreted as a bitmap for which the bits are defined in the TCG Algorithm Registry 6.10 Hash Algorithms Bit Field.
This table defines a bit field to concisely convey a set of hash algorithms.
- which PCR banks are active and supported by the BIOS
- if the measured boot log supports measurements for all active PCR banks.
Windows only uses one PCR bank to continue boot measurements.
All other active PCR banks will be extended with an event separator to indicate that they are not used by Windows and measurements that appear to be from Windows should not be trusted.
Decode Measured Boot logs to track PCR changes
The Measured Boot log is a trusted (resistant to spoofing and tampering) log of all boot components.By tracking changes in the PCRs, and identifying when they changed, you can gain insight into issues that occur or learn why a device or computer entered BitLocker recovery mode.
The Measured Boot logs record PCR changes and other information.
These logs are located in:
- Linux
- Windows C:\Windows\Logs\MeasuredBoot\
Canonical Event Log Format
Attestation is the process of reporting a platform’s operational state.During boot, the platform executes components that may impact the trustworthiness of its operational state.
To support Attestation, the identity or state of each of these components is recorded. This process is called Measurement.
When using the TPM , the measurement process uses the TPM’s Extend operation.
The TPM's Extend operation provides evidence of the integrity of a measurement.
A Measurement at a minimum performs an Event operation.
A particular Measurement, may, therefore, record information about the component being measured.
This type of measurement is called an Event Log Record.
The collection of the Event Log Records is an Event Log.
When a TPM PCR Extend operation is performed, an event log entry is recorded in a TPM Event log file.
The event log files are not maintained by the TPM.
Thus, the firmware(BIOS) must provide storage for the log files and provide interfaces to update the log files on PCR Extends and access the log files for attestation purposes.
The Event Log may be stored in insecure locations. Authenticity of the Event Log is performed using a Quote operation.
A Quote may be performed using the TPM2_PCR_Quote command but other methods are available such as a TPM2_PCR_Read within an Audit Session.
Unless otherwise stated, this specification will use the term Quote as a general operation to mean the general operation of proving a series of measurements that may use a key restricted by TPM Policies.
TPM Event Log in Linux
The preboot firmware maintains an event log that gets new entries every time something gets hashed by it to any of the PCR registers.The events are regregated by their type and contain the value of the hashed PCR register.
The PCR contents are used to provide the validation of the measurement log.
Before calling ExitBootServices() Linux EFI stub copies the event log to a custom configuration table defined by the stub itself.
Measured Boot, also referred to as Trusted Boot, is the process in which a system measures all boot components(BIOS, bootloader, or the OS kernel.) consecutively after the system is powered on.
Measurements are recorded in one or more event logs and represent hashes of software binaries and files, generated using a cryptographic hash function, such as SHA256.
Along with the hash of a component, an identifier is recorded in the event log, e. g. "UEFI", "Option ROM", or "Bootloader", which enables the log to be auditable at a later point.
Each measurement that's pushed to the TPM is accompanied by a new entry in the event log, containing not only the hash that was pushed to the TPM but also metadata that tells us what was measured and why.
Since the algorithm the TPM uses to calculate the hash values is known, we can replay the same values from the event log and verify that we end up with the same final value that's in the TPM. We can then examine the event log to see what changed.
A measurement hash is extended to PCR inside the TPM.
A PCR realises a folding hash function internally and allows only to extend it, i. e. it is not possible to delete the PCR or set it to an arbitrary value.
The measurement process is implemented as follows:
- execute main logic of component
- measure next component in the boot chain
- append measurement to the event log
- anchor log entry in the TPM
- activate next component
Integrity Measurement Architecture (IMA)
IMA is part of the Linux Security Modules (LSM) subsystem and extends the principles of Measured Boot and Secure Boot into the Linux OS.IMA provides two mechanisms:
- Appraisal This extends the principle of Secure Boot into the OS and its applications.
- Measurement This extends Measured Boot into the OS.
- ascii_runtime_measurements With the standard template ima-ng, the columns are:
Known good hash values of each file are put into the extended file attributes. IMA uses these values to compare them against actual measurements of a file.
IMA maintains an ordered list of hash values in the kernel, the Stored Measurement Log (SML), for all files measured since the OS took over control.
IMA provides the SML in both ASCII and binary representations in /sys/kernel/security/ima/:
TPM PCR   template hash    name of the used IMA template  hash of the file content    file
10        7...e            ima-ng                          sha256:e...c               boot_aggregate
- tcb measures kernel modules, executed software, files which are loaded into memory for execution with mmap, and files opened for reading by the root user.
- appraise_tcb appraises in place, instead of only measures, the same components as the tcb policy. It denies access if files do not match their known good hash.
- secure_boot appraises only the kernel, its modules, and the IMA policies.
Platform Configuration Registers
Platform Configuration Registers (PCRs) is to provide a method to cryptographically record (measure) software state: both the software running state on a platform and configuration data used by that software.The PCR update calculation, called an extend, is a one-way hash so that measurements can't be removed. These PCRs can then be read to report their state.
TPM PCRs just record values.
A TPM implements a number of PCRs: for example, 24 for a PC TPM.
A PCR value is changed through what the TPM calls an extend operation as follows:
PCR new value = Digest of ( PCR old value || data to extend )In words, it takes the old PCR value and concatenates some data to be extended.
The TPM digests the result of the concatenation and stores the resulting digest as the new PCR value.
The net result is that the PCR value represents the history of all measurements extended into it. Because of the one-way nature of a secure digest, there is no way to undo a measurement (to extend the PCR back to a desired value).
tpm2-tss
OSS implementation of the TCG TPM2 Software Stack (TSS2).Installation
Install packages directly,$ sudo apt install libtss2-dev libtss2-esys0Or, install from the source code,
$ sudo apt -y install   autoconf-archive   libcmocka0   libcmocka-dev   procps   iproute2   build-essential   git   pkg-config   gcc   libtool   automake   libssl-dev   uthash-dev   autoconf   doxygen   libjson-c-dev   libini-config-dev
$ git clone https://github.com/tpm2-software/tpm2-tss
To configure the tpm2-tss source code first run the bootstrap script, which generates list of source files, and creates the configure script:
$ ./bootstrapConfiguring the Build,
$ ./configure --with-udevrulesdir=/etc/udev/rules.d --with-udevrulesprefix=70-
- --with-udevrulesdir The user account that's running the tpm2-abrmd needs to have both read and write access to the TPM device node /dev/tpm[0-9].
- --with-udevrulesprefix This allows for the rules to be applied in a predictable order.
This requires that udev be instructed to set the owner and group for this device node when its created.
Using Debian as an example we can instruct the build to install the udev rules in the right location as the above usage.
$ make -j$(nproc)Once you've built the tpm2-tss software it can be installed with:
$ sudo make installYou'll need to instruct udev to reload its rules and apply the new rule.
$ sudo udevadm control --reload-rules && sudo udevadm triggerAfter successful installation a standalone application using ESAPI can be compiled as follows:
$ gcc standalone-example.c -L=/usr/local/lib/ -ltss2-esys -o standalone-examplestandalone-example.c:
#include <stdlib.h>
#include <stdio.h>
#include <tss2/tss2_esys.h>

int main() {

    TSS2_RC r;

    /* Initialize the ESAPI context */
    ESYS_CONTEXT *ctx;
    r = Esys_Initialize(&ctx, NULL, NULL);

        if (r != TSS2_RC_SUCCESS){
        printf("\nError: Esys_Initializen\n");
        exit(1);
    }

    /* Get random data */
    TPM2B_DIGEST *random_bytes;
    r = Esys_GetRandom(ctx, ESYS_TR_NONE, ESYS_TR_NONE, ESYS_TR_NONE, 20,
                       &random_bytes);

    if (r != TSS2_RC_SUCCESS){
        printf("\nError: Esys_GetRandom\n");
        exit(1);
    }

    printf("\n");
    for (int i = 0; i < random_bytes->size; i++) {
        printf("0x%x ", random_bytes->buffer[i]);
    }
    printf("\n");
    exit(0);
}
tpm2-tools
The source repository for the Trusted Platform Module (TPM2.0) tools.This TPM (Trusted Platform Module) 2.0 tools is based on tpm2-tss.
Installation
$ sudo apt install tpm2-toolsIt may be necessary to run ldconfig (as root) to update the run-time bindings before executing a program that links against libsapi or a TCTI library:
$ sudo ldconfig
tpm2_pcrread
Displays PCR values.Without any arguments, tpm2_pcrread outputs all PCRs and their hash banks.
One can specify the hash algorithm or a PCR list as an argument to filter the output.
For ex.,
- Display all PCR values for the supported PCR bank algorithms
$ tpm2_pcrread
$ tpm2_pcrread sha1
$ tpm2_pcrread sha1:0+sha256:0
sha1 :
  0  : 0000000000000000000000000000000000000003
sha256 :
  0  : 0000000000000000000000000000000000000000000000000000000000000003
Output is written in a YAML format to stdout, with each algorithm followed by a PCR index and its value.
tpm2_getcap
Display TPM capabilities in a human readable form.tpm2_getcap [OPTIONS] [CAPABILITY]Currently supported capability groups are:
- algorithms Display data about supported algorithms.
$ sudo tpm2_getcap algorithms | grep -i AES
aes:
rsaes:
This command is used to check what TPM chip is used on the system.
tpm2_testparms
Verify that specified algorithm suite is supported by TPM.There are two major algorithm specification string classes, simple and complex.
- Simple specifiers
- Asymmetric rsa,ecc
- Symmetric aes,camellia
- Hashing Algorithms sha1,sha256,sha384,sha512,sm3_256,sha3_256,sha3_384,sha3_512
- Keyed Hash hmac,xor
- Signing Schemes rsassa,rsapss,ecdsa,ecdaa,ecschnorr
- Asymmetric Encryption Schemes oaep,rsaes,ecdh
- Modes ctr,ofb,cbc,cfb,ecb
- Misc null
- Complex Specifiers
<type>:<scheme>:<symmetric-details>
- type aes,aes128<mode>,aes192<mode>,aes256<mode>,ecc,ecc192,ecc224,ecc256,ecc384,ecc521,rsa,rsa1024,rsa2048,rsa4096
- scheme Schemes are usually Signing Schemes or Asymmetric Encryption Schemes.
- symmetric-details This field is optional, and defaults based on the type of object being created and it's attributes. Generally, any valid Symmet- ric specifier from the Type Specifiers list should work. If not specified, an asymmetric objects symmetric details defaults to aes128cfb.
This is an optional field and can be skipped.
- 0 Success.
- 1 General non-specific error.
- 2 Options handling error.
- 3 Authentication error.
- 4 TCTI related error.
- 5 Non supported scheme.
Applicable to tpm2_testparams.
- Check whether if "rsa" is supported
$ sudo tpm2_testparms aes
WARNING:esys:src/tss2-esys/api/Esys_TestParms.c:269:Esys_TestParms_Finish() Received TPM Error
ERROR:esys:src/tss2-esys/api/Esys_TestParms.c:95:Esys_TestParms() Esys Finish ErrorCode (0x000001c9)
ERROR: Specified symmetric mode unsupported
ERROR: Unable to run tpm2_testparms
$ echo $?
5
$ tpm2_testparms ecc256:ecdsa:aes128ctr
$ echo $?
0
Use Case: Linux Unified Key Setup (LUKS) disk encryption
Disk encryption prevents storage devices from being mounted without authorization.An encrypted volume that is automatically mounted without user intervention will offer no protection.
Many LUKS implementations interactively prompt for the passphrase.
Many Internet of Things (IoT) and embedded scenarios lack of a human at a keyboard.
A method is needed to encrypt the passphrase or key until it is needed at runtime(after the user log in) to decrypt the volume .
The improved solution has two steps:
- Seal the passphrase or key file into the TPM.
- Unseal the secret in memory and pass it to cryptsetup.
Unprotected file system
Set up a disk image file without encryption:$ dd if=/dev/zero of=plain.disk bs=1M count=10 ... 10485760 bytes (10 MB, 10 MiB) copied, 0.00642172 s, 1.6 GB/s $ mkfs.ext4 plain.disk mke2fs 1.45.5 (07-Jan-2020) ... Writing superblocks and filesystem accounting information: doneWrite some content:
$ mkdir mountpoint
$ sudo mount plain.disk mountpoint
$ cd mountpoint
$ sudo vi plain.txt
$ cd ..
$ sudo umount mountpoint
At this point we have a disk with a file plain.txt, the file system is not mounted by the operating system.
The content of the file in the disk is not protected.
The following command will disclose the file name and content on the disk:
$ strings plain.disk
...
/home/jerry/test/tpm/mountpoint
secure content
LUKS with on-disk plain text passphrase
LUKS-encrypted disk volumes can be automatically mounted, and the encryption passphrase can be supplied interactively (default) and or specified as key file (command line argument).The user-space utility cryptsetup aids creating and managing LUKS volumes.
$ sudo apt install cryptsetup-bin
- Prepare a key file It can be random data or something specific
$ dd if=/dev/urandom of=disk.key bs=1 count=32
$ dd if=/dev/zero of=enc.disk bs=1M count=20
The disk's size must be > 16 MB or the error happens: "Requested offset is beyond real size of device"
The loop device is a pseudo-device that makes a file accessible as a block device.
Find the next unused loopback device and associate loop devices with the disk file:
$  losetup -f
/dev/loop22
$ sudo losetup /dev/loop22 enc.disk
$ sudo cryptsetup --key-file=disk.key luksFormat /dev/loop22

WARNING!
========
This will overwrite data on /dev/loop22 irrevocably.

Are you sure? (Type uppercase yes): YES
it will have successfully converted your partition into an encrypted LUKS volume. At this point you have set up the LUKS volume.
- Open the volume onto the device mapper
$ sudo cryptsetup --key-file=disk.key open /dev/loop22 enc_volume
$ sudo mkfs.ext4 -j /dev/mapper/enc_volume
$ sudo mount /dev/mapper/enc_volume mountpoint
Create a plain text file again, and unmount the volume:
$ cd mountpoint
$ sudo vi plain.txt
$ cd ..
$ sudo umount mountpoint
$ sudo cryptsetup remove enc_volume
$ sudo losetup -d /dev/loop22
Observe that the sensitive data is no longer visible in the (encrypted) disk image:
$ strings enc.disk| grep -i plain
LUKS with passphrase stored in TPM
A method is needed to encrypt the passphrase or key until it is needed at runtime to decrypt the volume.This method has two steps.
Seal the passphrase or key file into the TPM.
Create and persist a sealing object then use it to seal a random byte sequence as the disk key:$ sudo tpm2_createprimary --hierarchy=o --key-context=prim.ctx -T device:/dev/tpmrm0 $ dd if=/dev/urandom bs=1 count=32 status=none | sudo tpm2_create --hash-algorithm=sha256 --public=seal.pub --private=seal.priv --sealing-input=- --parent-context=prim.ctx -T device:/dev/tpmrm0 name-alg: value: sha256 raw: 0xb attributes: value: fixedtpm|fixedparent|userwithauth raw: 0x52 type: value: keyedhash raw: 0x8 algorithm: value: null raw: 0x10 keyedhash: 6632ceb33626e24b012b5db7fa124e150b03fe192d9904eb910c8a2268155c77 $ sudo tpm2_load --parent-context=prim.ctx --public=seal.pub --private=seal.priv --name=seal.name --key-context=seal.ctx -T device:/dev/tpmrm0 $ sudo tpm2_evictcontrol --hierarchy=o --object-context=seal.ctx -T device:/dev/tpmrm0 persistent-handle: 0x81000000 action: persisted
- tpm2_createprimary This command is used to create a primary object under one of the hierarchies: Owner, Platform, Endorsement, NULL.
- --hierarchy Defaults to TPM_RH_OWNER, when no value specified. Supported options are:
- o for TPM_RH_OWNER
- p for TPM_RH_PLATFORM
- e for TPM_RH_ENDORSEMENT
- n for TPM_RH_NULL
- --key-context The file path to save the object context of the generated primary object.
- tpm2_create Create a child object.
- --sealing-input The data file to be sealed, optional.
- --public The output file which contains the public portion of the created object, optional.
- --private The output file which contains the sensitive portion of the created object, optional.
- tpm2_load Load both the private and public portions of an object into the TPM.
- --parent-context=OBJECT The parent object.
- --public=FILE A file containing the public portion of the object.
- --private=FILE A file containing the sensitive portion of the object.
- --name= An optional file to save the name structure of the object.
- --key-context=FILE The file name of the saved object context, required.
- tpm2_evictcontrol
The command will create and load a Primary Object.
The sensitive and public portions are not returned.
A context file for the created object's handle is saved as a file for future interactions with the created primary.
The object can either be a key or a sealing object.
A sealing object allows to seal user data to the TPM, with a maximum size of 256 bytes.
If file is -, read from stdin.
tpm2_evictcontrol [OPTIONS] [ARGUMENT]Allows a transient object to be made persistent or a persistent object to be evicted.
- --object-context=OBJECT A context object specifier of a transient or persistent object.
- If OBJECT is a transient object it will be persisted, either to the handle specified by the argument or to first available vacant persistent handle.
- If the OBJECT is for a persistent object, then the object will be evicted from non-volatile memory.
- ARGUMENT This specifies the persistent handle to save the transient object to.
Unseal the secret in memory and pass it to cryptsetup to open the encrypted volume.
Install the new key to replace the old one, and use it to encrypt the disk.Then, delete the old key created previously:
$ sudo tpm2_unseal --object-context=0x81000000 -T device:/dev/tpmrm0 | sudo cryptsetup --key-file=disk.key luksChangeKey enc.disk
$ rm -f disk.key
tpm2_unseal returns a data blob in a loaded TPM object.
The data blob is returned in clear. The data is sealed at the time of the object creation using the tpm2_create tool.
- --object-context=OBJECT Object context for the loaded object.
- file path the file is loaded as a restored TPM transient object.
- owner: the owner hierarchy
- platform: the platform hierarchy
- endorsement: the endorsement hierarchy
- lockout: the lockout control persistent object
- a handle, e.g. 0x81010013
- --auth=AUTH Optional auth value to use for the key specified by --object-context=OBJECT.
- --output=FILE Output file name containing the unsealed data. Defaults to STDOUT if not specified.
The type of a context object is determined by the OBJECT:
Mount the volume with the new key sealed in the TPM:
$ sudo losetup /dev/loop31 enc.disk
$ tpm2_unseal --object-context=0x81000000 | sudo cryptsetup --key-file=- luksOpen /dev/loop31 enc_volume
$ sudo mount /dev/mapper/enc_volume mountpoint
Verify that the disk access is granted with the new secret:
$ ls mountpoint
lost+found  plain.txt
$ cat mountpoint/plain.txt
HI am
encrypted
Unmount the disk:
sudo umount mountpoint
sudo cryptsetup remove enc_volume
sudo losetup -d /dev/loop31
This improved solution will protect against offline attacks through cloning or physical theft of the encrypted disk.
But, if the secret needed to decrypt the LUKS volume is stole, the attacker can decrypt the disk using the same procedure.
This can be achieved with a TPM and its platform configuration register (PCR) sealing provision.
LUKS with passphrase sealed to TPM PCRs
A Platform Configuration Register (PCR) is a memory location in the TPM that has some unique properties.The size of the value that can be stored in a PCR is determined by the size of a digest generated by an associated hashing algorithm:
- A SHA-1 PCR can store 20 bytes the size of a SHA-1 digest.
- Multiple PCRs associated with the same hashing algorithm are referred to as a PCR bank.
PCR[N] = HASHalg( PCR[N] || ArgumentOfExtend )
- The existing value is concatenated with the argument of the TPM Extend operation.
- The resulting concatenation is then used as input to the associated hashing algorithm, which computes a digest of the input.
- This computed digest becomes the new value of the PCR.
Effective use of TPM PCRs requires the cooperation of:
- the system firmware
- boot loaders
- operating system kernel
- applications
TPM PCRs are used to measure boot SW components using a secure hash algorithm such as SHA-256.
- The TPM PCRs default to a zero value when the system is reset. To reset the TPM in the Linux:
echo 5 > /sys/class/tpm/tpm0/ppi/request
It is impossible to set a PCR to a user-specified value and also impossible to "take back".
The TCG PC Client Specific Implementation Specification for Conventional BIOS only specifies usage of PCRs 0-7, 16, and 23.
PCR0, for example, contains measurements of the system firmware and BIOS.
PCR usage during and after operating system boot is operating system specific.
Create a PCR policy with current value of PCR0 in the sha256 bank:
# tpm2_startauthsession --session=session.ctx -T device:/dev/tpmrm0
# tpm2_policypcr -Q --session=session.ctx --pcr-list="sha256:0" --policy=pcr0.sha256.policy -T device:/dev/tpmrm0
# tpm2_flushcontext session.ctx -T device:/dev/tpmrm0
- tpm2_startauthsession Starts a session with the TPM. The default is to start a trial session.
- --session=FILE The name of the policy session file, required.
- --policy-session Default without this option is TPM_SE_TRIAL.
- A trial session is used when building a policy
- A policy session is used when authenticating with a policy.
- --hash-algorithm=ALGORITHM
- --key-context=OBJECT
- tpm2_policypcr Create a policy that includes specific PCR values.
- --session=FILE The policy session file generated via tpm2_startauthsession
- --pcr-list=PCR The list of PCR banks and selected PCRs' ids for each bank.
- --policy=FILE File to save the policy digest.
- tpm2_flushcontext Remove a specified handle, or all contexts associated with a transient object, loaded session or saved session from the TPM.
- The handle of the object to be flushed from the TPM. Must be a valid handle number.
- Flush a session via a session file. A session file is generated from tpm2_startauthsession()'s -S option.
It saves the policy session data to a file. This file can then be used in subsequent tools that can use a policy file for authorization or policy events.
Start a policy session of type TPM_SE_POLICY.
The object to be flushed is specified as the first argument to the tool and is in one of the following forms:
# tpm2_unseal --object-context=0x81000000 -T device:/dev/tpmrm0 | tpm2_create -Q --hash-algorithm=sha256 --public=pcr_seal_key.pub --private=pcr_seal_key.priv --sealing-input=- --parent-context=prim.ctx --policy=pcr0.sha256.policy -T device:/dev/tpmrm0
# tpm2_evictcontrol --hierarchy=o --object-context=0x81000000 -T device:/dev/tpmrm0
# tpm2_load -Q --parent-context=prim.ctx --public=pcr_seal_key.pub --private=pcr_seal_key.priv --name=pcr_seal_key.name --key-context=pcr_seal_key.ctx -T device:/dev/tpmrm0
# tpm2_evictcontrol --hierarchy=o --object-context=pcr_seal_key.ctx 0x81000000 -T device:/dev/tpmrm0
persistent-handle: 0x81000000
action: persisted
Now, try to mount the encrypted disk again.
This time, the secret is sealed inside a TPM object whose unsealing operation can only be accessed by satisfying the PCR policy.
The PCR values reflect the authenticated state of the system software.
$ losetup -f
/dev/loop24
$ sudo losetup /dev/loop24 enc.disk
$ sudo tpm2_startauthsession --policy-session --session=session.ctx -T device:/dev/tpmrm0
$ sudo tpm2_policypcr -Q --session=session.ctx --pcr-list="sha256:0" --policy=pcr0.sha256.policy -T device:/dev/tpmrm0
Make a copy of the unsealed secret:
$ sudo tpm2_unseal --auth=session:session.ctx --object-context=0x81000000 > disk_secret.bkupMount the volume with the unsealed secret:
$ sudo cat disk_secret.bkup | sudo cryptsetup --key-file=- luksOpen /dev/loop24 enc_volume
$ sudo mount /dev/mapper/enc_volume mountpoint/
$ ls mountpoint/
Remove the saved session,
$ sudo tpm2_flushcontext session.ctx -T device:/dev/tpmrm0PCR0 can be extended to prevent further unsealing.
After PCR0 is extended, PCR0 will hold a different value. This will cause a failed policy check and thus a failed unsealing attempt.
tpm2_pcrread can list PCR values:
tpm2_pcrread [OPTIONS] PCR_LIST_OR_ALGWithout any arguments, tpm2_pcrread outputs all PCRs and their hash banks.
One can use specify the hash algorithm or a pcr list as an argument to filter the output.
Look at the PCR state :
- before extending PCR0
$ sudo tpm2_pcrread sha256:0 -T device:/dev/tpmrm0
sha256:
  0 : 0x873DF7519ED810124F5D466913771664A6ED763BC7316357DBB1BE419BCFE260
$ sudo tpm2_pcrextend 0:sha256=0000000000000000000000000000000000000000000000000000000000000000 -T device:/dev/tpmrm0
$ sudo tpm2_pcrread sha256:0 -T device:/dev/tpmrm0 -T
sha256:
  0 : 0x84BF64360969DC6C078FC8BF51261CC9E37FB8E6AD3D79288C17758F6FD537CA
Now, try to unseal the sealed secret with the dirty(old) PCR files:
$ sudo tpm2_startauthsession --policy-session --session=session.ctx -T device:/dev/tpmrm0
$ sudo tpm2_policypcr -Q --session=session.ctx --pcr-list="sha256:0" --policy=pcr0.sha256.policy -T device:/dev/tpmrm0
$ sudo tpm2_unseal --auth=session:session.ctx --object-context=0x81000000 -T device:/dev/tpmrm0
WARNING:esys:src/tss2-esys/api/Esys_Unseal.c:291:Esys_Unseal_Finish() Received TPM Error
ERROR:esys:src/tss2-esys/api/Esys_Unseal.c:98:Esys_Unseal() Esys Finish ErrorCode (0x0000099d)
ERROR: Esys_Unseal(0x99D) - tpm:session(1):a policy check failed
ERROR: Unable to run tpm2_unseal
$ sudo tpm2_flushcontext session.ctx
tpm2_pcrextend can extend a PCR.To store a new value in a PCR, the PCR's existing value is extended with that new value.
tpm2_pcrextend [OPTIONS] PCR_DIGEST_SPEC
A PCR_DIGEST_SPEC is defined as follows:
- A numerical PCR identifier
- A colon followed by the algorithm hash specification For ex., extend PCR 4's SHA1 bank with the hash of a firmware:
tpm2_pcrextend 4:sha1=f1d2d2f924e986ac86fdf7b36c94bcdf32beec15
Unmount the disk:
$ sudo umount mountpoint
$ sudo cryptsetup remove enc_volume
$ sudo losetup -d /dev/loop24
LUKS with passphrase protected by authorized PCR policy
Configuring Secure Boot + TPM 2
TPM2 and Linux
TPM2 is radically different from its predecessor TPM1.2; so different, in fact, that none of the existing TPM1.2 software on Linux (trousers, the libtpm.so plug in for openssl, even my gnome keyring enhancements) will work with TPM2.What are the Main 1.2 vs 2.0 Differences?
The big one is termed Algorithm Agility.TPM1.2 had SHA1 and RSA2048 only.
TPM2 is designed to have many possible algorithms, including support for elliptic curve and a host of government mandated (Russian and Chinese) crypto systems.
There’s no requirement for any shipping TPM2 to support any particular algorithms, so you actually have to ask your TPM what it supports.
The bedrock for TPM2 in the West seems to be :
- RSA1024-2048, ECC and AES for crypto
- SHA1 and SHA256 for hashes
What algorithm agility means is that you can no longer have root keys (EK and SRK see here for details) like TPM1.2 did.
TPM2 has primary “seeds” and a Key Derivation Function (KDF).
A seed is simply a long string of random numbers, but it is used as input to the KDF along with the key parameters and the algorithm and out pops a real key based on the seed.
If you input the same algorithm and the same parameters you get the same key again.
There are four primary seeds in the TPM2
Playing with TPM2 Simulator
If there is no physical TPM2 based system, you can still play along, but you need a TPM2 emulator.The best one is here: This project "IBM's Software TPM 2.0" is an implementation of the TCG TPM 2.0 specification. It is based on the TPM specification Parts 3 and 4 source code donated by Microsoft, with additional files to complete the implementation.
Simply download and untar it then type make in the src directory:
$ gunzip ibmtpm1637.tar.gz
$ tar xvf ibmtpm1637.tar
$ cd src
$ make
then, run it as
./tpm_serverIt listens on two TCP ports, 2321 and 2322, it can be run directly from the source directory.
After that, you need the interface software :
- tpm2-tools Use the command line option:
-T mssim:host=localhost,port=2321
Or set the environment:
export TPM2TOOLS_TCTI="mssim:host=localhost,port=2321"
If you see "out of memory for object contexts", do the following:
$ tpm2_flushcontext -t -T mssim:host=localhost,port=2321
$ export TPM_INTERFACE_TYPE=socsim
The next thing you need to do for running the simulator is to power it on and start it up (for a real device, this is done by the bios).To run tss2's commands for starting this IBM's simulator:
$ tsspowerup
$ tssstartup
Trusted and Encrypted Keys
Trusted Keys and Encrypted Keys are two new key types added to the existing kernel key ring service:- Both types are variable length symmetric keys, and in both cases all keys are created in the kernel, and user space sees, stores, and loads only encrypted blobs
- Trusted Keys require the availability of a Trusted Platform Module (TPM) chip for greater security
- Encrypted Keys can be used on any system
- All user level blobs, are displayed and loaded in hex ascii for convenience, and are integrity verified.
To create a primary storage key (the SRK) and make it persistent
This key is available after reboot.- tpm2-tools
$ tpm2_createprimary --hierarchy o -G rsa2048 -c key.ctxt -T mssim:host=localhost,port=2321
[...]
$ tpm2_evictcontrol -c key.ctxt 0x81000001
persistentHandle: 0x81000001
$ time tsscreateprimary -hi o -st -rsa
Handle 80000000

real	0m0.048s
user	0m0.006s
sys	0m0.003s
$ tssevictcontrol -hi o -ho 80000000 -hp 81000001
- tsscreateprimary
- tssevictcontrol
To store this permanently under a well known key handle and get rid of the temporary copy
- tpm2-tools
- tss2
$ tssevictcontrol -hi o -ho 80000000 -hp 81000001
$ tssflushcontext -ha 80000000
- tssevictcontrol tells the TPM to copy the key at transient handle 800000004 to permanent NV handle 81000001
- tssflushcontext erases the transient key Flushing transient objects is very important, because TPM2 has a lot less transient storage space than TPM1.2 did.
The maximum capacity of the device is limited only by the amount of the NV memory in the chip, the spec defines some minimums in order to ensure proper operation.
You can tell how much they are by doing,
$ tssgetcapability -cap 6|grep -i _MIN
TPM_PT 0000010e value 00000003 TPM_PT_HR_TRANSIENT_MIN - the minimum number of transient objects that can be held in TPM RAM
TPM_PT 0000010f value 00000007 TPM_PT_HR_PERSISTENT_MIN - the minimum number of persistent objects that can be held in TPM NV memory
TPM_PT 00000110 value 00000003 TPM_PT_HR_LOADED_MIN - the minimum number of authorization sessions that can be held in TPM RAM
TPM_PT 00000113 value 00000003 TPM_PT_PCR_SELECT_MIN - the minimum number of octets in a TPMS_PCR_SELECT.sizeOfSelect
===
The final step in taking ownership of a TPM2 is to set the authorization passwords.
Each of the four hierarchies (Null, Owner, Endorsement, Platform) and the Lockout has a possible authority password.
- The Platform authority is cleared on startup, so there’s not much point setting it (it’s used by the BIOS or Firmware to perform TPM functions).
- Of the other four, you really only need to set Owner, Endorsement and Lockout
$ tsshierarchychangeauth -hi l -pwdn lee123
$ tsshierarchychangeauth -hi e -pwdn lee123
$ tsshierarchychangeauth -hi o -pwdn lee123
===
If you have a real TPM2 device you set it to "dev"
All your users connect directly to the TPM2 device /dev/tpm0.
To do this, the device has to support read and write by arbitrary users, so its permissions need to be 0666.
The following udev script can be added to achieve this, /etc/udev/rules.d/80-tpm-2.rules
# tpm 2 devices need to be world readable
SUBSYSTEM=="tpm", ACTION=="add", MODE="0666"
You can use TPM2 as a keystore.
To convert from a password protected openssh RSA key to a TPM2 based one,
create_tpm2_key -a -p 81000001 -w id_rsa id_rsa.tpm
How To Use the TPM to Secure Your IoT/Device Data

The TPM can take measurements against the system it's installed on and these measurements are stored on the PCR (Platform Configuration Registers).
A TPM chip is a secure crypto-processor that is designed to carry out cryptographic operations.
The most common TPM functions are used for:
- system integrity measurements During the boot process of a system, the boot code that is loaded can be measured and recorded in the TPM.
- key creation and use Certificates can be installed or created on computers that are using the TPM. After a computer is provisioned, the RSA private key for a certificate is bound to the TPM and cannot be exported.
Install TPM Tools
$ sudo apt install tpm2-tools
Generate GPG Keys
Gnerate a new key pair:$ gpg --generate-keyThe keys themselves are stored in GPG's database locally. We can get a list of public keys stored locally by running:
$ gpg --list-keys --keyid-format short
/home/jerry/.gnupg/pubring.kbx
------------------------------
pub   rsa3072/12345678 2021-02-01 [SC] [expires: 2023-02-01]
      91EC3D73313498352BBDFA5846427E4F12345678
uid         [ultimate] Jerry Lee <junye.lee@gmail.com>
sub   rsa3072/40E8BA65 2021-02-01 [E] [expires: 2023-02-01]
My short Key ID is 12345678.To export the private key:
$ gpg --export-secret-keys -a 12345678 > privateKey.ascTo export the public key:
$ gpg --armor --export -a 12345678 > public.keyThe --armor command makes the key ASCII and readable instead of binary.
Test the keys:
- Let's create a file to encrypt
$ echo 'Hello World!' > file.txt
$ gpg --encrypt --recipient 'junye.lee@gmail.com' file.txt
    $ gpg --decrypt file.txt.gpg
gpg: encrypted with 3072-bit RSA key, ID 6A8A484C40E8BA65, created 2021-02-01
      "Jerry Lee <jerry.lee@google.com>"
Hello World!
The TPM is very slow for cryptographic functions so we only encrypt (also called sealing) the private key of another key pair.To seal the private key, encrypt this privateKey.asc with PCR's 0 and 7 :
$ tpm_sealdata --infile privateKey.asc --outfile keyblob --pcr 0 --pcr 7The output of sealing the private key will be a TPM keyblob. This is your encrypted private key.
To unseal the encrypted private key,
$ tpm_unsealdata --infile keyblob --outfile unsealedPrivateKey.keyLet's do a hash to see if they're the same:
$ sha256sum privateKey.asc
$ sha256sum unsealedPrivateKey.key
Security: IntegrityMeasurement/Using TPM
What is TPM?
TPM stores cryptographic keys and other sensitive data in its internal, shielded memory, and provides ways to platform software to use those keys to achive security goals.TPM must support a minimum set of algorithms:
- RSA
- SHA-1
- HMAC
- asymmetric key generation (RSA)
- asymmetric enycryption/decryption (RSA)
- hashing (SHA-1)
- Random number generation (RNG)
- The signature is signed by other entities
- TPM use the RSA algorithm for signature operations
The TPM is only a generator, storage device and protector of symmetric keys.
Each TPM consits of a minimum 16, a 160-bit Platform Configuration Register (PCR) which are storage locations for integrity measurements.
A large number of integrity metrics may be measured in a platform, and a particular integrity metric may change with time and a new value may need to be stored.
The PCR is designed to hold an unlimited number of measurements by using a cryptographic hash and hashing all updates to a PCR:
PCRi New = HASH ( PCRi Old value || value to add)Some of these registers are set to known values during the boot up process, for example, a PCR might contain the hash of a boot loader in PCR before it is run.
Each TPM has a unique public/private key pair called the endorsement key (EK), set at manufacture time.
In addition to EK, when ownership of the TPM is taken using the command takeownership, the TPM generates a public/private key pair called the storage root key (SRK) which is the root of the tree of storage keys.
Trusted and Encrypted Keys
Trusted and Encrypted Keys are two new key types added to the existing Linux kernel key ring service.Both of these new types are variable length symmetric keys, and in both cases all keys are created in the kernel. User space sees, stores, and loads only encrypted blobs.
- Trusted Keys require the availability of a Trust Source (TPM)
- Encrypted Keys can be used on any system
A trust source provides the source of security for Trusted Keys.
If the trust source is TPM (Trusted Platform Module: hardware device), Storage Root Key (SRK) which never leaves the TPM that provides crypto operation to establish root of trust for storage.
Trusted Keys use a TPM to generate and seal the keys. Keys are
- sealed under a 2048 bit RSA key in the TPM
- optionally sealed to specified PCR (integrity measurement) values
- unsealed by the TPM, if PCRs and blob integrity verifications match.
What measured boot and trusted boot means for Linux
In trusted boot and the measured boot:- the basic flow starts with the TPM performing a measurement of the BIOS/EFI layer. This measurement involves:
- checking the binary instructions to be carried out by this layer
- creating a cryptographic hash of the binary image The hash that's produced is then stored in one of several Platform Configuration Register (PCR) "slots" in the TPM.
- After measuring the BIOS/EFI layer, the firmware is measured. In this case, the resulting hash is combined with the previous hash (which was stored in the PCR slot) and then also stored in a PCR slot.
- The process continues until all the layers involved in the boot process have been measured and the hashes' results have been stored.
This provides assurances that once a value is written to a PCR by the TPM, it can be considered constant for the lifetime of the system until power off or reboot.
Measured boot measures but doesn't perform any other actions.
The alternative, "trusted boot," goes a step further.
When a trusted boot process is performed, the process not only measures each value but also performs a check against a known (and expected!) good value at the same time. If the check fails, then the process will halt, and the booting of the system will fail.
Disk Encryption
A simple use case - Creating an RSA Key pair and securely persisting in TPM
Once you have all the necessary tpm2 software installed, it is fairly simple to create an RSA key pair and store it in the TPM persitent memory.- Create the RSA key
$ tpm2_createprimary --hierarchy=o --key-algorithm=rsa --key-context=prim.ctx
$ tpm2_evictcontrol --hierarchy=o --object-context=prim.ctx 0x81010001The sensitive portion of the key is never released outside of the TPM2 device.
Once the key is generated and persisted in the TPM2 device, it can now be used throughout the boot sequence as soon as TPM becomes available (even the operating system is not loaded yet).
Use case - Disk encryption using Linux Unified Key Setup (LUKS) with TPM2 as the encryption key protector
Simple disk encryption scheme using Linux Unified Key Setup (LUKS)
LUKS disk encryption scheme with pass-phrase stored in TPM2 as the protector
Auto mount would necessitate providing pass-phrase/ key to cryptsetup at runtime without user intervention, hence the secret has to be provided to LUKS in clear.To prevent an attacker from mounting the storage on another system to access to the encryption key in clear on the file-system:
- Seal the secret into a TPM device
- Unseal the secret in memory and pass it to cryptsetup
- Create a primary key The command will create and load a Primary Object.
The sensitive and public portions are not returned.
$ tpm2_createprimary -Q -C o -c prim.ctx
- -Q --quiet: Silence normal tool output to stdout.
- -C o The hierarchy under which the object is created.
- -c prim.ctx A context file for the created object's handle is saved as a file prim.ctx for future interactions with the created primary object.
o for TPM_RH_OWNER.
$ dd if=/dev/urandom bs=1 count=32 status=none | tpm2_create -Q -g sha256 -u seal.pub -r seal.priv -i- -C prim.ctx
tpm2_create create a child object.The object can either be a key or a sealing object.
A sealing object allows to seal user data to the TPM.
- -C The parent of the object to be created.
- -g The hash algorithm for generating the objects name.
- -i The data file to be sealed, optional.
- -u The output file which contains the public portion of the created object, optional.
- -r The output file which contains the sensitive portion of the created object, optional.
If file is -, read from stdin.
$ tpm2_load -Q -C prim.ctx -u seal.pub -r seal.priv -n seal.name -c seal.ctx
- -n An optional file to save the name structure of the object.
- -c The file name of the saved object context
$ tpm2_evictcontrol -C o -c seal.ctx 0x81010001
the object will be persisted at the specified HANDLE 0x81010001
$ tpm2_unseal -Q -c 0x81010001 |sudo cryptsetup luksOpen --key-file=- $loopdevice enc_volumetpm2_unseal returns a data blob in a loaded TPM object. The data blob is returned in clear. Attacker now additionally needs the TPM on platform along with the disk.
The decryption key is safely stored on the TPM anchored to the specific platform.
TCG Specification Architecture Overview

4. TCG Architecture
Reference PC Platform Containing a TCG Trusted Platform Module (TPM):
- protected capabilities Protected capabilities are a set of commands with exclusive permission to access shielded locations.
- integrity measurement
- integrity reporting
TPM protected capabilities can include additional security functionality such as cryptographic key management, random number generation, sealing data to system state and others as determined necessary by TCG members.
There are commonly three Roots of Trust in a trusted platform:
- root of trust for measurement (RTM)
- root of trust for storage (RTS)
- root of trust for reporting (RTR)

4.5.3 Interfacing with TPM and Software Services
4.6 TCG Programmatic Interfaces
4.6.2 Command Ordinals and Serialization
Command messages have a message header composed of:- Message type request or response, 2 bytes.
- Message Size message size (in bytes),4 bytes.
4.6.3 Summary of TCG Commands and Interfaces
TCG PC Client Platform TPM Profile (PTP) Specification
Platform-specific functionality is defined in platform specifications which details the additional features that SHALL be implemented by a TPM for a PC Client platform.5 TPM Capabilities and Commands
5.2 Command Table
To be compliant with this specification, the TPM SHALL support the commands labeled as mandatory (M).
TCG PC Client Platform Firmware Profile Specification
10 Event Logging
Trusted Platform Module Library. Part 1: Architecture
A Practical Guide to TPM 2.0
Using the New Trusted Platform Module in the New Age of Securityby Will Arthur, David Challener, Kenneth Goldman
Chapter 1 History of the TPM
A Trusted Platform Module (TPM), is a cryptographic coprocessor that is present on most commercial PCs and servers.Why a TPM?
The Trusted Computing Group (TCG) tried to come out a solution that a hardware TPM chip intended to be physically attached to the motherboard of a PC.The TPM command set was architected to provide all functions necessary for its security use cases.
History of Development of the TPM Specification from 1.1b to 1.2
The certificate authority (CA) was to provide a means to prove that a key generated in the TPM came from a real TPM.In a manner similar to smart-card chips attached to the motherboard, IBM PCs were the first to use TPMs.
A small amount of nonvolatile RAM (usually about 2KB) was used in TPM.
Certified Migratable Keys (CMKs) could only be migrated by a designated third party.
TPMs are well equipped to take over the task which smart card does:
- store keys to identify users
- store keys to encrypt data
How TPM 2.0 Developed from TPM 1.2
History of TPM 2.0 Specification Development
Chapter 2 Basic Security Concepts
Cryptographic Attacks
Security Definitions
Cryptographic Families
Chapter 3 Quick Tutorial on TPM 2.0
The TPM 1.2 specification was the Trusted Computing Group’s (TPG’s) first attempt to solve this problem and was aimed at addressing the following major issues in the industry:- Identification of devices Devices were mostly identified by MAC addresses or IP addresses are not secure.
- Secure generation of keys Having a hardware random-number generator is a big advantage when creating keys.
- Secure storage of keys
- NVRAM storage Having NVRAM allows a TPM to maintain a certificate store.
- Device health attestation
- Algorithm agility
- Enhanced authorization
- Quick key loading
- Non-brittle PCRs
- Flexible management:
- Identifying resources by name
Scenarios for Using TPM 1.2
Identification
The use is similar to the smart card:- The private key embedded in the chip identifies the card on which it resides
- an authentication password or PIN is used to authenticate a person to the card
Encryption
Encrypting keys are used to encrypt files on the hard drive or to decrypt files that arrived from other systems.Key Storage
The TPM has access to a self-generated private key, so it can encrypt keys with a public key and then store the resulting blob on the hard disk.Random Number Generator
NVRAM Storage
Having NVRAM provides the following:- Storage for root keys for certificate chains These are public keys
- Storage for an endorsement key (EK) An EK is stored by the manufacturer and used to decrypt certificates and pass passwords into the TPM during provisioning.
- Storage for a representation of what the state of the machine ought to be Like the public root key used in UEFI secure-boot implementations, this is used by the system owner to specify the state they want the machine to be.
- Storage for decryption keys used before the hard disk is available For example, a key used for a self-encrypting drive.
Platform Configuration Registers
They store hashes of measurements taken by external software, and the TPM can later report those measurements by signing them with a specified key.Privacy Enablement
Scenarios for Using Additional TPM 2.0 Capabilities
Algorithm Agility (New in 2.0)
Instead of having to use SHA-1, a TPM can now use virtually any hash algorithm.TCG has announced the families of algorithms that can be supported by publishing a separate list of algorithm IDs that identify algorithms to be used with a TPM.
Chapter 4 Existing Applications That Use TPMs
Chapter 5 Navigating the Specification
Chapter 8 TPM Entities
A TPM 2.0 entity is an item in the TPM that can be directly referenced with a handle.Permanent Entities
A permanent entity is one whose handle is defined by the TPM specification and can’t be created or deleted.The following sections discuss each permanent entity in turn.
- Persistent Hierarchies TPM 2.0 has 3 persistent hierarchies (platform, storage, and endorsement), each can be referenced by a permanent handle:
- TPM_RH_PLATFORM (0x4000000C)
- TPM_RH_OWNER (0x40000001)
- TPM_RH_ENDORSEMENT (x4000000B)
- Ephemeral Hierarchy This is called the NULL hierarchy, which is also referenced by a permanent handle: TPM_RH_NULL (0x40000007).
- Dictionary Attack Lockout Reset Mechanism A TPM is configured to lock out a user for 24 hours after 5 password entry failures.
- Clear TPM in BIOS setup menu
- by PPI
The administrator can use lockout authorization to reset the failure count so the user doesn’t have to wait for the 24-hour lockout period to expire.
This mechanism is used to reset the dictionary attack lockout.
This mechanism can be referenced by the handle TPM_RH_LOCKOUT (0x4000000A).
TPM lockout may be reset by:
echo 5 | sudo tee /sys/class/tpm/tpm0/ppi/request
Reading the value stored in a PCR doesn’t require authentication.
The PC Client platform specifies a minimum of 24 PCRs.
Only one PCR bank (a set of PCRs with the same hash algorithm) is mandatory, programmable to either SHA-1 or SHA-256 at boot time.
When it’s clear (disabled), access to any NV index in the platform hierarchy is denied.
Nonvolatile Indexes
An NVRAM index in a TPM is a nonvolatile entity.When configured, it’s given an index and a set of attributes, chosen by the user.
Objects
A TPM object is either a key or data. Typically, most objects are keys.Objects belong to a hierarchy.
Using keys or other objects requires the use of a TPM non-persistent entity: the session.
Nonpersistent Entities
A nonpersistent entity never persists through power cycles.
- Authorizations control access to entities in the TPM, providing many of the security guarantees of the TPM.
- Sessions are the vehicle for authorizations and maintain state between subsequent commands
Persistent Entities
A persistent entity is an object that the owner of a hierarchy has asked to remain resident in the TPM through power cycles. A TPM has a limited amount of persistent memory, so you should be sparing in your use of persistent entities.
For ex., at boot time, the disk isn’t available.
The application transfers the key to TPM persistent storage, where it’s immediately available for use in early boot cryptographic operations.
Entity Names
The Name is the entity’s unique identifier.- Permanent entities (PCRs and hierarchy handles) have handles that never change, so their Name is simply their handle.
- Other entities (NV indexes and loaded objects) have a calculated name that is essentially a hash of the entity’s public data. Both the TPM and caller independently calculate the Name value for use during authorization.
Chapter 9 Hierarchies
Three Persistent Hierarchies
A hierarchy is a collection of entities that are related and managed as a group.The cryptographic root of each hierarchy is a seed: a large random number that the TPM generates and never exposes outside its secure boundary.
The TPM uses the seed to create primary objects such as storage root keys.
Platform Hierarchy
The platform hierarchy is intended to be under the control of the platform manufacturer.This is represented by the early boot code shipped with the platform.
Fo x86 PC platforms, it's called BIOS and UEFI recently.
The platform firmware must verify an RSA digital signature to authenticate software as part of the UEFI secure boot process. The platform OEM stores a public key, or a digest of a list of trusted public keys, in a TPM NV index. Only the platform OEM can update it.
During boot, the platform firmware uses the stored trusted public key to verify a signature.
- TPM_NV_Read
- TPM2_LoadExternal
- TPM2_VerifySignature
Storage Hierarchy
Endorsement Hierarchy
Privacy
NULL Hierarchy
Cryptographic Primitives
Chapter 10 Keys
TPM acts as a key cache, with the application securely swapping keys in and out as needed.Each TPM hierarchy can form trees of keys in a parent-child relationship.
Key Commands
See the TPM 2.0 specification, Part 3, for the complete command set and API details.
Key Generator
The TPM’s greatest strength is its ability to generate a cryptographic key and protect its secret within a hardware boundary.
Primary Keys and Seeds
Primary keys are the root keys in the hierarchy. They have no parent.Primary keys are created with the command TPM2_CreatePrimary.
In TPM 1.2, the equivalent key called the storage root key (SRK).
Each of the three persistent hierarchies has an associated primary seed:
- the endorsement primary seed
- the platform primary seed
- the storage primary seed
When the TPM creates a primary key, it uses a primary seed plus a public template:
- the algorithms
- key size
- policy
- the type of key signing, encryption, and so on
- unique data(optional)
By varying the unique data in the template, the caller can create an unlimited number of primary keys.
Persistence of Keys
A user calls the TPM2_EvictControl command to move a key from volatile to nonvolatile memory so it can remain loaded (persist) though power cycles.
Key Cache
The TPM2_Create command creates a key, encrypts it with the parent, and returns the encrypted key to the caller. The caller saves the key external to the TPM, perhaps on disk.
To use the key, the user must first load it into the TPM under its parent using TPM2_Load.
When finished, the caller can free memory using TPM2_FlushContext.
The key slots are memory areas where a key can be loaded. TPM management middleware is responsible for swapping keys in and out of the cache.
The root keys (the parents) and the key cache (the children) form a tree of keys. These trees are called hierarchies.
Key Authorization
Chapter 11 NV Indexes
Chapter 12 Platform Configuration Registers
Chapter 13 Authorizations and Sessions
Chapter 14 Extended Authorization(EA) Policies
Chapter 15 Key Management
Chapter 16 Auditing TPM Commands
Chapter 17 Decrypt/Encrypt Sessions
Chapter 18 Context Management
Chapter 19 Startup, Shutdown and Provisioning
Chapter 20 Debugging
Chapter 21 Solving Bigger Problems with TPM 2.0
Chapter 22 Platform Security Technologies That Use TPM 2.0
Physical TPM support in Secure Boot
Remote Attestation
Introduction
There are many cases where it is crucial to verify the correctness of software and hardware configuration of a computer system.TPM device can be used to validate a system integrity by implementing an attestation protocol.
Remote Attestation With Tpm2 Tools
Attestation is the evidence or proof of something. It is a declaration that something exists or is the case.What is a PCR and how are PCR values generated
PCRs are special TPM2 objects that can only be modified or written to by hash extension mechanism: the incoming new value is concatenated with the existing value in the PCR and hashed.The new hash value now replaces the old value.
The new value reflects a history of all the hash extensions.
PCRs are arranged in banks,
- Each one for a specific hash algorithm SHA1, SHA256, etc.
- Every bank has up to 32 PCRs.
- the only way to modify a PCR is to extend a hash
- the robustness mechanisms that prevent physical tampering of the values
Initial state of the PCR
Values at a given PCR index can be read using the tpm2_pcrread tool and specifying the PCR-selection string.For ex., to read PCR indices 0,1,2 in SHA1 and SHA256 banks:
$ tpm2_pcrread sha1:0,1,2+sha256:0,1,2 -T device:/dev/tpmrm0
sha1:
  0 : 0xD7774F26EA0F649CFCF9EB3FEA19C0AC12C2040B
  1 : 0x083030D10C1559CD01858DA2BE954C92E8EBA494
  2 : 0xB2A83B0EBF2F8374299A5B2BDFC31EA955AD7236
sha256:
  0 : 0xA205565343D3B56E04BB18517FD0C88F32927E7D33622F73233D45BBD8656DA0
  1 : 0xB8BD8947F9A501D1EB3B9A9BF5ECF786DD2176B2B46C63F5758B073F357935BF
  2 : 0x3D458CFE55CC03EA1F443F1562BEEC8DF51C75E14A9FCF9A7234A13F198E7969
If the PCR are in the initial state, in that the PCR are not extended just yet, the default values (00/ FF) should be displayed instead.
Extending values into PCR indices
A PCR index can be modified only by extending it.It cannot be set to an absolute value like a register.
One of the three commands can modify the PCR values
- tpm2_pcrextend
- tpm2_pcrevent
- tpm2_pcrreset The PCR index value is reset to zero.
Not all PCR indices are resettable.
The entity extending the PCR is inherently trusted.
This trusted entity is called a Root-of-trust-for-measurement (RTM) in TCG terminology.
System software state
Throughout the platform boot process, a log of all executable code and relevant configuration data is created and extended into PCRs.Each time a PCR is extended, a log entry is made in the TCG event log.
The event log can be examined using the tpm2_eventlog tool.
The event log is typically stored at this location /sys/kernel/security/tpm0/binary_bios_measurements.
EFI event log在Linux下的讀取過程
Boot產生的event log在Linux下會保存在/sys/kernel/security/tpm0/binary_bios_measurement文件中。Study how the content of the file binary_bios_measurement is read.
Dump binary_bios_measurements的python3工具:
#!/usr/bin/env python3
import sys
import argparse
import struct
import binascii
import hashlib

datalen = 0

event_types = {
    0x00000000:"preboot_cert",
    0x00000001:"post_code",
    0x00000003:"no_action",
    0x00000004:"separator",
    0x00000005:"action",
    0x00000006:"event_tag",
    0x00000007:"s_ctrm_contents",
    0x00000008:"s_ctrm_version",
    0x00000009:"cpu_microcode",
    0x0000000a:"platform_config_flags",
    0x0000000b:"table_of_devices",
    0x0000000c:"compact_hash",
    0x0000000d:"ipl",
    0x0000000e:"ipl_partition_data",
    0x0000000f:"nonhost_code",
    0x00000010:"nonhost_config",
    0x00000011:"nonhost_info",
    0x00000012:"omit_boot_device_events",
    0x80000001:"efi_variable_driver_config",
    0x80000002:"efi_variable_boot",
    0x80000003:"efi_boot_services_application",
    0x80000004:"efi_boot_services_driver",
    0x80000005:"efi_runtime_services_driver",
    0x80000006:"efi_gpt_event",
    0x80000007:"efi_action",
    0x80000008:"efi_platform_firmware_blob",
    0x80000009:"efi_handoff_tables",
    0x80000010:"efi_hcrtm_event",
    0x800000e0:"efi_variable_authority"
}

class TCPAEvent:
    def __init__(self,
                 pcr_index, event_type, pcr_value, event_size, event_data):
        self.pcr_index = pcr_index
        try:
            self.event_type = event_types[event_type]
        except KeyError:
            self.event_type = hex(event_type)
        self.pcr_value = pcr_value
        self.event_size = event_size
        self.event_data = event_data
        self.valid = self.__validate()

    def __validate(self):
        h = hashlib.sha1()
        h.update(self.event_data)
        data_digest = h.digest()
        return self.pcr_value == data_digest

    def __str__(self):
        return "{:<3} {:<31} {} {:<4} {:<5} {}".format(
            self.pcr_index,
            self.event_type,
            binascii.hexlify(self.pcr_value).decode(),
            self.event_size,
            self.valid,
            self.event_data[:datalen])


class TCPAParser(struct.Struct):
    def __init__(self, bpath):
        super().__init__("<II20sI")
        self.bpath = bpath

    def __iter__(self):
        with open(self.bpath, "rb") as bfile:
            while True:
                br = bfile.read(self.size)
                if not br:
                    break
                us = self.unpack(br)
                event = TCPAEvent(*us, bfile.read(us[3]))
                yield event

class PCR:
    def __init__(self, pcrnum):
        self.pcrnum = pcrnum
        if (pcrnum >= 17 and pcrnum <= 22):
            self.value = b"\xFF" * 20
        else:
            self.value = b"\x00" * 20
        self.__hex()

    def __hex(self):
        self.hval = binascii.hexlify(self.value).decode().upper()

    def update(self, value):
        h = hashlib.sha1()
        h.update(self.value + value)
        self.value = h.digest()
        self.__hex()

    def __str__(self):
        return "PCR-{:02d}: {}".format(
            self.pcrnum,
            " ".join([self.hval[i:i+2] for i in range(0, len(self.hval), 2)]))


if __name__ == "__main__":
    parser = argparse.ArgumentParser(description="TPM binary measurement parser.")
    parser.add_argument("-f",
                        default="/sys/kernel/security/tpm0/binary_bios_measurements",
                        metavar="binary_bios_measurements_file",
                        dest="bfile",
                        help="binary_bios_measurements file path")
    parser.add_argument("-r",
                        default=list(),
                        action="append",
                        nargs=2,
                        metavar=("ID", "SHA1HASH"),
                        dest="replacelist",
                        help="Replace event ID pcr_value with SHA1HASH. Could be used multiple times.")
    parser.add_argument("-l",
                        default=30,
                        metavar="length",
                        type=int,
                        dest="datalen",
                        help="Length of data to display. Defaults to 30. -1 means all.")
    args = parser.parse_args()

    tcpa_data = list()
    pcrs = list()

    datalen = args.datalen

    for p in range(24):
        pcrs.append(PCR(p))

    for event in TCPAParser(args.bfile):
        tcpa_data.append(event)

    for ev_id, pcr_val in args.replacelist:
        try:
            ev_id = int(ev_id)
            if len(pcr_val) != 40:
                print("Replacement ID {} hash length error!".format(ev_id))
                sys.exit(1)
            print("Replacing event ID {} hash {} with {}".format(
                ev_id,
                binascii.hexlify(tcpa_data[ev_id].pcr_value).decode(),
                pcr_val))
            tcpa_data[ev_id].pcr_value = binascii.unhexlify(pcr_val)
        except (TypeError, ValueError):
            print("Replacement ID {} value error!".format(ev_id))
            sys.exit(1)
        except IndexError:
            print("Replacement ID {} is out of event index!".format(ev_id))
            sys.exit(1)

    for event in tcpa_data:
        pcrs[event.pcr_index].update(event.pcr_value)

    print("{:<3} {:<3} {:<31} {:<40} {:<4} {} {}".format(
        "Num", "PCR", "EV_type", "PCR_value", "Size", "Valid", "Data"))
    for num, event in enumerate(tcpa_data):
        print("{:<3} {}".format(num, event))

    print()
    print("Final PCRs:")
    for p in pcrs:
        print(p)
TCG TPM Vendor ID Registry Family 1.2 and 2.0
TrustedPlatformModule
This reference provides cmdlet descriptions and syntax for all TPM cmdlets. It lists the cmdlets in alphabetical order based on the verb at the beginning of the cmdlet.
| Clear-Tpm | Resets a TPM to its default state. |
| ConvertTo-TpmOwnerAuth | Creates a TPM owner authorization value from a supplied string. |
| Disable-TpmAutoProvisioning | Disables TPM auto-provisioning. |
| Enable-TpmAutoProvisioning | Enables TPM auto-provisioning. |
| Get-Tpm | Gets an object that contains information about a TPM. |
| Get-TpmEndorsementKeyInfo | Gets information about the endorsement key and certificates of the TPM. |
| Get-TpmSupportedFeature | Verifies whether a TPM supports specified features. |
| Import-TpmOwnerAuth | Imports a TPM owner authorization value to the registry. |
| Initialize-Tpm | Performs part of the provisioning process for a TPM. |
| Set-TpmOwnerAuth | Changes the TPM owner authorization value. |
| Unblock-Tpm | Resets a TPM lockout. |

留言
很高興在網路上看到您寫的這篇關於TPM的文章,
恰逢日前在工作(工控產業)上有客戶詢問下tsshierarchychangeauth指令出現錯誤訊息,
依據你文章提及的去編譯ibmtss tool與相關設置啟動S/W的tpm_server後, 即排除問題,
但日前此客戶又提出了想修改platform hierarchy的需求,
我理解的是platform hierarchy這項目屬於硬體製造商的權限範疇,
但我本人對於TPM真的了解不深,
想請教您, 如要對platform hierarchy進行修改或設定,
是否有可詳盡的做法或文章可以指導,
以及相關韌體(如:BIOS)是否也需要配合設置,
來完成從O/S層面修改platform hierarchy設定的做法,
以上, 還煩請不吝賜教,
也祝您事事順心
Lauryn
The platform hierarchy is intended to be under the control of the platform manufacturer(OEM), represented by the early boot code(BIOS/UEFI firmware) shipped with the platform.
Because the platform hierarchy has its own enable flag, the platform firmware(BIOS/UEFI) decides when to enable or disable the hierarchy.
As in the UEFI case, the platform firmware must verify an RSA digital signature to authenticate software/OS as part of the UEFI secure boot process.
The platform OEM stores a public key, or a digest of a list of trusted public keys, in a TPM NV index. The controls on the index permit only the platform OEM to update it.
During boot, the platform firmware uses this trusted public key to verify a signature.
The TPM provides : (1) provides a secure location to store the public
key. (2) the RSA algorithm in HW
Platform hierarchy is Used by the BIOS and System Management
Mode (SMM), not by the end user.
---
Hope this may be helpful information to you.
I've not touched "platform hierarchy" yet.
Currently, I'm just an end user trying to understand how to use it...