ACPI in Linux
ACPI in Linux
ACPI ensures that hardware and OS continue to work together.
The ACPI specification describes platform registers, ACPI tables, and operation of the ACPI-enabled BIOS.
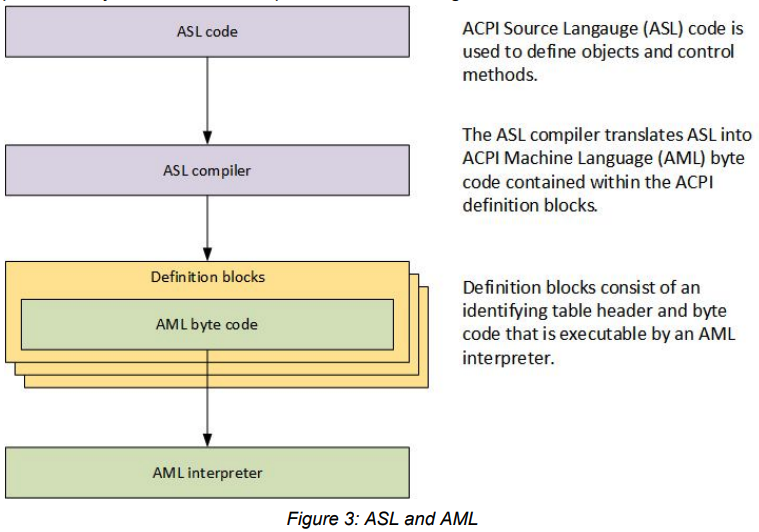
It also specifies AML (ACPI Machine Language), which the BIOS exports via ACPI tables to abstract the hardware.
AML is executed by an interpreter in the ACPI-enabled OS, such as Linux.

ACPI-enabled BIOS
The ACPI BIOS generates ACPI tables and loads ACPI tables into main memory.
ACPI table 在BIOS 裏面用ASL code 去描述。而ACPI Table又分成不同類型的Table(RSDT/FADT/DSDT...etc).
我們比較常使用的DSDT Table就是放了一些event code.
簡單來說, 就是當某個H/W event發生後,系统會依照在這個DSDT Table中的ASL code去执行,而這些ACPI Table 包在BIOS ROM 中的形式是AML Code (類似机器碼)。
BIOS在開機過程中會把包在BIOS ROM中的ACPI Table 載入到RAM中,然後留下一些訊息讓OS來找到他.
最簡單的例子就是RSDP Structure會放在1M以下的某個位置(一般是E0000h~FFFFh), 然後OS就可以透過搜尋Signature的方式來找到其他的ACPI Table entry point。
OS 需要有一個AML interpreter去翻译这些AML byte code,然后去执行他们。
ACPI tables
Advanced Configuration and Power Interface (ACPI) provides an open standard that OS can use to discover and configure computer hardware components, to perform power management.ACPI defines a hardware abstraction interface between the devices firmware (e.g. BIOS, UEFI), the computer hardware components, and the OS.
Many of the firmware ACPI functionality is provided in bytecode and stored in the ACPI tables.
To make use of the ACPI tables, the operating system must have an interpreter for the AML( ACPI Machine Language ) bytecode.
ACPI tables provide the interface between an ACPI-compliant OS and system firmware (BIOS or UEFI). This includes RSDP, RSDT, XSDT, FADT, FACS, DSDT, SSDT, MADT, and MCFG.
The tables allow description of system hardware in a platform-independent manner.
每個 Platform 的host controller的register位置不同,所以BIOS需要透過ACPI Table來告知OS這些register的位置,這樣子做的好處是OS不需要知道你是在什麼Platform,因為他只單純看BIOS所提供的HW信息。
As Microsoft Windows "Device Manager" as an example,

- Search RTC in the ASL code
- Modify ASL code to hide RTC
- Compile the ASL code then flash the byte code to the BIOS ROM
ACPI in Linux
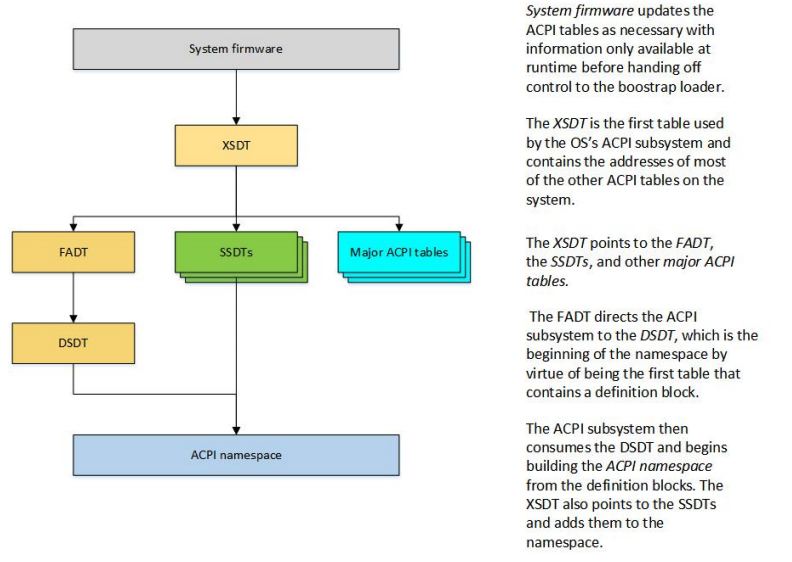
BIOS在开机过程中会把包在BIOS ROM中的ACPI Table 载入到RAM中,然后留下一些信息给OS来找到他们。
The first step in retrieving the ACPI tables is finding the Root System Description Pointer, or RSDP.
最简单的例子就是RSDP Structure会放在1M以下的某个位置(一般是E0000h~FFFFh),然后OS就可以通过搜寻signature(某个标记字)的方式来找到其他的ACPI Table entry point。
ACPI Component Architecture (ACPICA)
The purpose of ACPICA is to simplify ACPI implementations for operating system vendors providing major portions of an ACPI implementation in OS-independent ACPI modules that can be integrated into any operating system.The ACPICA software can be hosted on any operating system by writing a small and relatively simple OS Services Layer (OSL) between the ACPI subsystem and the host operating system.
A major goal of the architecture is to isolate all operating system dependencies to a relatively small translation or conversion layer (the OS Services Layer) so that the bulk of the ACPICA code is independent of any individual operating system.

For example, all AML code is hidden from the OSL and host operating system. Also, the details of the ACPI hardware are abstracted to higher-level software interfaces.

This allows the Core Subsystem to remain OS independent.
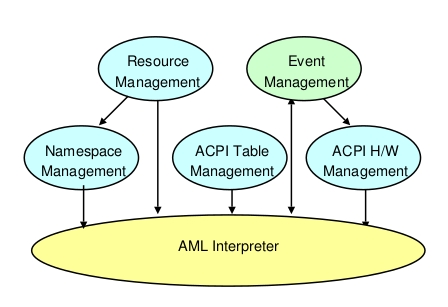
- AML Interpreter The services that the interpreter provides include:
- AML Control Method Execution
- Evaluation of Namespace Objects
- ACPI Table Management The tables may be loaded from the firmware or directly from a buffer provided by the host operating system.
- ACPI Table Parsing
- ACPI Table Verification
- ACPI Table installation and removal
- Namespace Management It builds and manages the internal ACPI namespace. Services include:
- Namespace Initialization from either the BIOS or a file
- Device Enumeration
- Namespace Access
- Access to ACPI data and tables
- Resource Management It provides resource query and configuration services on top of the Namespace manager and AML interpreter.
- Getting and Setting Current Resources
- Getting Possible Resources
- Getting IRQ Routing Tables
- Getting Power Dependencies
- ACPI Hardware Management
- Event Handling
Services include:
Services include:
ACPI-enabled OS must expose an ACPI-compatible environment to device drivers, which exposes certain system, device and processor states.
Global states
The ACPI Specification defines the following four global "Gx" states and six sleep "Sx" states for an ACPI-compliant computer system.| Gx | Name | Sx | Description |
| G0 | Working | S0 | The computer is running and the CPU executes instructions. "Awaymode" is a subset of S0, where monitor is off but background tasks are running |
| G1 | Sleeping |
| |
| G2 | Soft Off | S5 | G2/S5 is almost the same as G3 Mechanical Off, except that the power supply unit (PSU) still supplies power, at a minimum, to the power button to allow return to S0. A full reboot is required. No previous content is retained. Other components may remain powered so the computer can "wake" on input from the keyboard, clock, modem, LAN, or USB device |
| G3 | Mechanical Off | The computer's power has been totally removed via a mechanical switch (as on the rear of a PSU). The power cord can be removed and the system is safe for disassembly (typically, only the real-time clock continues to run using its own small battery) |
Processor Power management
Managing processor speed and voltage based on utilization is effective in increasing battery life on laptops, reducing fan noise on desktops, and lowing power and cooling costs on servers.
Processor States
The CPU power states C0–C3 are defined as follows:- C0 is the operating state.
- C1 (often known as Halt) is a state where the processor is not executing instructions, but can return to an executing state essentially instantaneously. All ACPI-conformant processors must support this power state. Some processors, such as the Pentium 4 and AMD Athlon, also support an Enhanced C1 state (C1E or Enhanced Halt State) for lower power consumption, however this proved to be buggy on some systems.[39][40]
- C2 (often known as Stop-Clock) is a state where the processor maintains all software-visible state, but may take longer to wake up. This processor state is optional.
- C3 (often known as Sleep) is a state where the processor does not need to keep its cache coherent, but maintains other state. Some processors have variations on the C3 state (Deep Sleep, Deeper Sleep, etc.) that differ in how long it takes to wake the processor. This processor state is optional.
- Additional states are defined by manufacturers for some processors. For example, Intel's Haswell platform has states up to C10, where it distinguishes core states and package states.
Performance States
While a device or processor operates, it can be in one of several power-performance states.These states are implementation-dependent.
P0 is always the highest-performance state, with P1 to Pn being successively lower-performance states, up to an implementation-specific limit of n no greater than 16.
ACPI support for CPU and Memory Hot-Plug
PNPACPI
The ACPI compatible BIOS defines all PNP devices in its ACPI DSDT(Differentiated System Description Table).Every ACPI PNP device defines a PNP ID, so the OS can enumerate this kind of device through the PNP ID.
ACPI PNP devices also define some methods for the OS to manipulate device resources.
Hot-Keys
References
Power Management
APM(Advanced Power Management) or ACPI(Advanced Configuration and Power Interface)?
ACPI 最早由 Win98 OS 開始支援把電源管理的功能整合到作業系統中,藉由統一的介面來控制所有硬體的電源操作,取代微軟先前所發展的一個經由BIOS管理的APM(Advanced Power Management)介面。APM在BIOS層級上提供 CPU 及週邊設備的電源管理,可設定設備在某一時間內沒有使用將其轉換到低耗電狀態。APM有若干缺點:每個BIOS的開發者必須自訂自己的APM功能及代碼,BIOS無法得知使用者在作什麼,只能經由IRQ和I/O Port來猜測使用者使用者的活動,作業系統無法得知系統為何進入休眠狀態等問題。
ACPI brings the power management under the control of the OS, as opposed to the previous BIOS-centric system that relied on platform-specific firmware to determine power management and configuration policies.
Linux-based operating systems can provide access to ACPI events via acpid.
- ACPI advertises the available components and their functions to the kernel by Instructions provided through the system firmware (UEFI or BIOS).
- Kernel parses the messages
- ACPI then executes the desired operations written in ACPI Machine Language (such as the initialization of hardware components)
要使用ACPI 電源管理系統, 除了要求主機板ACPI Controller必須府合2.0 的要求外,顯示卡和網路卡及週邊設備亦要支援,還需要有ACPI規格的電源供應器配合,其要求電源在正常供電5伏電壓給主機板的同時還必須使電流穩定在720毫安以上才能使ACPI 電原管理的功能正常運作。
例如螢幕或硬碟在使用者超過一段特定時間沒有使用時便進入省電模式,或是停止運作,直到使用者再度使用才恢復正常供電模式。
TNDC最近針對相當多的系統、主機板進行相容的硬體測試發現經由微軟WHQL測試通過的系統安裝Linux時會無法安裝或重新開機的現象,必須將ACPI的功能關閉才能正常運作,有的雖然可以支援但其功能不正常無法讀取硬體資訊供作業系統判讀等問題,因此使用Linux系統的ACPI功能必須小心挑選電腦硬體,否則將無法保證其功能可完全發揮。
The best way to determine which, if either, your system supports is to build a kernel with both ACPI and APM enabled. If a working ACPI implementation is found, the ACPI driver will override and disable APM, otherwise the APM driver will be used.
Both APM and ACPI rely on user-space daemons, apmd and acpid respectively, to be completely functional.
If ACPI or APM is not available on your system the associated daemon will exit gracefully.
ACPI Tricks and Tips
The Linux ACPI driver is a very large and complex software component.The driver is responsible for locating and extracting data from the ACPI tables and interpreting it in a way that conforms to the specification.
ACPI provides an abstract view of how to control machine specific hardware to any operating system.
UnderstandingSuspend
Background
DSDT (Differentiated System Description Table) is a part of the ACPI specification.This table contains the Differentiated Definition Block, which supplies the information and configuration information about the base system.
ACPI tables are provided in firmware from the manufacturer.
A common Linux problem is that DSDTs are made with Windows specifically in mind, which can be patched after installation.
DSDTs contain information about supported power events in a given system.
The DSDT is always inserted into the ACPI Namespace by the OS at boot time. Unfortunately, many hardware vendors and OEMs are not capable of supplying fully functional tables. So there is a need to patch these tables .
You might need to override the DSDT when certain features like battery status are incorrectly reported (usually causing error messages to syslog).
Basically, you need to copy the fixed table into your kernel source with a special filename.
About how to do it,
- Richard Black wrote a HOWTO about integrating a custom DSDT into the kernel and how to debug it.
- Another extensive manual by jetblack was made available at Gentoo's.
- Check also Philipp Matthias Hahn's page in our Wiki how to integrate a custom DSDT.
- Markus Gaugusch recently presented a patch for integrating a custom DSDT via initrd, similar to the approach of bootsplash.
To use suspend, an operating system must first configure wake-up events (things like the power button, lid-button, etc).
These events are listed in /proc/acpi/wakeup:
Device	S-state	  Status   Sysfs node
PEG0	  S4	*enabled   pci:0000:00:01.0
PEGP	  S4	*disabled  pci:0000:01:00.0
...
PS2K	  S4	*disabled
PS2M	  S4	*disabled
RP09	  S4	*disabled  pci:0000:00:1d.0
RP05	  S4	*disabled  pci:0000:00:1c.0
RP08	  S4	*enabled   pci:0000:00:1c.7
PXSX	  S4	*disabled  pci:0000:03:00.0
XHC	  S4	*enabled   pci:0000:00:14.0
GLAN	  S4	*disabled
The "Device" codes come from the DSDT of your BIOS. This "table" describes the integrated devices on your mainboard, their dependencies and power-management functions.
They are inherently vendor-specific, as the vendor may name any device as he likes. But there are some names that are common:
- PS2K PS/2 keyboard
- PS2M PS/2 mouse
- PWRB or PBTN Power button
- LID Laptop lid
- RP0x or EXPx PCIE slot #x (aka PCI Express Root Port #x)
- EHCx or USBx USB 2.0 (EHCI) chip
- XHC USB 3.0 (XHCI) chip
- PEGx PCI Express for Graphics slot #x
- GLAN Gigabit Ethernet
DSDT
DSDT (Differentiated System Description Table) is a part of the ACPI specification. It supplies information about supported power events in a given system.Basically a DSDT table is the code run on ACPI (Power Management) events.
acpixtract - ACPICA source code conversion utility
acpixtract extracts binary ACPI tables from the output of the acpidump command.A default invocation will extract the DSDT and all SSDTs.
- -a Extract all tables, not just DSDT/SSDT
- -l List table summaries, do not extract
- -s signature Extract all tables with signature
acpidump - dump a system's ACPI tables to an ASCII file
sudo apt update -y
sudo apt install -y acpidump
acpidump options are as follow:
- -a, --addr 0x1234 look for tables at this phisical address
- -t, --table DSDT only dump table with DSDT signature
- -o, --output filename redirect output from stdin to filename
- -b, --binary dump data in binary form rather than in hex-dump format
- -l, --lenght 0x456 works only with --addr, dump phisical memory region without trying to understand it's contents
- -s, --skip 2 skip 2 tables of the given name and output only 3rd one
- -h, --help outputs an help message
EXAMPLES
- Dump the DSDT table to the file DSDT.aml in binary format (this can be disassembled later with iasl(1))
acpidump -b -t DSDT -o DSDT.aml
acpidump -t FACP > FACP.dat
acpixtract -a FACP.dat
iasl -d FACP.dat
acpidump -o DSDT.dat
acpixtract -a
acpidump -o DSDT.dat
acpixtract -sAPIC DSDT.dat
ACPI AML Runtime Debugger
Enabling AML Debugging
There are two kernel configs are required for AML run-time debugging:$ grep CONFIG_ACPI_DEBUGGER /boot/config-5.4.0-72-generic CONFIG_ACPI_DEBUGGER=y CONFIG_ACPI_DEBUGGER_USER=yInstall acpidbg:
sudo apt install linux-tools-`uname -r` linux-tools-generic
Usage
acpidbg is particularly handy when one needs to evaluate any ACPI AML objects during run-time.
$ sudo acpidbg


-help

Summary of AML Debugger Commands
...
- find TPM
                        \_SB.TPM Device       000000002e0b4ad5 001
ACPI Tricks and Tips
FirmwareTestSuite
Firmware Test Suite (FWTS) is a test suite that performs sanity checks on firmware. It is intended to identify BIOS, UEFI, ACPI and many other errors and if appropriate it will try to explain the errors and give advice to help workaround or fix firmware bugs.
Download
- Source releases can be downloaded from http://fwts.ubuntu.com/release/
$ git clone git://kernel.ubuntu.com/hwe/fwts.git
- Development (stable) release
$ sudo add-apt-repository ppa:firmware-testing-team/ppa-fwts-stable
$ sudo add-apt-repository ppa:firmware-testing-team/ppa-fwts-devel
sudo apt-get update
sudo apt-get install fwts
The test results are stored on the USB device and can be analysed on the fly or later on another computer.
- Download the image from http://fwts.ubuntu.com/fwts-live/
- Decompress xz file to the USB stick
$ xzcat wts-live-21.03.00.img.xz | sudo dd of=dev_usb bs=32M; sync
- Insert the USB stick into the machine you want to test and boot the machine. You will see the boot screen, wait a few moments and the boot will proceed.
- After a while, you will be presented with the UI screen
- After the tests are completed, a dialog box will inform you the path name to the results.log on the USB stick.
/fwts/
fwts examples
- Show tests
$ fwts --show-tests / fwts –show-tests-full
$ sudo fwts
$ sudo fwts method
$ sudo fwts uefidump
$ sudo fwts uefirtmisc uefirttime uefirtvariable
$ sudo fwts msr mtrr nx virt
$ sudo fwts klog
ACPI: Advanced Configuration and Power Interface
4. About ACPI
ACPI allows control of power management from within the operating system. The previous industry standard for power management, Advanced Power Management (APM), is controlled at the BIOS level.ACPI can typically be configured from within the operating system. This is unlike APM where configuration often involves rebooting and entering the BIOS configuration screens to set parameters.
13. Reboot and test
To look at all ACPI-related bits that were loaded/started when your system rebooted, do this:$ dmesg | grep ACPI [ 0.000000] BIOS-e820: [mem 0x00000000c8052000-0x00000000c8086fff] ACPI data [ 0.000000] BIOS-e820: [mem 0x00000000c8428000-0x00000000c8428fff] ACPI NVS [ 0.000000] BIOS-e820: [mem 0x00000000d67a5000-0x00000000d67cbfff] ACPI data [ 0.000000] BIOS-e820: [mem 0x00000000d6987000-0x00000000d6faefff] ACPI NVS [ 0.000000] reserve setup_data: [mem 0x00000000c8052000-0x00000000c8086fff] ACPI data [ 0.000000] reserve setup_data: [mem 0x00000000c8428000-0x00000000c8428fff] ACPI NVS [ 0.000000] reserve setup_data: [mem 0x00000000d67a5000-0x00000000d67cbfff] ACPI data [ 0.000000] reserve setup_data: [mem 0x00000000d6987000-0x00000000d6faefff] ACPI NVS [ 0.000000] efi: ACPI 2.0=0xc8052000 ACPI=0xc8052000 SMBIOS=0xd7a00000 SMBIOS 3.0=0xd79ff000 MPS=0xfc9e0 ESRT=0xd2ece898 [ 0.010509] ACPI: Early table checksum verification disabled [ 0.010512] ACPI: RSDP 0x00000000C8052000 000024 (v02 ALASKA) [ 0.010514] ACPI: XSDT 0x00000000C80520A8 0000C4 (v01 ALASKA A M I 01072009 AMI 00010013) [ 0.010519] ACPI: FACP 0x00000000C807ADB8 000114 (v06 ALASKA A M I 01072009 AMI 00010013) [ 0.010524] ACPI: DSDT 0x00000000C8052200 028BB2 (v02 ALASKA A M I 01072009 INTL 20160422) ...If you compiled ACPI support in as "M"odules, the modules should be in /lib/modules/
/lib/modules/5.4.0-48-generic/kernel/drivers/acpi
├── acpi_configfs.ko
├── acpi_extlog.ko
├── acpi_ipmi.ko
├── acpi_pad.ko
├── acpi_tad.ko
├── apei
│   └── einj.ko
├── dptf
│   └── dptf_power.ko
├── ec_sys.ko
├── nfit
│   └── nfit.ko
├── sbshc.ko
├── sbs.ko
└── video.ko
16. Using ACPI
There are a few different applications/daemons you will want to install on your system: acpid (the daemon that will control your hardware states), and acpi (the interface to monitor events and states) are the base install.If you do get acpi installed you can use it to monitor your system like this:
$ acpi -V
No support for device type: power_supply
No support for device type: power_supply
Thermal 0: ok, 29.8 degrees C
Thermal 0: trip point 0 switches to mode critical at temperature 119.0 degrees C
Thermal 1: ok, 27.8 degrees C
Thermal 1: trip point 0 switches to mode critical at temperature 119.0 degrees C
Thermal 1: trip point 1 switches to mode active at temperature 71.0 degrees C
Thermal 1: trip point 2 switches to mode active at temperature 55.0 degrees C
Thermal 1: trip point 3 switches to mode active at temperature 50.0 degrees C
Thermal 1: trip point 4 switches to mode active at temperature 45.0 degrees C
Cooling 0: Fan 0 of 1
Cooling 1: Processor 0 of 3
Cooling 2: Processor 0 of 3
Cooling 3: intel_powerclamp no state information available
Cooling 4: Fan 0 of 1
Cooling 5: Fan 0 of 1
Cooling 6: Fan 0 of 1
Cooling 7: Processor 0 of 3
Cooling 8: Processor 0 of 3
Cooling 9: Fan 0 of 1
Cooling 10: x86_pkg_temp no state information available
PowerManagement
How to Disable Suspend and Hibernation Modes In Linux
Suspending your system helps save power when you are not using your system. Getting back to using your system requires a simple mouse-click or a tap on any keyboard button. Sometimes, you may be required to press the power button.There are 3 suspend modes in Linux:
- Suspend to RAM (Normal Suspend) This is the mode that most laptops automatically enter incase of inactivity over a certain duration or upon closing the lid when the PC is running on the battery. In this mode, power is reserved for the RAM and is cut from most components.
- Suspend to Disk (Hibernate) In this mode, the machine state is saved into swap space and the system is completely powered off. However, upon turning it on, everything is restored and you pick up from where you left.
- Suspend to both (Hybrid suspend) Here, the machine state is saved into swap, but the system does not go off. Instead, the PC is suspended to RAM. The battery is not used and you can safely resume the system from the disk and get ahead with your work. This method is much slower than suspending to RAM.
Disable Suspend and Hibernation in Linux
To prevent your Linux system from suspending or going into hibernation, you need to disable the following systemd targets:sudo systemctl mask sleep.target suspend.target hibernate.target hybrid-sleep.targetTo prevent your Linux system from suspending or going into hibernation, you need to disable the following systemd targets:
sudo systemctl status sleep.target suspend.target hibernate.target hybrid-sleep.target
Enable Suspend and Hibernation in Linux
Enable Suspend and Hibernation in Linuxsudo systemctl unmask sleep.target suspend.target hibernate.target hybrid-sleep.target
Shutdown the computer as an unprivileged user
Use systemctl to power off, reboot, suspend, or hibernate the system:- systemctl poweroff Shut down and power-off the system. This is mostly equivalent to systemctl start poweroff.target --job-mode=replace-irreversibly --no-block, but also prints a wall message to all users.
- systemctl reboot Shut down and reboot the system. This is mostly equivalent to systemctl start reboot.target --job-mode=replace-irreversibly --no-block, but also prints a wall message to all users.
- systemctl suspend Suspend the system. This will trigger activation of the special target unit suspend.target.
- systemctl hibernate Hibernate the system. This will trigger activation of the special target unit hibernate.target.
Debugging hibernation and suspend
Testing hibernation (aka suspend to disk or STD)
To check if hibernation works, you can try to hibernate in one supported mode, the system should create a hibernation image, reboot, resume and get back to the command prompt where you have started the transition.Several modes to hibernate:
- the "reboot" mode
# echo reboot > /sys/power/disk
# echo disk > /sys/power/state
If your machine fails to hibernate or resume in the “reboot” mode, you should try the “platform” mode.
# echo platform > /sys/power/disk
# echo disk > /sys/power/state
The "platform" mode of hibernation does not work on some systems with broken BIOSes.In such cases the “shutdown” mode of hibernation might work
# echo shutdown > /sys/power/disk
# echo disk > /sys/power/state
It is similar to the "reboot" mode, but it requires you to press the power
button to make the system resume.
Test modes of hibernation
If the kernel is compiled with CONFIG_PM_DEBUG set, there is the file /sys/power/pm_test that can be used to make the hibernation core run in a test mode.There are 5 test modes availableto be used, write the corresponding string to /sys/power/pm_test:
- freezer Test the freezing of processes.
- devices test the freezing of processes and suspending of devices
- platform test the freezing of processes, suspending of devices and platform global control methods(*)
- processors test the freezing of processes, suspending of devices, platform global control methods(*) and the disabling of nonboot CPUs
- core test the freezing of processes, suspending of devices, platform global control methods(*), the disabling of nonboot CPUs and suspending of platform/system devices
If the "freezer" test fails, there is a task that cannot be frozen
Once you have found the failing driver (there can be more than just one of them), you have to unload it every time before hibernation. In that case please make sure to report the problem with the driver.
Testing minimal configuration
Using the "test_resume" hibernation option
Advanced debugging
Testing suspend to RAM (STR)
BEST PRACTICE TO DEBUG LINUX* SUSPEND/HIBERNATE ISSUES
The Linux kernel user’s and administrator’s guide: Power Management
The Linux kernel supports two major high-level strategies for power management .- One is the low-power states of the whole system , referred to as sleep states. In these states, user space code cannot be executed and the overall system activity is significantly reduced.
- The other one is based on adjusting the power states of individual hardware components of the system, referred to as the working-state power management
The kernel puts the system into one of these states when requested by user space and the system stays in it until a special signal is received from one of designated devices, triggering a transition to the working state in which user space code can run.
System-Wide Power Management
Sleep States That Can Be Supported
- Standby This state is supported if:
- the CONFIG_SUSPEND kernel configuration option is set
- the support for it is registered by the platform with the core system suspend subsystem. On ACPI-based systems this state is mapped to the S1 system state defined by ACPI.
- Suspend-to-Idle It allows more energy to be saved relative to runtime idle by:
- freezing user space
- suspending the timekeeping
- putting all I/O devices into low-power states (possibly lower-power than available in the working state)
- Suspend-to-RAM This state (referred to as STR or S2RAM) offers significant energy savings as everything in the system is put into a low-power state, only memory should be placed into the self-refresh mode to retain its contents.
- Hibernation This state (also referred to as Suspend-to-Disk or STD) offers the greatest energy savings.
- the kernel stops all system activity and creates a snapshot image of memory to be written into persistent storage.
- the system goes into a state in which the snapshot image can be saved
- after the image is written out and finally the system goes into the target low-power state (like ACPI S4) in which power is cut from almost all of its hardware components, including memory, except for a limited set of wakeup devices.
- control goes to the platform firmware that runs a boot loader which boots a fresh instance of the kernel control may also go directly to the boot loader, depending on the system configuration, but anyway it causes a fresh instance of the kernel to be booted.
- That new instance of the kernel (referred to as the restore kernel) looks for a hibernation image in persistent storage and load it into memory.
- the restore kernel overwrites itself with the image contents and jumps into a special trampoline area in the original kernel stored in the image the special architecture-specific low-level code is needed for this.
The system is woken up from this state by in-band interrupts, so theoretically any devices that can cause interrupts to be generated in the working state can also be set up as wakeup devices for S2Idle.
It is always supported if the CONFIG_SUSPEND kernel configuration option is set.
All devices are suspended and put into low-power states. This state requires some minimal boot-strapping code in the platform firmware to resume the system from it.
S2RAM is supported if the CONFIG_SUSPEND kernel configuration option is set and the support for it is registered by the platform with the core system suspend subsystem.
This state is mapped to the S3 system state defined by ACPI.
When hibernation is triggered,
Basic sysfs Interfaces for System Suspend and Hibernation
The following files located in the /sys/power/ directory can be used for sleep states control by user space .
- /sys/power/state This file contains a list of strings representing sleep states supported by the kernel.
$ cat /sys/power/state
freeze mem disk
Writing one of these strings into it causes the kernel to start a transition of the system into the sleep state represented by that string.- "standby" represent the standby sleep state(S1)
- "freeze" represent the suspend-to-idle sleep state(S2)
- "mem" represent the Suspend-to-RAM state(S3)
- "disk" represent the hibernation sleep state(S4)
Working-State Power Management
Enabling Wake-On-LAN (In Ubuntu 20.10)
Hardware Requirements
Wake-on-LAN support is implemented on the motherboard of a computer and the network interface card, and is consequently not dependent on the OS running on the hardware.PCI version 2.2 supports PME (Power Management Events). PCI cards send and receive PME signals via the PCI socket directly, without the need for a Wake-on-LAN cable.
Software Requirements
$ sudo apt install ethtool

$ ip a
2: enp2s0: <BROADCAST,MULTICAST,UP,LOWER_UP> mtu 1500 qdisc fq_codel state UP group default qlen 1000
    link/ether 38:f3:ab:36:f1:c7 brd ff:ff:ff:ff:ff:ff
    inet 192.168.168.165/24 brd 192.168.168.255 scope global dynamic noprefixroute enp2s0
       valid_lft 86251sec preferred_lft 86251sec
    inet6 2001:b011:5003:1c59:8c1c:6420:4e24:f0df/64 scope global dynamic noprefixroute
       valid_lft 65708sec preferred_lft 65708sec
    inet6 fe80::f5eb:1e0f:9ea1:70b5/64 scope link noprefixroute
       valid_lft forever preferred_lft forever

$ sudo ethtool enp2s0
Settings for enp2s0:
	Supported ports: [ TP MII ]
	Supported link modes:   10baseT/Half 10baseT/Full
	                        100baseT/Half 100baseT/Full
	                        1000baseT/Full
	Supported pause frame use: Symmetric Receive-only
	Supports auto-negotiation: Yes
	Supported FEC modes: Not reported
	Advertised link modes:  10baseT/Half 10baseT/Full
	                        100baseT/Half 100baseT/Full
	                        1000baseT/Full
	Advertised pause frame use: Symmetric Receive-only
	Advertised auto-negotiation: Yes
	Advertised FEC modes: Not reported
	Link partner advertised link modes:  10baseT/Half 10baseT/Full
	                                     100baseT/Half 100baseT/Full
	                                     1000baseT/Full
	Link partner advertised pause frame use: Symmetric
	Link partner advertised auto-negotiation: Yes
	Link partner advertised FEC modes: Not reported
	Speed: 100Mb/s
	Duplex: Full
	Port: Twisted Pair
	PHYAD: 0
	Transceiver: internal
	Auto-negotiation: on
	MDI-X: Unknown
	Supports Wake-on: pumbg
	Wake-on: d
	Link detected: yes
ethtool with a single argument specifying the device name prints current settings of the specified device."wol" is used to set Wake-on-LAN options:
wol p|u|m|b|a|g|s|f|d...Not all devices support this.
The argument to this option is a string of characters specifying which options to enable.
- p Wake on PHY activity
- u Wake on unicast messages
- m Wake on multicast messages
- b Wake on broadcast messages
- a Wake on ARP
- g Wake on MagicPackettm
- s Enable SecureOntm password for MagicPackettm
- f Wake on filter(s)
- d Disable (wake on nothing). This option clears all previous options.
The ethtool will turn on Wake-On-LAN, but (supposedly) everytime you reboot the machine it will reset to disabled.
Try to only wake the machine when it gets the "Magic Packet",
$ sudo ethtool --change enp2s0 wol g
$ sudo ethtool enp2s0
...
	Supports Wake-on: pumbg
	Wake-on: g
	Link detected: yes
Test
- Install the triggering tool
- Suspend the target
- Wake up the target
$ sudo apt install wakeonlan
$ sudo systemctl suspend
$ wakeonlan -i 192.168.168.165 38:f3:ab:36:f1:c7
Set up WoL Permantly
networkd
The ethtool package provides some scripts called when the networking interface's status is changed:- /etc/network/if-pre-up.d/ethtool
/sbin/ethtool --change eno1
/sbin/ethtool --pause  eno1
/sbin/ethtool --coalesce eno1
/sbin/ethtool --set-ring  eno1
/sbin/ethtool --offload  eno1
Add a service manually(deprecated)
To make a service that always enables Wake-On-LAN the first step is to find the path to ethertool.$ which ethtool /usr/sbin/ethtoolThen, create a file at /etc/systemd/system/wol.service :
[Unit]
Description=Enable Wake On Lan

[Service]
Type=oneshot
ExecStart = /usr/sbin/ethtool --change enp2s0 wol g

[Install]
WantedBy=basic.target
Enable the service:
$ sudo systemctl daemon-reload
$ sudo systemctl enable wol.service
$ systemctl status wol
Issues related to suspend and resume
Realtek RTL8111/8168/8411 PCI Express Gigabit Ethernet Controller (rev 1b)- 10ec:8168
drivers/net/ethernet/realtek/r8169.c- Bug 204079 - r8169: no link after resume from sleep, possible regression from commit fa6821cbf1d9724284ef0906c9a01a5fbf13a35c Post the "ethtool -d enp2s0" output before suspend:
$ sudo ethtool -d enp2s0
Unknown RealTek chip (TxConfig: 0x57100f80)
Offset		Values
------		------
0x0000:		38 f3 ab 36 f1 c7 00 00 50 00 40 10 82 00 80 00
0x0010:		00 b0 36 0c 01 00 00 00 4f 02 06 00 00 00 00 00
0x0020:		00 f0 7e 04 01 00 00 00 00 00 00 00 00 00 00 00
0x0030:		00 00 00 00 00 00 00 0c 00 00 00 00 3f 00 00 00
0x0040:		80 0f 10 57 4e cf 02 00 00 1b a2 5d 00 00 00 00
0x0050:		10 00 cf b8 60 11 03 01 11 11 11 00 00 00 00 00
0x0060:		00 00 00 00 aa 17 4d 31 2c f0 00 80 f3 00 80 f0
0x0070:		03 6f 00 c4 b0 f1 00 00 07 00 00 00 00 00 f9 ed
0x0080:		8b 06 01 00 00 00 00 00 00 00 00 00 00 00 00 00
0x0090:		00 00 00 00 00 00 00 00 00 00 00 00 00 00 00 00
0x00a0:		00 00 00 00 00 00 00 00 00 00 00 00 00 00 00 00
0x00b0:		7f 04 00 00 00 00 00 00 ec 10 1a d2 00 00 00 00
0x00c0:		00 00 00 00 00 00 00 00 00 00 00 00 00 00 00 00
0x00d0:		21 00 00 32 0e 00 00 00 00 00 00 40 b0 12 fd 00
0x00e0:		61 20 00 00 00 b0 4d 04 01 00 00 00 27 00 00 00
0x00f0:		3f 00 00 00 00 00 00 00 03 00 00 00 00 00 00 00
The following worked:
- Revert 5ea25b125289 then fa6821cbf1d9(r8169: improve WoL handling)
- set WoL before suspending
$ sudo ethtool -s enp2s0 wol g
All enabling WoL does is to prevent the PHY from being powered-down.Try "ip link set enp5s0 down/up" w/o suspending, does the same problem occur ?
r8169: don't use MSI before RTL8168d:
[ Upstream commit f13bc68131b0c0d67a77fb43444e109828a983bf ]

The original change fixed an issue on RTL8168b by mimicking the vendor
driver behavior to disable MSI on chip versions before RTL8168d.
This however now caused an issue on a system with RTL8168c, see [0].
Therefore leave MSI disabled on RTL8168b, but re-enable it on RTL8168c.

[0] https://bugzilla.redhat.com/show_bug.cgi?id=1792839

Fixes: 003bd5b4a7b4 ("r8169: don't use MSI before RTL8168d")
Signed-off-by: Heiner Kallweit <hkallweit1@gmail.com>
Signed-off-by: David S. Miller <davem@davemloft.net>
Signed-off-by: Greg Kroah-Hartman <gregkh@linuxfoundation.org>
---
 drivers/net/ethernet/realtek/r8169.c |    2 +-
 1 file changed, 1 insertion(+), 1 deletion(-)

--- a/drivers/net/ethernet/realtek/r8169.c
+++ b/drivers/net/ethernet/realtek/r8169.c
@@ -7249,7 +7249,7 @@ static int rtl_alloc_irq(struct rtl8169_
 		RTL_W8(tp, Config2, RTL_R8(tp, Config2) & ~MSIEnable);
 		RTL_W8(tp, Cfg9346, Cfg9346_Lock);
 		/* fall through */
-	case RTL_GIGA_MAC_VER_07 ... RTL_GIGA_MAC_VER_24:
+	case RTL_GIGA_MAC_VER_07 ... RTL_GIGA_MAC_VER_17:
 		flags = PCI_IRQ_LEGACY;
 		break;
 	default:
- #43 The network works as long as I run this between reboots:
$ sudo ethtool -s eth0 wol g
Otherwise the network card just vanishes (not visible in BIOS and Linux) until I unplug the computer for a minute or so.
SE30
$ sudo dmesg | grep 8169
[   62.397756] libphy: r8169: probed
[   62.397971] r8169 0000:2f:00.0 eth0: RTL8168h/8111h, 8c:8c:aa:54:8d:29, XID 541, IRQ 136
[   62.397972] r8169 0000:2f:00.0 eth0: jumbo features [frames: 9200 bytes, tx checksumming: ko]
[   63.261742] r8169 0000:2f:00.0 enp47s0: renamed from eth0
[   63.310596] Generic FE-GE Realtek PHY r8169-0-2f00:00: attached PHY driver [Generic FE-GE Realtek PHY] (mii_bus:phy_addr=r8169-0-2f00:00, irq=IGNORE)
[   63.422040] r8169 0000:2f:00.0 enp47s0: Link is Down
[   66.474136] r8169 0000:2f:00.0 enp47s0: Link is Up - 1Gbps/Full - flow control rx/tx
M90n
PME's are triggered by PCI devices.Check whether this PME interrupt generates an ACPI interrupt.
$ cat /proc/interrupts
           CPU0       CPU1
  0:          8          0  IR-IO-APIC   2-edge      timer
  8:          0          0  IR-IO-APIC   8-edge      rtc0
  9:          0         13  IR-IO-APIC   9-fasteoi   acpi
 14:          0          0  IR-IO-APIC  14-fasteoi   INT34BB:00
 16:          2          0  IR-IO-APIC  16-fasteoi   i801_smbus
120:          0          0  DMAR-MSI   0-edge      dmar0
121:          0          0  DMAR-MSI   1-edge      dmar1
122:          0          0  IR-PCI-MSI 475136-edge      PCIe PME, pciehp
123:          0          0  IR-PCI-MSI 481280-edge      PCIe PME, aerdrv, pcie-dpc
124:          0          0  IR-PCI-MSI 483328-edge      PCIe PME, aerdrv, pcie-dpc
125:         25       5538  IR-PCI-MSI 327680-edge      xhci_hcd
126:       1687        163  IR-PCI-MSI 1048576-edge      enp2s0
127:          0          8  IR-PCI-MSI 1572864-edge      nvme0q0
128:       5481          0  IR-PCI-MSI 1572865-edge      nvme0q1
129:          0       6491  IR-PCI-MSI 1572866-edge      nvme0q2
130:         36          0  IR-PCI-MSI 360448-edge      mei_me
131:          0        153  IR-PCI-MSI 333824-edge      iwlwifi: default queue
132:          0          0  IR-PCI-MSI 333825-edge      iwlwifi: queue 1
133:          0          0  IR-PCI-MSI 333826-edge      iwlwifi: queue 2
134:         33          0  IR-PCI-MSI 333827-edge      iwlwifi: exception
135:          0        303  IR-PCI-MSI 32768-edge      i915
136:        602          0  IR-PCI-MSI 514048-edge      snd_hda_intel:card0
NMI:          1          1   Non-maskable interrupts
LOC:      21445      22148   Local timer interrupts
SPU:          0          0   Spurious interrupts
PMI:          1          1   Performance monitoring interrupts
IWI:          0         63   IRQ work interrupts
RTR:          0          0   APIC ICR read retries
RES:       4156       2994   Rescheduling interrupts
CAL:       1982       5019   Function call interrupts
TLB:        251        290   TLB shootdowns
TRM:          0          0   Thermal event interrupts
THR:          0          0   Threshold APIC interrupts
DFR:          0          0   Deferred Error APIC interrupts
MCE:          0          0   Machine check exceptions
MCP:          3          4   Machine check polls
ERR:          0
MIS:          0
PIN:          0          0   Posted-interrupt notification event
NPI:          0          0   Nested posted-interrupt event
PIW:          0          0   Posted-interrupt wakeup event
$ cat /sys/firmware/acpi/interrupts/gpe_all
$ sudo dmesg | grep 8169
[    1.544709] libphy: r8169: probed
[    1.544917] r8169 0000:02:00.0 eth0: RTL8168h/8111h, 38:f3:ab:36:f1:c7, XID 541, IRQ 127
[    1.544923] r8169 0000:02:00.0 eth0: jumbo features [frames: 9194 bytes, tx checksumming: ko]
[    1.574737] r8169 0000:02:00.0 enp2s0: renamed from eth0
[    5.106879] Generic FE-GE Realtek PHY r8169-0-200:00: attached PHY driver (mii_bus:phy_addr=r8169-0-200:00, irq=MAC)
[    5.308152] r8169 0000:02:00.0 enp2s0: Link is Down
[    8.289628] r8169 0000:02:00.0 enp2s0: Link is Up - 1Gbps/Full - flow control rx/tx


# lspci -vvv
02:00.0 Ethernet controller: Realtek Semiconductor Co., Ltd. RTL8111/8168/8411 PCI Express Gigabit Ethernet Controller (rev 1b)
	Subsystem: Lenovo RTL8111/8168/8411 PCI Express Gigabit Ethernet Controller
	Control: I/O+ Mem+ BusMaster+ SpecCycle- MemWINV- VGASnoop- ParErr- Stepping- SERR- FastB2B- DisINTx+
	Status: Cap+ 66MHz- UDF- FastB2B- ParErr- DEVSEL=fast >TAbort- <TAbort- <MAbort- >SERR- <PERR- INTx-
	Latency: 0, Cache Line Size: 64 bytes
	Interrupt: pin A routed to IRQ 19
	Region 0: I/O ports at 3000 [size=256]
	Region 2: Memory at a1204000 (64-bit, non-prefetchable) [size=4K]
	Region 4: Memory at a1200000 (64-bit, non-prefetchable) [size=16K]
	Capabilities: <access denied>
	Kernel driver in use: r8169
	Kernel modules: r8169

$ sudo modinfo r8169
filename:       /lib/modules/5.4.0-87-generic/kernel/drivers/net/ethernet/realtek/r8169.ko
firmware:       rtl_nic/rtl8125a-3.fw
firmware:       rtl_nic/rtl8107e-2.fw
firmware:       rtl_nic/rtl8107e-1.fw
firmware:       rtl_nic/rtl8168fp-3.fw
firmware:       rtl_nic/rtl8168h-2.fw
firmware:       rtl_nic/rtl8168h-1.fw
firmware:       rtl_nic/rtl8168g-3.fw
firmware:       rtl_nic/rtl8168g-2.fw
firmware:       rtl_nic/rtl8106e-2.fw
firmware:       rtl_nic/rtl8106e-1.fw
firmware:       rtl_nic/rtl8411-2.fw
firmware:       rtl_nic/rtl8411-1.fw
firmware:       rtl_nic/rtl8402-1.fw
firmware:       rtl_nic/rtl8168f-2.fw
firmware:       rtl_nic/rtl8168f-1.fw
firmware:       rtl_nic/rtl8105e-1.fw
firmware:       rtl_nic/rtl8168e-3.fw
firmware:       rtl_nic/rtl8168e-2.fw
firmware:       rtl_nic/rtl8168e-1.fw
firmware:       rtl_nic/rtl8168d-2.fw
firmware:       rtl_nic/rtl8168d-1.fw
license:        GPL
softdep:        pre: realtek
description:    RealTek RTL-8169 Gigabit Ethernet driver
author:         Realtek and the Linux r8169 crew
srcversion:     55433A9810B8CACC44DE8A7
alias:          pci:v000010ECd00003000sv*sd*bc*sc*i*
alias:          pci:v000010ECd00008125sv*sd*bc*sc*i*
alias:          pci:v00000001d00008168sv*sd00002410bc*sc*i*
alias:          pci:v00001737d00001032sv*sd00000024bc*sc*i*
alias:          pci:v000016ECd00000116sv*sd*bc*sc*i*
alias:          pci:v00001259d0000C107sv*sd*bc*sc*i*
alias:          pci:v00001186d00004302sv*sd*bc*sc*i*
alias:          pci:v00001186d00004300sv*sd*bc*sc*i*
alias:          pci:v00001186d00004300sv00001186sd00004B10bc*sc*i*
alias:          pci:v000010ECd00008169sv*sd*bc*sc*i*
alias:          pci:v000010FFd00008168sv*sd*bc*sc*i*
alias:          pci:v000010ECd00008168sv*sd*bc*sc*i*
alias:          pci:v000010ECd00008167sv*sd*bc*sc*i*
alias:          pci:v000010ECd00008161sv*sd*bc*sc*i*
alias:          pci:v000010ECd00008136sv*sd*bc*sc*i*
alias:          pci:v000010ECd00008129sv*sd*bc*sc*i*
alias:          pci:v000010ECd00002600sv*sd*bc*sc*i*
alias:          pci:v000010ECd00002502sv*sd*bc*sc*i*
depends:
retpoline:      Y
intree:         Y
name:           r8169
vermagic:       5.4.0-87-generic SMP mod_unload modversions
sig_id:         PKCS#7
signer:         Build time autogenerated kernel key
sig_key:        2E:F0:45:6E:57:F1:09:84:6C:03:D9:0D:35:BC:3A:D7:C9:5E:16:60
sig_hashalgo:   sha512
signature:      38:23:39:63:CF:CE:0D:BD:A4:C4:DB:3C:9E:A6:79:98:E8:0E:C7:57:
		18:F5:1B:4A:C5:00:E0:C1:EA:3B:CD:DA:D4:41:97:EF:A7:BB:65:E0:
		E0:92:CF:C1:E4:93:18:11:E5:56:A3:2C:27:29:A7:5A:B9:2C:36:10:
		39:E5:58:21:1A:D9:15:5D:23:84:5C:97:55:73:55:A1:DE:83:FE:69:
		E7:CD:F6:F9:71:AD:3B:05:78:D2:6C:FA:5D:32:AE:DE:14:EC:49:A9:
		F2:4E:75:30:42:E9:17:0C:20:8E:5F:7A:B1:F3:6C:B7:2B:4A:98:43:
		AF:CD:56:60:CE:EC:E7:5F:07:96:C6:12:97:1A:7F:16:E3:B3:81:C1:
		97:6A:22:BA:42:5A:56:2E:52:A7:CD:23:D5:1F:35:04:E5:16:29:23:
		D8:50:D1:D6:DF:92:61:79:94:C5:14:10:E5:72:6A:72:BE:18:8E:D1:
		D4:31:6C:4B:3C:92:0A:0B:D9:3A:F9:44:80:6C:CD:AD:2E:F6:68:FA:
		17:8D:29:60:BB:D7:47:BF:5C:8D:CE:E5:31:69:11:79:3D:F0:25:7A:
		6D:74:60:E4:AD:FE:0A:76:B8:62:11:2E:53:11:70:58:53:E3:FA:81:
		5A:AE:62:2A:40:95:6F:6B:AA:17:38:64:A8:FC:F5:9E:47:62:ED:77:
		8D:69:A7:36:17:C1:08:B3:73:3F:E8:91:9E:5E:F4:79:73:B5:83:BB:
		9B:A3:95:45:FD:D4:D1:8D:C7:72:CC:B5:BB:69:5F:C6:4C:AF:D7:C3:
		BC:83:E7:76:78:76:41:8E:AA:D4:ED:74:87:EE:32:36:A7:F2:56:7D:
		D7:3D:C1:94:99:DD:BB:14:F8:59:49:16:37:95:E5:89:F7:7C:93:38:
		A3:47:AF:1B:97:E3:3C:A5:94:58:04:EC:FD:A5:B6:BE:AC:83:BB:60:
		FD:C5:BF:C9:45:1B:5A:3D:9A:43:6A:A9:96:57:8A:19:35:91:9B:D4:
		87:06:3F:68:26:7F:AC:47:BE:23:A9:C2:94:95:FE:C3:B5:5E:B5:E7:
		6D:E6:85:39:F0:67:DD:A7:CC:92:5B:DE:CC:57:72:C5:B8:C2:98:E0:
		55:BA:AB:D0:FD:21:42:E1:51:BE:A8:A8:98:BB:97:8D:E6:BB:3C:7D:
		F6:78:FC:36:60:A8:31:71:B3:26:E7:F0:59:91:07:AB:42:7C:F2:36:
		17:51:98:E5:6F:26:0E:00:43:A3:52:85:EF:1B:72:8C:B4:40:0D:B6:
		9C:64:81:80:DC:EC:CF:C8:3F:57:4D:60:B2:75:89:39:32:E6:6A:7E:
		BA:6F:92:28:D7:AC:B5:DB:52:E5:6A:15
parm:           debug:Debug verbosity level (0=none, ..., 16=all) (int)

$ lspci -n | grep 02:00
02:00.0 0200: 10ec:8168 (rev 1b)

# ethtool enp2s0
# cat /proc/acpi/wakeup

$ sudo modinfo r8169
filename:       /lib/modules/5.13.0-20-generic/kernel/drivers/net/ethernet/realtek/r8169.ko
firmware:       rtl_nic/rtl8125b-2.fw
firmware:       rtl_nic/rtl8125a-3.fw
firmware:       rtl_nic/rtl8107e-2.fw
firmware:       rtl_nic/rtl8107e-1.fw
firmware:       rtl_nic/rtl8168fp-3.fw
firmware:       rtl_nic/rtl8168h-2.fw
firmware:       rtl_nic/rtl8168h-1.fw
firmware:       rtl_nic/rtl8168g-3.fw
firmware:       rtl_nic/rtl8168g-2.fw
firmware:       rtl_nic/rtl8106e-2.fw
firmware:       rtl_nic/rtl8106e-1.fw
firmware:       rtl_nic/rtl8411-2.fw
firmware:       rtl_nic/rtl8411-1.fw
firmware:       rtl_nic/rtl8402-1.fw
firmware:       rtl_nic/rtl8168f-2.fw
firmware:       rtl_nic/rtl8168f-1.fw
firmware:       rtl_nic/rtl8105e-1.fw
firmware:       rtl_nic/rtl8168e-3.fw
firmware:       rtl_nic/rtl8168e-2.fw
firmware:       rtl_nic/rtl8168e-1.fw
firmware:       rtl_nic/rtl8168d-2.fw
firmware:       rtl_nic/rtl8168d-1.fw
license:        GPL
softdep:        pre: realtek
description:    RealTek RTL-8169 Gigabit Ethernet driver
author:         Realtek and the Linux r8169 crew <netdev@vger.kernel.org>
srcversion:     1FE969887C6433B52D39789
alias:          pci:v000010ECd00003000sv*sd*bc*sc*i*
alias:          pci:v000010ECd00008125sv*sd*bc*sc*i*
alias:          pci:v00000001d00008168sv*sd00002410bc*sc*i*
alias:          pci:v00001737d00001032sv*sd00000024bc*sc*i*
alias:          pci:v000016ECd00000116sv*sd*bc*sc*i*
alias:          pci:v00001259d0000C107sv*sd*bc*sc*i*
alias:          pci:v00001186d00004302sv*sd*bc*sc*i*
alias:          pci:v00001186d00004300sv*sd*bc*sc*i*
alias:          pci:v00001186d00004300sv00001186sd00004B10bc*sc*i*
alias:          pci:v000010ECd00008169sv*sd*bc*sc*i*
alias:          pci:v000010FFd00008168sv*sd*bc*sc*i*
alias:          pci:v000010ECd00008168sv*sd*bc*sc*i*
alias:          pci:v000010ECd00008167sv*sd*bc*sc*i*
alias:          pci:v000010ECd00008161sv*sd*bc*sc*i*
alias:          pci:v000010ECd00008136sv*sd*bc*sc*i*
alias:          pci:v000010ECd00008129sv*sd*bc*sc*i*
alias:          pci:v000010ECd00002600sv*sd*bc*sc*i*
alias:          pci:v000010ECd00002502sv*sd*bc*sc*i*
depends:
retpoline:      Y
intree:         Y
name:           r8169
vermagic:       5.13.0-20-generic SMP mod_unload modversions
sig_id:         PKCS#7
signer:         Build time autogenerated kernel key
sig_key:        79:A5:D8:58:96:68:18:4C:B9:FE:38:40:68:CC:7C:9F:49:75:6D:73
sig_hashalgo:   sha512
signature:      A6:BB:82:20:E0:AB:F6:30:23:B1:06:B3:17:FB:D9:66:F6:CC:65:7D:
		37:7A:22:61:88:D3:10:1C:AD:0B:59:AA:3D:73:26:30:3B:44:B9:96:
		DE:EB:2C:AC:28:60:B7:48:2C:53:9A:44:78:81:B3:7F:16:F4:E2:E7:
		A8:70:A9:29:98:7B:9A:60:2E:D7:8C:8A:B9:92:70:AA:B2:EC:2F:46:
		C7:9C:99:76:74:13:78:65:8B:5D:84:88:4C:09:0F:47:F4:C6:2F:32:
		6D:FC:9B:A2:71:B4:9C:A4:12:0D:F0:C8:12:D5:B3:01:5E:EE:09:74:
		96:EC:3B:86:BE:E4:E0:72:A3:3F:69:BC:B2:7F:21:21:E6:9A:BF:5A:
		26:7B:D1:43:EE:49:71:7C:41:6C:8B:5B:55:F4:30:64:CB:FF:69:F4:
		BD:E0:F8:CF:AA:01:30:17:20:68:4C:B0:A4:EC:CA:E9:75:40:95:84:
		13:79:23:C0:B0:CA:22:9A:65:FF:C8:43:A9:E2:AC:34:D9:3A:26:07:
		0A:B8:B9:F2:1C:DC:42:EC:C8:F1:45:6C:43:DB:68:AD:32:32:B7:C0:
		9C:2C:8D:20:48:61:A7:08:C0:C5:C2:E5:8C:31:E6:2C:98:D4:7F:B7:
		7F:61:A4:4C:13:A6:97:47:F0:36:81:9C:62:E3:6B:6C:0D:40:86:63:
		34:54:2C:2D:F6:1A:46:DE:CF:19:72:B5:04:BD:B4:05:83:4E:DE:F7:
		EF:96:48:C3:0F:BC:3B:91:67:94:F0:2B:23:9F:0A:B6:AE:AD:5A:63:
		93:F9:77:EC:DF:5E:60:C1:CD:1F:80:B2:1F:7E:84:59:AF:C9:8E:3E:
		66:C5:BA:A4:4F:2F:C3:E2:AC:01:CF:36:85:BB:49:AF:88:63:06:57:
		B1:14:1B:33:5E:C4:BD:15:01:C4:7E:52:00:D3:07:A4:1D:6A:03:01:
		86:80:12:6E:4A:10:34:E4:51:F9:B2:13:D1:1D:03:53:CB:23:E6:C7:
		17:14:7D:20:16:3D:1D:1E:6E:4C:A3:31:DF:35:79:7E:A5:D6:9B:37:
		C5:26:A9:0D:9C:46:25:80:08:B2:02:F4:8C:BA:3D:9C:47:D7:26:AD:
		B4:A8:74:77:F9:C8:79:89:98:25:63:29:98:C1:C6:1B:71:14:74:12:
		52:99:DC:90:F6:EA:E1:EC:11:9D:AD:49:23:23:3F:3A:81:71:20:8A:
		04:A2:9A:64:DA:F7:C2:37:EC:E2:A7:49:1A:DE:46:BF:DC:96:AD:EC:
		03:0E:F4:1D:D2:95:89:73:E0:13:23:01:FC:B9:AE:80:A7:74:BB:2E:
		17:8A:C3:92:06:1C:B8:67:E9:23:90:CC

$ cat /sys/power/state
freeze mem disk
$ sudo -i
# echo "mem" > /sys/power/state
Then, the network interface is DOWN:
The workaround
Your problem can usually be fixed with a single service file for suspend and resume.- Create a file /etc/systemd/system/network-restart.service
- Enable the service
#/etc/systemd/system/network-restart.service
#sudo systemctl enable network-restart.service
#sudo systemctl start network-restart.service
#sudo systemctl stop network-restart.service
#sudo systemctl disable network-restart.service
#systemctl status network-restart.service

[Unit]
Description=Network Suspend/Resume Service
Before=sleep.target
StopWhenUnneeded=yes

[Service]
User=root
Type=oneshot
RemainAfterExit=yes
ExecStartPre=-/usr/bin/sudo -u $USER /bin/bash -lc 'nmcli networking off'
ExecStart=/usr/bin/sleep 1
ExecStart=-/usr/bin/systemctl stop NetworkManager
ExecStart=/usr/bin/sleep 1
ExecStart=-/usr/bin/ip link set enp2s0 down
ExecStart=/usr/bin/sleep 1
ExecStart=-/usr/bin/modprobe -r r8169
ExecStop=-/usr/bin/modprobe r8169
ExecStop=/usr/bin/sleep 2
ExecStop=-/usr/bin/ip link set enp2s0 up
ExecStop=/usr/bin/sleep 2
ExecStop=-/usr/bin/systemctl start NetworkManager
ExecStop=/usr/bin/sleep 1
ExecStop=-/usr/bin/sudo -u $USER /bin/bash -lc 'nmcli networking on'

[Install]
WantedBy=sleep.target
$ sudo systemctl enable network-restart.service
Intel e1000e driver issue
This e1000e driver needs to be reloaded after resuming.Execute the following to install a systemd service to handle this:
#!/usr/bin/bash

snap install toolbox

cat > /etc/systemd/system/systemd-networkd-resume.service << EOF
[Unit]
Description=Local system resume actions
After=suspend.target
After=sleep.target
After=hibernate.target
After=hybrid-sleep.target
After=default.target

[Service]
Type=simple

ExecStartPre=/snap/toolbox/current/sbin/ethtool -s eno1 mdix on
ExecStart=/snap/toolbox/current/sbin/ethtool -s enp3s0 mdix on
ExecStartPost=/snap/toolbox/current/sbin/ethtool -s enp4s0 mdix on

[Install]
WantedBy=suspend.target
WantedBy=sleep.target
WantedBy=hibernate.target
WantedBy=hybrid-sleep.target
WantedBy=default.target
EOF

cat > /etc/systemd/system/systemd-networkd-wol.service << EOF
[Unit]
Description=Reload ethernet drivers with ethtool settings
After=default.target

[Service]
Type=oneshot
RemainAfterExit=true
ExecStartPre=/snap/toolbox/current/sbin/ethtool -s eno1 mdix on
ExecStart=/snap/toolbox/current/sbin/ethtool -s enp3s0 mdix on
ExecStartPost=/snap/toolbox/current/sbin/ethtool -s enp4s0 mdix on

[Install]
WantedBy=default.target
EOF

systemctl daemon-reload
systemctl enable systemd-networkd-wol
systemctl enable systemd-networkd-resume
systemctl start systemd-networkd-wol.service
systemctl start systemd-networkd-resume.service
Runtime Power Management in the PCI Subsystem of the Linux Kernel
Wakeup Signaling – Power Management Events (PME)
Out-of-band for “parallel” PCI (PME network)- PME signals go directly to system core logic.
- May be routed around bridges.
- Platform (e.g. ACPI BIOS) support required.
- Add-on devices problem.
- Device identification (bridge as a proxy, bus walking required).
- Hardware vendors (sometimes) “forget” to attach PME lines.
ACPI-based wakeup signaling
Each wakeup-capable device has a dedicated General Purpose Event (GPE) for wakeup signaling, _PRW returns its number.- Device wakeup signal (e.g. PME) goes to core logic.
- Core logic activates the device’s “wakeup” GPE.
- GPE causes System Control Interrupt (SCI) to be generated.
- SCI interrupt handler executes GPE control method (_Exx/_Lxx).
- GPE control method schedules system notification for the device.
Linux Kernel and ACPICA(ACPI Component Architecture)
An operating system (OS)-independent reference implementation of the Advanced Configuration and Power Interface Specification (ACPI).It can be easily adapted to any host OS.” (http://www.acpica.org)

留言